

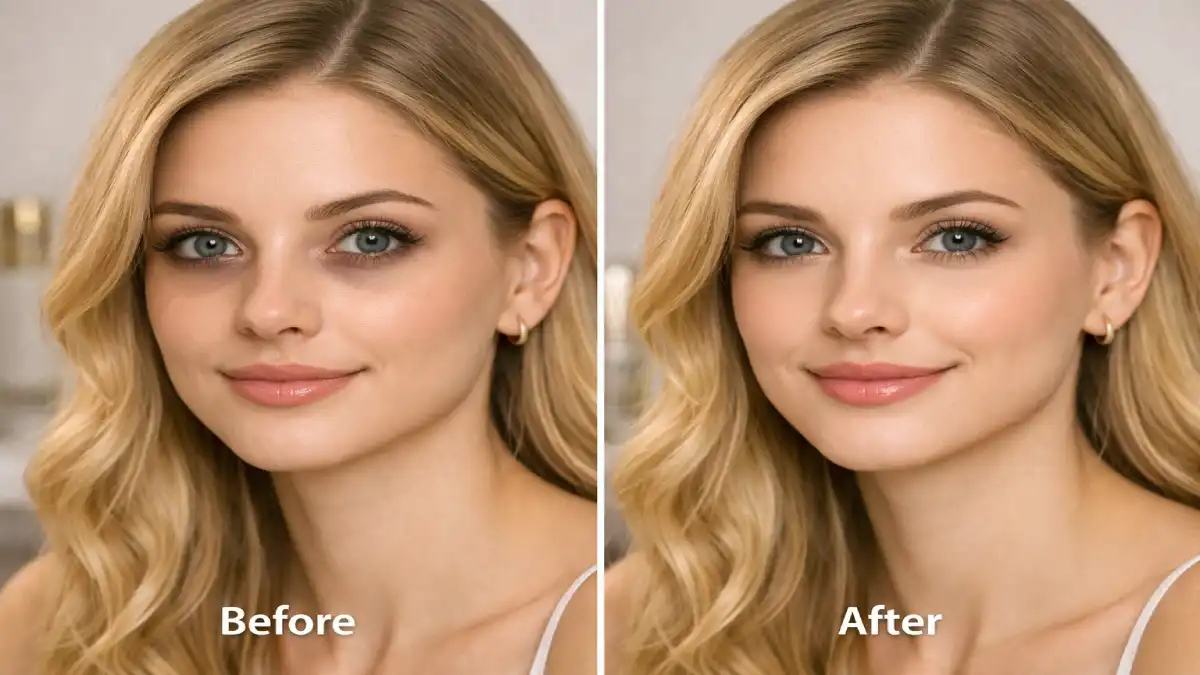
How to Erase Dark Circles Instantly with a $10 Drugstore Routine
Jump Links
- Why My Dark Circles Outsmarted Every Concealer I Owned
- What Dermatologists Say Is Actually Causing Your Dark Circles
- The Color Theory Behind Erasing Dark Circles
- 5 Drugstore Concealer Formulas That Actually Deliver Full Coverage
- Cream vs. Liquid Color Correctors: Which Should You Choose?
- What to Check on the Label Before You Buy
- How to Apply Concealer for a Truly Instant, Seamless Disappearing Act
- Matching Your Routine to Your Specific Dark Circle Type
- Lifestyle Factors That Make Dark Circles Worse (And Why Concealer Alone Isn’t the Whole Picture)
- Common Mistakes That Make Dark Circles More Obvious, Not Less
- When Concealer Alone Won’t Be Enough
- Cost Breakdown: Drugstore vs. Luxury Concealer Routine
- The Bottom Line
- FAQ
Why My Dark Circles Outsmarted Every Concealer I Owned
I have the kind of dark circles that make strangers ask if I’m feeling okay on a completely normal Tuesday. For years, I threw expensive, luxury concealers at the problem, only to watch that stubborn blue-gray shadow peek right back through by lunchtime. I genuinely believed my under-eyes were simply “concealer-resistant.”
It turns out I wasn’t using the wrong price tier—I was using the wrong strategy entirely. Dark circles aren’t just a pigmentation issue; they’re a color problem that requires basic color theory to solve, paired with the right budget-friendly products. Once I stopped wasting money at Sephora and built a strategic $10 drugstore routine using targeted color correctors and high-coverage concealers, my under-eyes completely transformed.
This guide breaks down what actually causes under-eye darkness, how color theory can instantly neutralize it, and the exact affordable drugstore products you need to build a flawless routine for under $10.
What Dermatologists Say Is Actually Causing Your Dark Circles
Understanding the actual cause of your dark circles matters because it directly determines which correction strategy will actually work. Board-certified dermatologist Dr. Corey Hartman has explained that under-eye discoloration is often related to increased melanin activity in the delicate under-eye skin, and when pigment-producing cells become damaged or overactive, melanin deposits deeper into the skin, creating discoloration that can appear brown, purple, blue, or black depending on your natural coloring.
Other board-certified dermatologists have pointed to a broader range of contributing factors. According to guidance shared by dermatologist Dr. Courtney Rubin, brown dark circles specifically are commonly linked to genetics, dehydration, poor sleep, and pigmentary disorders, while purple or blue-toned circles tend to relate more to thin under-eye skin that reveals underlying blood vessels, a factor also often influenced by genetics.
This matters practically because a brown, pigmentation-based circle and a blue or purple, vascular-based circle require different color-correcting approaches to actually neutralize, not just cover. Treating both types the same way with plain concealer alone is exactly why so many people, myself included for years, end up frustrated with products that seem to “not work” when the real issue was a mismatched strategy from the start. It’s a frustrating cycle: you buy a new concealer hoping it will finally be the one, apply it the same way you always have, get the same disappointing result, and conclude that your dark circles are simply “too much” for any product, when the missing piece was never the product itself.
The Color Theory Behind Erasing Dark Circles
This is the step most people skip entirely, and it’s the single biggest factor in whether your concealer actually erases dark circles or just slightly lightens them. Color correction works through complementary colors, meaning colors positioned opposite each other on the color wheel that cancel each other out when combined.
Since dark circles most commonly present with blue, purple, or gray undertones, an orange or peach corrector is the standard recommendation, since orange sits directly opposite blue on the color wheel. Board-certified dermatologist Dr. Kally Papantoniou has specifically recommended a color-correcting concealer with peach or orange undertones to neutralize brown-toned discoloration around the eyes, reinforcing that this isn’t just a makeup artist trick, it’s a genuinely dermatologist-endorsed approach.
The intensity of corrector you need generally scales with how deep and saturated your natural skin tone and dark circle discoloration are. Lighter skin tones with milder blue or purple shadows typically do well with a soft peach corrector, while medium to deep skin tones with more saturated blue, purple, or brown discoloration usually need a more vivid, true orange corrector to fully neutralize the color underneath. Using a corrector that’s too light or too subtly pigmented for your specific depth of discoloration is one of the most common reasons people conclude that color correction “doesn’t work” for them, when really the shade selection simply wasn’t strong enough for the job.
5 Drugstore Concealer Formulas That Actually Deliver Full Coverage
Rather than chasing a single luxury “miracle” product, the most reliable budget strategy involves choosing the right formula type for your specific skin needs. Here are five highly-rated, drugstore-accessible formulas (all under $10) that consistently deliver professional results:
| Product & Formula Type | Best For | Key Trait & Price |
|---|---|---|
| L.A. Girl Pro Conceal HD Corrector (Peach/Orange Color Corrector) | Neutralizing stubborn blue, purple, or gray undertones | High pigment concentration, creamy texture Cost: ~$5.00 |
| e.l.f. Hydrating Camo Concealer (High-Coverage Liquid) | Layering over color corrector for a seamless, bright finish | Full coverage, satin finish that doesn’t cake Cost: ~$7.00 |
| Maybelline Instant Age Rewind Eraser (Hydrating & Anti-Creasing) | Dry, thin, or mature under-eye skin prone to fine lines | Infused with haloxyl, sponge-tip for smooth blending Cost: ~$10.00 |
| L’Oreal Infallible Full Wear (Long-Wear & Waterproof) | All-day wear, humid climates, or oily under-eye areas | Maximum coverage, transfer-resistant matte finish Cost: ~$10.00 |
| Wet n Wild Photo Focus Concealer (Lightweight Cream) | Quick, everyday natural coverage on a tight budget | Creamy, buildable formula with a soft-focus finish Cost: ~$4.50 |
Building your routine with these targeted products ensures you only spend around $10 to $15 total for a complete, professional-grade setup—saving you up to $60 compared to high-end brands.
Cream vs. Liquid Color Correctors: Which Should You Choose?
Color correctors typically come in either cream or liquid form, and each has genuine trade-offs worth understanding before you buy, since this choice affects both how easy the product is to blend and how long it holds up throughout the day.
| Format | Pros | Cons | Best For |
|---|---|---|---|
| Cream (stick or pot) | Higher pigment payoff, easier to build up in one small area, generally longer-wearing | Can feel heavier or thicker on very delicate under-eye skin | Deep, stubborn discoloration needing maximum neutralization |
| Liquid | Lighter feel, blends more easily with fingertips or a sponge, layers well under liquid concealer | Slightly less pigment concentration per swipe, may need reapplication for very dark circles | Milder discoloration, or those wanting a more natural, lightweight feel |
Neither format is inherently better, the right choice comes down to how significant your discoloration is and how your skin tends to respond to product weight in that delicate under-eye area. If you have very stubborn, deeply set discoloration, a cream corrector generally provides the strongest base to build from. If your circles are relatively mild or you have very sensitive, easily irritated under-eye skin, a liquid formula often feels more comfortable for daily wear. Some people even find it useful to keep both formats on hand, reaching for the cream version on days when circles look particularly pronounced, perhaps after a poor night’s sleep or a long flight, and the lighter liquid version for everyday, lower-maintenance wear.
Matte vs. Dewy: The Best Budget Foundations Under $12 for Every Skin Type
What to Check on the Label Before You Buy
| Look For | Why It Matters |
|---|---|
| “Full coverage” or “high coverage” specifically stated | Sheer or “natural coverage” formulas won’t have enough pigment to fully neutralize dark circles on their own |
| Hyaluronic acid or glycerin in the ingredient list | Helps prevent the concealer from settling into fine lines and creasing throughout the day |
| A doe-foot or brush applicator rather than a sponge tip | Provides more precise, buildable application, particularly important for the delicate under-eye area |
| Color-correcting shade options (peach, orange, salmon) available in the same product line | Signals the brand offers a genuine color-correcting step, not just skin-toned shades |
| Talc-free or lightweight formula language for dry under-eyes | Heavier, talc-forward formulas can occasionally emphasize fine lines and dryness in this delicate area |
How to Apply Concealer for a Truly Instant, Seamless Disappearing Act
- Start with hydrated under-eye skin. Apply a lightweight eye cream and let it absorb for a few minutes before starting makeup. Dry under-eye skin causes concealer to sit unevenly and settle into fine lines.
- Apply your color corrector first, only where discoloration exists. Use a small brush or your fingertip to dab it precisely onto the darkest areas rather than sweeping it broadly across your whole under-eye.
- Blend the corrector gently and let it set for a moment. Rushing straight into concealer application before the corrector has settled can cause the two products to mix and dilute the neutralizing effect.
- Apply your full-coverage concealer in a triangle shape. Rather than just dabbing directly under the eye, extend the concealer slightly down toward the top of the cheek in a triangle shape, which brightens a larger area and creates a more natural, lifted appearance.
- Use a damp sponge to blend, pressing rather than dragging. This helps the concealer melt into skin evenly without disturbing the color-correcting layer underneath.
- Set with a very light dusting of translucent powder. Focus only on the areas most prone to creasing, since over-powdering this delicate area can actually emphasize fine lines rather than smoothing them.
- Check your work in natural light after a few minutes. Some formulas continue to settle slightly after initial application, so a final check ensures nothing has crept into fine lines or faded unevenly.
Matching Your Routine to Your Specific Dark Circle Type
| Circle Type | Recommended Corrector Shade | Additional Notes |
|---|---|---|
| Blue or purple, thin skin/visible veins | Orange (deeper skin) or peach (lighter skin) | Most common type, responds very well to proper color correction |
| Brown, pigmentation-based | Peach or salmon-toned corrector | Often linked to genetics, sun exposure, or post-inflammatory pigmentation |
| Gray, aging or fatigue-related | Warmer, richer orange tone | A warmer corrector helps counteract the cooler gray cast |
| Hollow or shadowed (structural, not pigment) | Concealer one to two shades lighter than skin tone, minimal corrector needed | This type is more about light reflection than actual discoloration, so a brightening concealer alone often works well |
Identifying which category best describes your own dark circles, which can sometimes be a combination of more than one, helps you shop far more efficiently instead of randomly trying products and wondering why results are inconsistent. Many people, especially as they get older, actually deal with a blend of two types at once, a genetic blue-purple base layered with some structural hollowness, which is exactly why a flexible, two-step approach tends to outperform any single product marketed as a universal fix.
Lifestyle Factors That Make Dark Circles Worse (And Why Concealer Alone Isn’t the Whole Picture)
While this guide focuses primarily on the makeup side of managing dark circles, it’s worth briefly acknowledging that certain everyday habits can make discoloration more pronounced, which in turn affects how much work your concealer routine has to do each morning.
| Factor | Effect on Dark Circles |
|---|---|
| Poor sleep or inconsistent sleep schedule | Can worsen blood vessel visibility and overall under-eye puffiness, making discoloration more noticeable |
| Dehydration | Thins and dulls the under-eye skin, which can make underlying discoloration more visible |
| Excessive sun exposure without SPF | Can contribute to pigmentation-based dark circles over time, particularly in genetically predisposed skin |
| High sodium intake | Can contribute to under-eye puffiness, which creates additional shadowing that compounds existing discoloration |
| Rubbing or scratching the eye area | Can worsen both pigmentation and blood vessel visibility over time due to repeated irritation |
None of this means you need to overhaul your entire lifestyle just to wear concealer comfortably, but being aware of these factors can help set realistic expectations about how much a great makeup routine can accomplish versus what might benefit from broader lifestyle adjustments or a conversation with a dermatologist if dark circles are a persistent, significant concern. A great concealer routine and a few reasonable lifestyle habits, like staying hydrated and getting consistent sleep when possible, tend to work best as complementary strategies rather than either one being expected to solve the issue entirely on its own.
How to Make a $5 Drugstore Foundation Look Like a $50 Luxury Finish
Common Mistakes That Make Dark Circles More Obvious, Not Less
- Skipping color correction and going straight to regular concealer. Skin-toned concealer alone often can’t fully neutralize blue or purple undertones, leaving a grayish cast peeking through.
- Using a corrector shade that’s too light for your depth of discoloration. This is one of the most common mistakes and tends to create an ashy, chalky-looking result rather than a seamless one.
- Applying too much product at once. Heavy layering in the thin under-eye skin is one of the fastest ways to emphasize fine lines and create a cakey, obvious “concealer look.”
- Setting with too much powder. Over-powdering this delicate area tends to settle into fine lines rather than smoothing them out.
- Skipping hydration underneath. Dry under-eye skin causes concealer to grab unevenly onto dry patches and crease throughout the day.
- Not blending far enough down toward the cheek. Stopping the concealer abruptly right under the eye can create an obvious, unnatural line of demarcation.
When Concealer Alone Won’t Be Enough
If your dark circles are primarily structural, caused by naturally hollow under-eye areas rather than actual pigment discoloration, concealer can help significantly but may not fully “erase” the shadow, since the issue is more about light and shadow than actual skin color. A concealer shade slightly lighter than your natural skin tone, paired with strategic highlighter placement, tends to work better than color correction for this specific type.
If you’ve tried consistent color correction and proper application technique without meaningful improvement, and your dark circles are accompanied by other symptoms like persistent swelling, itching, or noticeable changes in texture, it’s worth mentioning this to a dermatologist, since some underlying causes of dark circles benefit from targeted treatments beyond what makeup alone can address.
Cost Breakdown: Drugstore vs. Luxury Concealer Routine
| Routine Type | Average Cost | Products Needed | Total Cost |
|---|---|---|---|
| Luxury color corrector + luxury concealer | $28-38 each | 2 products | $56-76 |
| Mid-range corrector + concealer | $12-20 each | 2 products | $24-40 |
| Drugstore corrector + drugstore concealer | $6-10 each | 2 products | $12-20 |
Building a full two-step color-correcting routine entirely from drugstore products can save $35-60 compared to the luxury equivalent, without sacrificing the actual color-correcting mechanism that makes the biggest difference in results.
The Bottom Line
Erasing dark circles instantly isn’t really about finding one miracle concealer, it’s about understanding the actual cause and color of your specific discoloration and applying the right combination of color correction and full-coverage concealer in the right order. Dermatologists consistently point to color theory, not price tag, as the deciding factor in whether a concealer routine actually neutralizes dark circles or just temporarily dims them. Once you match the right corrector shade to your circle type and layer a genuinely full-coverage formula on top, a $6-10 drugstore concealer routine is fully capable of delivering that instant, seamless disappearing act. The next time a concealer seems to “not work,” it’s worth asking whether the product actually failed, or whether the strategy behind it needed a second, color-correcting step first.
For more honest, budget-friendly beauty guidance like this one, check out The Frugal Glow for more real solutions that don’t require a luxury price tag.
FAQ
Do I really need a color corrector, or can regular concealer work on its own?
For most blue, purple, or gray-toned dark circles, regular skin-toned concealer alone often can’t fully neutralize the discoloration, since it doesn’t address the underlying color cast the way a complementary color corrector does.
Should I use peach or orange corrector for my dark circles?
Peach generally works best for lighter skin tones with milder discoloration, while orange is typically better suited for medium to deep skin tones with more saturated blue, purple, or brown circles.
Why does my concealer crease under my eyes by midday?
This is usually caused by insufficient hydration underneath the concealer, applying too much product at once, or over-setting the area with powder. Hydrating skin prep and a lighter hand generally solve this.
Can a $10 drugstore routine really provide full coverage for dark circles?
Yes, absolutely. By combining a budget-friendly color corrector (like L.A. Girl for ~$5.00) with a highly pigmented, hydrating liquid concealer (like e.l.f. Hydrating Camo for ~$7.00), you can build a flawless, full-coverage routine for under $12 that outperforms most luxury setups.
What’s the difference between color corrector and concealer?
Color corrector neutralizes unwanted undertones using complementary colors, while concealer provides overall coverage and blends with your skin tone. Most effective dark circle routines use both in sequence, corrector first, concealer on top.
How do I know if my dark circles are pigment-based or structural?
Gently stretch the skin under your eye. If the discoloration lightens noticeably, it’s likely more pigment-based and will respond well to color correction. If it stays roughly the same, it may be more structural, related to hollowness or shadow, and might respond better to a brightening concealer and strategic highlighting instead.