

The 50-Cent Sock Hack: How to Get Perfect Hollywood Curls Without Heat or Stylers
Jump Links
- The 50-Cent Tool That Replaces a $100 Curling Iron
- What You’ll Need (Under $1 Total)
- Step-by-Step: The Sock Curl Method
- The ‘Anastasia Steele’ Look: Soft Waves That Last
- How to Customize Your Curls (Tighter or Looser)
- My Biggest Mistakes (So You Don’t Make Them)
- The Math: What I Saved in One Year
- Frequently Asked Questions (FAQ)
- Final Thoughts: The Best Curls Are the Ones That Don’t Cost a Thing
The $100 curling iron was sitting in my online cart. The $40 heat protectant spray. The $25 styling cream. I was about to spend $165 on heat styling tools that would damage my hair and probably collect dust in my bathroom cabinet.
Then I remembered a viral TikTok hack that uses something you already have in your laundry room: a sock. That’s it. No heat. No expensive tools. Just a clean sock and a little patience.
I tried it. My hair came out with soft, bouncy, Hollywood-style curls that lasted all day. And it cost me exactly 50 cents.
Today, I’m sharing the sock curl method that gives you perfect heatless curls. No curling iron. No heat damage. No expensive stylers. Just a sock and 5 minutes of prep.
The 50-Cent Tool That Replaces a $100 Curling Iron
The sock curl method has been trending on TikTok for good reason. It’s a heatless way to create beautiful, bouncy curls without the damage of hot tools . The method is especially popular for achieving that “effortlessly chic” look inspired by characters like Anastasia Steele from 50 Shades of Grey .
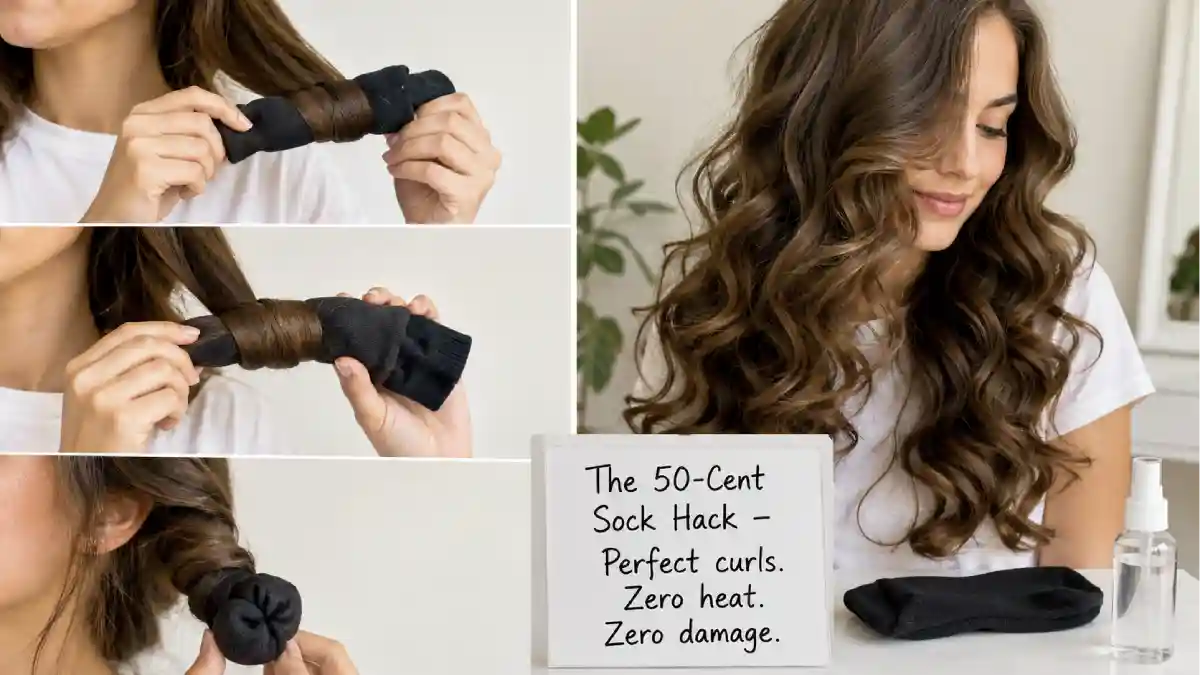
How it works: You wrap sections of slightly damp hair around a clean sock, roll it up to your scalp, and secure it. You leave it in overnight (or for 4-6 hours), and when you unravel it, you have beautiful, natural-looking curls .
Why it’s better than heat styling:
| Feature | Sock Curls | Curling Iron |
|---|---|---|
| Heat damage | Zero | High (causes breakage, split ends) |
| Cost | $0.50 (a sock) | $50-200+ |
| Time (active) | 5 minutes | 20-30 minutes |
| Results | Soft, natural waves | Can look stiff or crunchy |
| Learning curve | Easy | Moderate |
The best part: It works on all hair types and lengths. “Even if you have shorter hair and thought heatless waves were out of reach,” the method can create beautiful results with smaller sections and shorter socks .
What You’ll Need (Under $1 Total)
You probably already have everything you need.
Essential items:
| Item | Cost |
|---|---|
| Clean sock (long ones work best) | $0 (you already have one) |
| Spray bottle with water | $0 (already have) |
| Small hair ties or scrunchies | $0 (already have) |
| Total | $0 |
Optional but helpful:
| Item | Cost |
|---|---|
| Leave-in conditioner or mousse | $0 (if you have it) |
| Texturizing spray | $0 (if you have it) |
What to look for in a sock: Long socks work best for wrapping, but you can use any clean sock . If you have longer hair, you might want to use longer socks or even two socks tied together.
Step-by-Step: The Sock Curl Method
Here’s the exact process. It takes about 5 minutes of active time .
Step 1: Slightly dampen your hair
Start with hair that’s towel-dried or spritzed with water. “Not soaking wet, just towel-dried or spritzed down. This helps the curls set better and last longer” .
Step 2: Part your hair
Decide on your part. “I usually go for a middle part, but you can do a side part if that’s your preferred look. Make sure your part is clean, as this will define how your curls fall” .
Step 3: Divide your hair into sections
The more sections you create, the tighter your curls will be. For softer, more voluminous waves, aim for 4-6 sections around your head .
Step 4: Place the sock
Take one section of hair and place the end of a clean sock at the very bottom of the section. Make sure the sock extends a bit beyond your hair ends .
Step 5: Roll your hair
Starting at the ends, roll your hair up around the sock. “Keep the tension firm but not too tight. Continue rolling until you reach your scalp” .
Step 6: Secure the curl
Once you reach the scalp, tie the ends of the sock together or use a hair tie to secure the hair around the sock, creating a “bun” or “doughnut” shape .
Step 7: Repeat for all sections
Repeat steps 4-6 for each section of your hair. “It might look a little silly, but trust the process – the results are worth it!” .
Step 8: Sleep on it
For the best results, leave the socks in overnight. If you’re short on time, at least 4-6 hours will help the curls set effectively .
Step 9: Unravel gently
In the morning, carefully unroll each section. “Don’t pull! Just let the curls fall naturally” .
Step 10: Style and go
Gently run your fingers through your curls. Add a little texturizing spray for extra hold if needed. The heatless curls should last all day.
The ‘Anastasia Steele’ Look: Soft Waves That Last
This sock curl method is especially popular for achieving that “effortlessly chic” look inspired by Anastasia Steele from 50 Shades of Grey .
The signature look: Soft, voluminous waves that look natural and slightly undone. It’s the kind of hair that looks like you woke up beautiful.
Why it works for that look: “This method isn’t just trending; it’s a game-changer, especially if you want that natural, slightly undone 50 Shades of Grey inspired hair without high temperatures” .
Pro tips for the Anastasia Steele look:
- Use 4-6 sections for softer waves
- Part your hair down the middle
- Roll your hair away from your face
- In the morning, don’t brush—just gently separate with your fingers
- A little hair mousse before you start can give more definition
One user’s experience: “This way, you can get gorgeous, long-lasting curls without spending hours with a curling iron or worrying about frizz and damage” .
How to Customize Your Curls (Tighter or Looser)
The sock curl method is customizable. Here’s how to get different results.
For tighter curls:
- Use smaller sections (6-8 sections)
- Use shorter socks
- Roll tighter
- Leave in for longer (overnight)
For looser waves:
- Use larger sections (4 sections)
- Use longer socks
- Roll loosely
- Leave in for shorter time (4-6 hours)
For shorter hair:
“If you have shorter hair, don’t worry! You can absolutely rock this. Just use smaller sections and maybe shorter socks or even roll your hair around foam rollers if socks feel too bulky. The key is to make sure your hair can fully wrap around the chosen tool. It might give you more of a bouncy, voluminous wave rather than long spirals, which is still totally chic” .
For extra hold:
“Some hair mousse applied before you start can give your curls more definition, or a texturizing spray after you unravel can enhance the waves and add volume” .
My Biggest Mistakes (So You Don’t Make Them)
I made plenty of mistakes when I first started. Learn from me.
Mistake #1: Starting with soaking wet hair.
My first attempt, I wrapped soaking wet hair. The curls came out limp and undefined. Start with damp hair, not wet. “Not soaking wet, just towel-dried or spritzed down” .
Mistake #2: Rolling too tightly.
I rolled my hair so tight it almost hurt. The curls came out kinky and unnatural. “Keep the tension firm but not too tight” .
Mistake #3: Not leaving it in long enough.
I only left the socks in for 2 hours. The curls fell out within 30 minutes. Leave them in for at least 4-6 hours, or overnight for best results .
Mistake #4: Brushing the curls.
I brushed my hair after unraveling the socks. The curls turned into frizz. “Don’t pull! Just let the curls fall naturally” . Use your fingers to separate gently.
Mistake #5: Using the wrong sock.
I used a thick, fuzzy sock. It was too bulky and hard to roll. Use a thin, long sock for the best results.
Mistake #6: Skipping the texture spray.
I didn’t use any product before or after. The curls fell out faster. “A little hair mousse applied before you start can give your curls more definition, or a texturizing spray after you unravel can enhance the waves and add volume” .
The Math: What I Saved in One Year
Let me break down the actual dollars.
If I bought heat styling tools:
| Item | Cost | How Often | Annual Cost |
|---|---|---|---|
| Curling iron | $100 | Once | $100 |
| Heat protectant spray | $25 | Every 3 months | $100 |
| Styling cream | $20 | Every 2 months | $120 |
| Hair repair products (for damage) | $30 | Every 2 months | $180 |
| Total | $500 |
What I actually spend:
| Item | Cost | How Often | Annual Cost |
|---|---|---|---|
| Socks (already have) | $0 | Once | $0 |
| Water | $0 | – | $0 |
| Total | $0 |
Annual savings: $500
Over 5 years: $2,500
And my hair is healthier because I’m not exposing it to heat damage every day.
📌 YOU MIGHT ALSO LIKE:
DIY Silk Press at Home: How to Get Ultra-Sleek Hair Without the $120 Salon Bill
Frequently Asked Questions (FAQ)
1. Does the sock curl method work on all hair types?
Yes! The sock curl method works on all hair types and lengths. “Even if you have shorter hair and thought heatless waves were out of reach,” the method can create beautiful results with smaller sections and shorter socks .
2. How long does it take for the curls to set?
For best results, leave the socks in overnight. If you’re short on time, at least 4-6 hours will help the curls set effectively .
3. Will the curls damage my hair?
No. Unlike curling irons, the sock curl method uses no heat. It’s completely safe for all hair types, including color-treated and damaged hair .
4. How long do the curls last?
With proper technique, the curls can last all day. “This way, you can get gorgeous, long-lasting curls without spending hours with a curling iron” . Using a texturizing spray after unraveling can help them last even longer.
5. What kind of sock should I use?
Long, thin socks work best for wrapping. “Long ones work better for wrapping” . Avoid thick, fuzzy socks—they’re harder to roll.
6. Can I use this method on shorter hair?
Yes! “If you have shorter hair, don’t worry! You can absolutely rock this. Just use smaller sections and maybe shorter socks or even roll your hair around foam rollers if socks feel too bulky. It might give you more of a bouncy, voluminous wave rather than long spirals, which is still totally chic” .
Final Thoughts: The Best Curls Are the Ones That Don’t Cost a Thing
The $100 curling iron is sitting in my online cart. I’m not buying it. I’m not buying the $40 heat protectant or the $25 styling cream. Instead, I’m using a sock that cost me 50 cents.
The sock curl method is proof that you don’t need expensive tools to have beautiful hair. No heat damage. No expensive products. Just a clean sock and a little patience.
The 50-cent routine:
- Dampen your hair
- Divide into 4-6 sections
- Roll each section around a sock
- Secure and sleep on it
- Unravel in the morning
That’s it. Perfect Hollywood curls for the price of a sock.
I’ve been using this method for months. My hair is healthier, my curls last all day, and I’ve saved hundreds of dollars.
That’s not cheap. That’s smart.
That’s the frugal glow. And it’s waiting for you in your laundry room. 💛
*For more budget beauty hacks, DIY styling tips, and money-saving hair care strategies, visit The Frugal Glow.*