The $2 Velvet Ribbon Hack: How I Get Perfect Heatless Overnight Waves Without the Price Tag

Jump Links
- Why I Retired My $200 Curling Wand
- The Real Science of Why Heat Wrecks Your Hair
- What You’ll Need (Total Cost: About $2)
- How to Do the Velvet Ribbon Heatless Wave Method
- Two Wrapping Techniques: Headband Method vs. Figure-Eight Method
- Adjusting the Method for Your Hair Type
- How Long to Leave It In and What to Expect
- Common Mistakes That Ruin Heatless Curls
- Who Should Adjust This Method
- Cost Breakdown: Curling Wand vs. Velvet Ribbon
- The Bottom Line
- FAQ
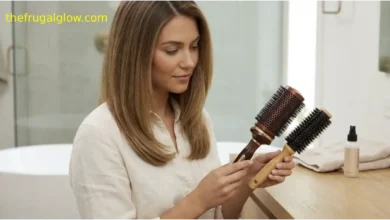
Why I Retired My $200 Curling Wand
I used to have a whole drawer dedicated to hot tools. A curling wand, a flat iron, a blow dryer with six different attachments, and a heat protectant spray that I somehow always ran out of at the worst possible time. Every “get ready with me” morning involved at least fifteen minutes of standing in front of a mirror getting slowly cooked by 400-degree ceramic plates, and my ends were paying the price for it.
Then I found the velvet ribbon method, and I genuinely have not picked up a curling wand since. The concept is almost embarrassingly simple: you wrap damp hair around a soft strip of velvet or satin ribbon, sleep on it, and wake up to soft, bouncy waves with zero heat involved. No sizzling, no burnt-finger mishaps, no lingering smell of singed hair. Just a two-dollar ribbon and eight hours of doing absolutely nothing.
This guide covers exactly how to do the velvet ribbon method step by step, the two main wrapping techniques depending on the wave pattern you want, how to adjust things for your specific hair type, and the mistakes that turn “effortless overnight waves” into “flat, weird-looking bends” that a lot of first-timers run into.
The Real Science of Why Heat Wrecks Your Hair
This isn’t just a preference thing, there’s real, well-documented research behind why skipping heat tools matters for hair health. Hair is made up almost entirely of a protein called keratin, and a peer-reviewed study on thermal damage from flat ironing, published and tracked through PubMed, used advanced imaging techniques to examine what happens to that keratin under heat, and the researchers documented the conversion of the hair’s alpha-helix protein structure into a beta-sheet structure along with clear evidence of protein degradation when hair was exposed to high flat-ironing temperatures.
A separate study focused specifically on the cumulative effects of daily heat exposure, published in PMC, found something just as telling: hair dried repeatedly with a hair dryer over a simulated month showed significantly reduced water content, weakened mechanical properties, and a measurable increase in the amount of protein released from the hair shaft compared to untreated hair. In plain terms, that means repeated heat exposure doesn’t just make hair look a little frizzier in the short term, it’s physically breaking down the protein structure that gives each strand its strength and elasticity, and that damage accumulates over time.
This is exactly the mechanism the velvet ribbon method sidesteps entirely. Instead of using heat to force a temporary bend into the hair shaft, the ribbon method relies on tension and drying time to set a natural wave pattern without ever raising the hair’s temperature high enough to affect its protein structure. The trade-off is that it takes longer, hours instead of minutes, but your hair’s cuticle and internal protein structure stay fully intact.
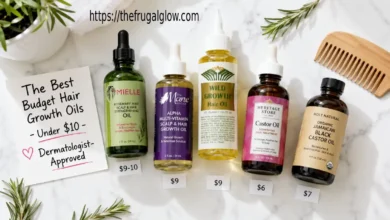
What You’ll Need (Total Cost: About $2)
| Item | Purpose | Approx. Cost |
|---|---|---|
| Velvet or satin ribbon (36-48 inches) | The core curling tool | $1.50-$2.50 |
| Wide-tooth comb | Detangling before wrapping | $0 (already owned) or $2 |
| Texturizing or sea salt spray | Helps hair hold the wave pattern | $0 (already owned) or $5-8 |
| A few soft hair clips or bobby pins | Securing the ribbon in place | $0 (already owned) |
| Silk or satin pillowcase (optional) | Reduces overnight frizz | $0 (already owned) or $10-15 |
You can find velvet or satin ribbon at almost any craft or fabric store for a couple of dollars per yard, and a single length is reusable indefinitely, so this really is a one-time $2 investment rather than a recurring cost.
How to Do the Velvet Ribbon Heatless Wave Method
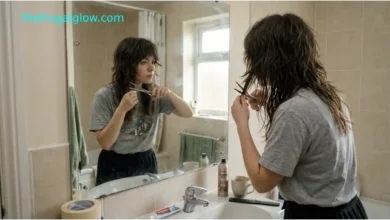
Step 1: Start With Freshly Washed, Damp Hair
Wash your hair as you normally would, then towel-dry until it’s about 70-80% dry, damp but not dripping. Fully soaking wet hair is too heavy to hold a curl shape and won’t dry completely overnight, which can leave you with limp waves or a damp, musty smell by morning.
Step 2: Detangle Completely
Run a wide-tooth comb through your hair from ends to roots until there are zero knots. Any tangles left in place before wrapping can turn into frustrating snags when you unwrap the ribbon later.
Step 3: Apply a Texturizing or Sea Salt Spray
Lightly mist your hair with a texturizing or sea salt spray. This step matters more than people expect, since it gives your hair some grip, sometimes described as making it slightly “grippy” or “dirty,” which helps the wave pattern actually hold once you remove the ribbon.
Step 4: Position the Ribbon
Drape the ribbon over your head like a headband, with the ends hanging down on either side of your face. Secure it in place at the crown with a clip or a couple of bobby pins so it doesn’t shift while you’re wrapping.
Step 5: Wrap the First Section
Starting near your face on one side, take a small section of hair (about one inch for tighter curls, larger for looser waves) and wrap it once around the ribbon, wrapping away from your face.
Step 6: Continue Wrapping, Adding Sections
For the next wrap, take a new small section and combine it with the hair you just wrapped, continuing to wind both around the ribbon together. Repeat this process, adding a new section with each wrap, until all the hair on that side has been incorporated and wrapped around the ribbon.
Step 7: Repeat on the Other Side
Move to the other side of your head and repeat the same wrapping process until all of your hair is wound around the ribbon.
Step 8: Secure the Ends
Once both sides are fully wrapped, tie the two ends of the ribbon together at the top of your head, or secure each end separately with a soft scrunchie if that feels more comfortable for sleeping.
Step 9: Sleep On It
Leave the ribbon in for at least 6-8 hours, ideally overnight, to give your hair enough time to fully dry and set into the wave pattern. If you’re impatient, waiting a couple of hours or using a low-heat blow dry setting can speed things up, but the longer it sits, the longer your waves will typically last.
Step 10: Unwrap Gently
In the morning, carefully unwind the ribbon from your hair, working slowly and pulling the ribbon out rather than yanking sections apart. Avoid brushing through the curls, use your fingers to gently separate and shape the waves instead. Brushing at this stage tends to break up the curl pattern and create frizz rather than soft waves.
Step 11: Set With a Light Product
Finish with a light-hold hairspray or a small amount of hair oil to help the waves last through the day. Go easy on product here, too much weighs the hair down and causes the waves to drop faster.
Two Wrapping Techniques: Headband Method vs. Figure-Eight Method
| Technique | How It Works | Best For |
|---|---|---|
| Headband method | Ribbon sits flat across the head like a headband; hair wraps around it in one continuous direction on each side | Soft, uniform waves and voluminous curls |
| Figure-eight method | Ribbon is folded in half before wrapping, and hair is wound around it in a figure-eight pattern | Curvier, more defined S-shaped waves |
If you’re trying this for the first time, start with the headband method since it’s more straightforward to learn. Once you’re comfortable with the basic wrapping motion, the figure-eight technique is a great way to switch up your wave pattern without buying any new tools.
Adjusting the Method for Your Hair Type
| Hair Type | Adjustment |
|---|---|
| Fine or thin hair | Use smaller sections for more defined curl, and go lighter on texturizing spray to avoid weighing hair down |
| Thick or coarse hair | Use larger sections to avoid an overly bulky wrap, and consider two ribbons if one doesn’t cover all your hair comfortably |
| Curly or naturally wavy hair | Detangle very thoroughly beforehand since curly textures tend to tangle more easily during wrapping |
| Straight, resistant hair | Apply texturizing spray generously, since straight hair often needs more grip to hold the wave shape through the night |
| Color-treated or damaged hair | Skip the sea salt spray, which can be drying, and opt for a lightweight curl cream instead |
How Long to Leave It In and What to Expect
- 2-3 hours: Produces a very loose, subtle wave, best if you’re short on time and just want a slight texture boost.
- 6-8 hours (a full night’s sleep): The sweet spot for most hair types, producing well-defined, long-lasting waves.
- More than 10 hours: Generally doesn’t add extra benefit beyond the 8-hour mark and can occasionally lead to slightly indented bend marks if the ribbon shifts overnight.
Results also depend heavily on your hair’s natural texture and thickness. Fine, straight hair often produces looser, more relaxed waves, while thicker or naturally wavy hair tends to hold a more defined curl pattern.
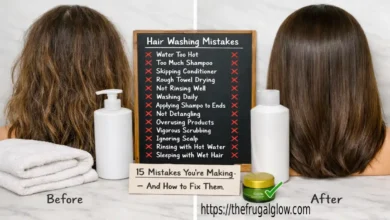
Common Mistakes That Ruin Heatless Curls
- Starting with hair that’s too wet. Soaking wet hair is heavy, slow to dry, and prone to producing flat, undefined waves.
- Skipping the texturizing spray. Clean, product-free hair often doesn’t have enough grip to hold the wave shape overnight.
- Wrapping too loosely. A loose wrap won’t create enough tension to set a defined curl pattern. Wrap snugly, though not painfully tight.
- Brushing out the curls in the morning. This is one of the most common mistakes. Brushing breaks up the curl pattern and creates frizz. Use your fingers instead.
- Not securing the ribbon well enough. If the ribbon shifts or loosens overnight, you’ll wake up with an uneven wave pattern.
- Using too much product to finish. Heavy oils or creams weigh down the wave and cause it to drop within a few hours.
Who Should Adjust This Method
If you sleep very restlessly or tend to move around a lot at night, secure the ribbon extra firmly with additional bobby pins, or consider doing this method during the day instead while relaxing or working from home, so the ribbon has less chance of shifting out of place.
If your hair is chemically relaxed, recently bleached, or otherwise fragile, detangle with extra care before wrapping, since fragile strands are more prone to breakage from tension and friction, even without heat involved.
If you have permanent hair extensions like tape-ins or micro-rings, avoid sleeping in this method with fully wrapped, damp extensions overnight, since extended dampness isn’t recommended for bonded extensions. It’s generally fine to use during the day while air-drying under supervision instead.
Cost Breakdown: Curling Wand vs. Velvet Ribbon
| Method | Average Cost | Frequency of Repurchase | Long-Term Hair Impact |
|---|---|---|---|
| Mid-range curling wand | $30-80 | Occasional replacement as tools wear out | Cumulative heat damage with repeated use |
| High-end curling wand | $150-250 | Rare, but pricier upfront | Cumulative heat damage with repeated use |
| Velvet ribbon method | $1.50-$2.50 | Reusable indefinitely | No heat exposure, no thermal protein damage |
Beyond the upfront cost savings, the bigger long-term win is avoiding the cumulative protein degradation that repeated heat styling causes. That’s a benefit that doesn’t show up on a price tag but absolutely shows up in how healthy your hair looks and feels a year from now.
The Bottom Line
Heatless curling methods like the velvet ribbon hack aren’t just a cute TikTok trend, they’re solving a real, scientifically documented problem: the cumulative protein damage that hot tools cause with regular use. A two-dollar length of ribbon, a bit of patience, and a full night’s sleep gets you soft, natural-looking waves without any of that thermal stress on your strands. It takes a little practice to get the wrapping technique down, but once you do, it’s genuinely hard to go back to standing in front of a mirror with a hot iron every morning.
For more no-cost beauty hacks that actually work, check out The Frugal Glow for more heat-free, budget-friendly hair and beauty routines.
FAQ
Does the velvet ribbon method actually work on all hair types?
Yes, though results vary. Fine and straight hair tends to produce looser, more relaxed waves, while thicker or naturally wavy hair typically holds a more defined curl pattern.
How long do I need to leave the ribbon in for the best results?
A full 6-8 hours, ideally overnight, produces the most defined and longest-lasting waves. Shorter durations still work but create a subtler wave.
Can I use a regular scarf instead of a velvet ribbon?
Yes, a silk or satin scarf can work similarly, though a dedicated velvet or satin ribbon tends to hold hair more securely without slipping overnight.
Why did my curls fall flat after a few hours?
This is usually caused by starting with hair that was too wet, skipping a texturizing spray, or using too much heavy product afterward, all of which reduce how long the wave pattern holds.
Is heatless curling actually better for hair health than using a curling wand?
Yes, based on hair science. Heat styling has been shown in peer-reviewed research to degrade the protein structure of hair over time, while heatless methods avoid that thermal stress entirely.
Can I sleep comfortably with the ribbon in overnight?
Most people find it comfortable once positioned correctly, since the flat, soft ribbon sits gently against the head rather than the bulkier feel of traditional rollers.