

Stop Paying $150 for Highlights! How I DIY My Root Touch-Ups for Under $10
Let me tell you about the $150 salon visit that made me want to scream.
I had been going to the same stylist for two years. She was great. My highlights were beautiful. But every six weeks, I would hand over my credit card and feel a little piece of my soul leave my body. $150 for partial highlights. Plus $30 for toner. Plus $20 tip. Plus the Uber. That’s over $200 every six weeks. Nearly $2,000 a year. On my hair.
I tried to justify it. “It’s self-care.” “My hair is my best feature.” “You get what you pay for.” But the math was undeniable. I was spending almost as much on my hair as I was on groceries.
Then the pandemic happened. Salons closed. My roots grew out. I looked in the mirror and saw a skunk stripe. I couldn’t hide it anymore.
I ordered a $10 highlighting kit from the drugstore. I watched a few YouTube videos. I sat in my bathroom with a plastic cap and a metal hook. I pulled strands of hair through tiny holes. I painted on bleach. I waited.
When I rinsed it out, my roots matched my highlights. Not perfectly. But well enough that I didn’t have a skunk stripe anymore.
That was three years ago. I haven’t been back to a salon for highlights since. I’ve done my own root touch-ups over twenty times. I’ve saved over $4,000. And my hair is healthier than ever because I’m not constantly bleaching the same strands.
Today, I’m sharing my exact process. The $10 kit that changed my life. The mistakes I made (so you don’t have to). And why you’re probably throwing away thousands of dollars on salon highlights.
Let’s get into it.
Jump Links
- The $200 Root That Broke My Spirit
- Why Salon Highlights Are So Expensive (And What You’re Paying For)
- The $10 Drugstore Kit That Saved My Hair (And My Wallet)
- Step-by-Step: How I Do My Own Root Touch-Ups
- My Biggest Mistakes (So You Don’t Make Them)
- Before and After: What to Expect from DIY Highlights
- How to Make Your DIY Highlights Look More Natural
- When to Go to a Salon (Even If You DIY)
- The Math: What I Saved in Three Years
- Frequently Asked Questions (FAQ)
- Final Thoughts: Your Roots Don’t Need to Cost a Fortune
The $200 Root That Broke My Spirit
I need to describe that moment in the salon chair.
My stylist was holding up a mirror to show me the back of my head. My roots were already showing. It had been six weeks. Exactly on schedule. The highlights were beautiful. The blending was seamless. But all I could see was the dollar signs.
She rang me up. $150 for partial highlights. $30 for toner. I added a $20 tip. Plus the $15 Uber ride. $215. For two hours in a chair. For hair that would need to be touched up again in six weeks.
I did the math on my phone while I waited for the Uber. $215 every six weeks is $1,720 per year. That’s not including the haircuts, deep conditioning treatments, and products I bought from the salon.
I had been doing this for two years. That’s over $3,400. I could have gone on a vacation. I could have bought a new laptop. I could have put a down payment on a car.
I tried to convince myself it was worth it. My hair looked good. People complimented it. But the compliments didn’t pay my credit card bill.
When the pandemic hit and salons closed, my roots grew out. I looked in the mirror and saw a harsh line between my dark brown roots and my honey blonde highlights. I looked like a raccoon. A very expensive raccoon.
I had two choices: let it grow out and look bad for months, or figure out how to do it myself.
I chose option two. And I never looked back.
Why Salon Highlights Are So Expensive (And What You’re Paying For)
Let me break down where that $150+ goes.
The stylist’s time and skill (60%):
A good colorist has training, experience, and an eye for detail. They know how to place highlights for maximum impact. They know how to blend so there’s no harsh line. You’re paying for their expertise. That’s fair.
The salon’s overhead (25%):
Rent, utilities, insurance, receptionists, shampoo bowls, chairs, towels, products. Salons have high overhead. That cost gets passed to you.
The products (10%):
Professional bleach, developer, toner, gloves, foils, bowls, brushes. These are higher quality than drugstore, but the markup is significant.
The “experience” (5%):
The scalp massage. The fancy coffee. The nice lighting. The feeling of being pampered. This has value, but it’s not essential.
What you’re NOT paying for (but think you are):
- Better results (drugstore can achieve comparable results with skill)
- Longer-lasting color (professional color fades just like drugstore)
- Healthier hair (over-bleaching damages hair regardless of where it’s done)
I’m not saying salons have no value. For a full head of complex balayage? Go to a pro. For color correction? Go to a pro. For a dramatic color change? Go to a pro.
But for root touch-ups on existing highlights? That is a simple, repetitive process. You are paying $150 for someone to pull your hair through a cap or paint it on foils. You can learn to do that yourself in one afternoon.
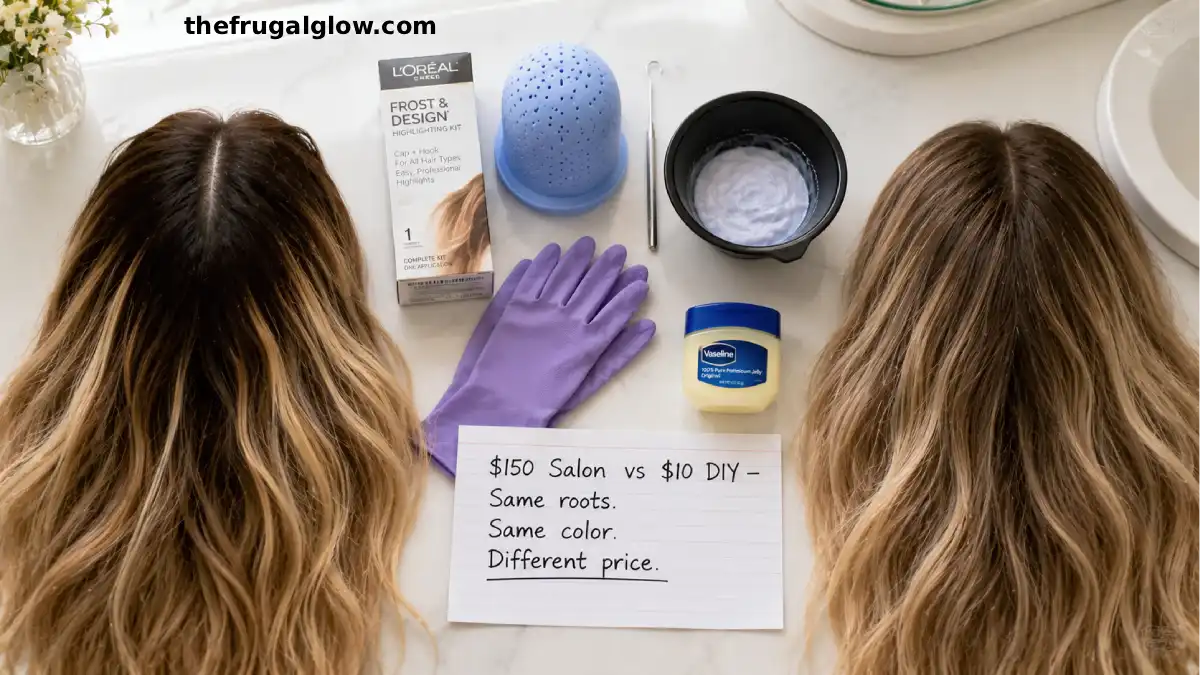
The $10 Drugstore Kit That Saved My Hair (And My Wallet)
The product is the L’Oreal Paris Frost & Design Highlighting Kit.
Price: $9.99 at Walmart, Target, CVS, Walgreens, Amazon
What’s inside:
- Highlighting cap with perforated holes (the “cap method”)
- Metal hook (for pulling hair through the cap)
- Powder lightener (bleach)
- Cream developer
- Plastic gloves
- Instruction booklet
- Conditioning treatment
What you need to provide:
- Old towel (to protect your shoulders)
- Hair clips (to section your hair)
- Petroleum jelly (to protect your skin)
- Timer on your phone
- Handheld mirror (to see the back)
Why this method works for beginners:
The cap method is foolproof. The cap protects the rest of your hair from bleach. The holes are evenly spaced, so you can’t mess up the pattern too badly. You pull through only the strands you want to lighten. It’s impossible to get bleach on the wrong sections.
Why I prefer this over foil methods:
Foil highlighting requires skill, sectioning, and a painting technique. The cap method requires patience and a hook. That’s it. Anyone can learn it in one session.
Important note: This kit is for root touch-ups on already highlighted hair. If you have virgin hair or want a completely new color, this is not the right product. This is for maintaining existing highlights.
Step-by-Step: How I Do My Own Root Touch-Ups
Here’s my exact process. I’ve done this over twenty times. It takes me about an hour now.
Step 1: Preparation (10 minutes)
- Wash your hair the day before (not right before – natural oils protect your scalp)
- Put on an old t-shirt and drape an old towel over your shoulders
- Apply petroleum jelly along your hairline, ears, and neck
- Brush your hair to remove tangles
Step 2: Put on the cap (5 minutes)
- Stretch the cap over your head like a swim cap
- Adjust so the seams are centered
- The cap should be tight but not painful
Step 3: Pull hair through the holes (20-30 minutes)
- Use the metal hook to pull small strands through the holes
- Only pull through the sections where your roots have grown out (usually the top and sides, not the underlayer)
- For a root touch-up, focus on the regrowth area (about 1/2 inch of root)
- Don’t pull through more than 50-60 strands for a partial touch-up
- Start at the front where you can see what you’re doing. Use a handheld mirror for the back.
Step 4: Mix the lightener (5 minutes)
- Follow the kit instructions to mix the powder and developer
- The mixture should be creamy, not runny (add powder if too runny, add developer if too thick)
Step 5: Apply the lightener (10 minutes)
- Use the brush from the kit (or a small paintbrush)
- Paint the lightener onto the hair strands sticking through the cap
- Make sure each strand is fully saturated but not dripping
Step 6: Wait (15-30 minutes)
- Processing time depends on your starting color and desired lightness
- Check after 15 minutes by wiping a little lightener off a strand
- For my light brown roots, 20 minutes gives me honey highlights. 25 minutes gives me lighter blonde.
- Set a timer. Check every 5 minutes after the minimum time.
Step 7: Rinse (10 minutes)
- Get in the shower (keep the cap on)
- Rinse thoroughly with cool water
- Remove the cap
- Shampoo and condition as normal (the kit includes a conditioning treatment – use it)
Step 8: Style as usual
- Dry and style your hair. No special steps.
The result: Your roots are now the same color as your existing highlights. No harsh line. No skunk stripe. No $150.
My Biggest Mistakes (So You Don’t Make Them)
I made a lot of mistakes when I first started. Learn from me.
Mistake #1: Skipping the petroleum jelly
I thought I didn’t need it. My hairline and ears turned orange from the bleach. It lasted for three days. I looked like I had a skin condition. Use the petroleum jelly.
Mistake #2: Pulling through too much hair
My first attempt, I pulled through every hole on the cap. My hair looked like a zebra. Too many highlights. Too much contrast. Now I only pull through 50-60 strands for a partial touch-up.
Mistake #3: Leaving the bleach on too long
I got distracted and left it for 40 minutes. My roots turned white. I looked like a skunk. It faded after a few washes, but I learned to set a timer and check early.
Mistake #4: Not checking the back
I forgot about the back of my head. When I finished, the front looked great. The back had huge splotches. Use a handheld mirror. Check your work.
Mistake #5: Using hot water to rinse
Hot water opens the hair cuticle and can make the bleach process too aggressive. Rinse with cool water. It’s uncomfortable but worth it.
Mistake #6: Expecting salon perfection on the first try
My first DIY job was not perfect. It was uneven. Some strands were too light. Others were too dark. I wore my hair up for a week. By the third attempt, I had it figured out. Give yourself grace and practice.
Before and After: What to Expect
Let me set realistic expectations.
Before (grown-out roots):
- Dark roots (1/2 inch to 1 inch of regrowth)
- Harsh line between roots and highlights
- “Skunk stripe” appearance
- You avoid putting your hair up because the roots are visible
After (DIY root touch-up):
- Roots match existing highlights
- No harsh line (the cap method creates soft, graduated highlights)
- You can wear your hair up again
- Total cost: $10
What you will NOT get:
- A perfect, salon-blended balayage (that’s a different technique)
- A full head of new highlights (this is for root touch-ups only)
- Results if you have very dark hair going very blonde (you may need multiple sessions)
What one user reported:
They had “maybe an inch of roots grown out” and “just looked like a hot mess.” After using the Frost & Design kit, they reported that their “hair looks like it did in between salon visits.” They were “thrilled” with the result.
Another user said: “I have used this product many times over the years. It works as long as you follow instructions. I’ve saved so much money not going to salons.”
This is not a fluke. Thousands of people do this every month.
How to Make Your DIY Highlights Look More Natural
The cap method can look a bit uniform if you’re not careful. Here’s how I make mine look more natural.
Technique #1: Pull through less hair
Don’t use every hole. Skip holes randomly. Clump some strands together. The natural look comes from irregularity.
Technique #2: Use different processing times
Leave some strands in for 15 minutes and others for 25 minutes. This creates variation in lightness, which looks more natural than uniform highlights.
Technique #3: Focus on the face-framing sections
Pull more strands near your face and at your crown. Fewer strands underneath and in the back. This mimics how the sun naturally lightens hair.
Technique #4: Don’t pull the ends
Only pull through the root regrowth (about 1/2 inch). Don’t pull the entire length of your hair through the cap. You’re just touching up roots, not re-highlighting everything.
Technique #5: Use a toner if needed
If your roots come out too brassy (orange or yellow), use a purple shampoo or toner. This neutralizes unwanted warmth.
When to Go to a Salon (Even If You DIY)
I’m not anti-salon. I still go. Here’s when I pay a professional.
Go to a salon for:
- Major color changes (dark to light, light to dark)
- Balayage (the hand-painted technique is hard to DIY)
- Color correction (if you messed up and need help)
- First-time highlights (let a pro establish the pattern, then you can maintain it)
- If you have very dark or resistant hair (can take multiple sessions)
DIY for:
- Root touch-ups on existing highlights (every 6-8 weeks)
- Maintaining your color between salon visits
- If you’re on a tight budget
- If you have fine or medium hair that lightens easily
My hybrid approach:
I go to a salon once a year for a full highlight refresh ($150). Then I maintain the roots myself for the next 8-10 months ($10 per month). Best of both worlds. My hair looks great. I save $1,000+ per year.
The Math: What I Saved in Three Years
Let me break down the actual dollars.
Before (salon every 6 weeks):
- Partial highlights: $150
- Toner: $30
- Tip (20% on $180): $36
- Uber/Lyft (round trip): $15
- Total per visit: $231
- Visits per year (every 6 weeks): 8.5
- Annual salon cost: $1,963
- 3-year salon cost: $5,889
After (DIY root touch-ups every 6 weeks, salon once per year):
- DIY kit (lasts 2-3 uses): $10 every 2 months = $60 per year
- Toner (purple shampoo, $12 bottle lasts 6 months): $24 per year
- Salon visit (once per year, no tip on products): $150 + $30 tip = $180
- Uber (once per year): $15
- Annual DIY + salon cost: $279
- 3-year DIY + salon cost: $837
Total savings over 3 years: $5,052
That’s not a typo. Five thousand dollars.
What I did with the savings:
- Took a vacation to Mexico ($1,200)
- Bought a new laptop ($800)
- Paid off a credit card ($1,500)
- Put the rest into savings
And my hair still looks great.
The $2 Pantry Hair Mask That Repaired My Bleached Hair in One Wash
Frequently Asked Questions (FAQ)
1. Is it safe to bleach my own hair at home?
Yes, if you follow instructions and do a patch test first. The kits are designed for home use. The risks are uneven color, over-processing, and skin irritation. Do a patch test on a small skin area 48 hours before. Don’t leave bleach on longer than the instructions say. If you have very damaged or chemically treated hair, see a professional.
2. How long does a DIY root touch-up take?
My first attempt took 90 minutes (including fixing mistakes). Now it takes me 45-60 minutes. A salon visit takes 60-90 minutes (including waiting, processing, and styling). So DIY is about the same or slightly faster once you learn.
3. Can I use this kit on dark brown or black hair?
Yes, but you may need to leave the bleach on longer (30-45 minutes) and may need multiple sessions to lift to a light blonde. The cap method works on all hair colors. If you have very dark hair, be patient. It may take 2-3 applications over several weeks to reach your desired lightness.
4. What if I mess up and my roots turn orange?
You have options. First, use purple or blue shampoo – it neutralizes orange tones. Second, wait two weeks and try again with a lower volume developer (20 volume instead of 30). Third, go to a salon for a color correction (costs $100-200, still cheaper than a year of full-price salon visits). Fourth, dye over it with a darker shade. Orange is fixable. Don’t panic.
5. Will DIY highlights damage my hair more than salon highlights?
Potentially, if you leave the bleach on too long or use too high a developer. But salon bleach can also damage hair. The chemical is the same. The difference is experience. Follow the instructions, time yourself, and use a lower volume developer (20 vol) for slower, gentler lightening. My hair is healthy after 3 years of DIY.
6. Can I use this method on previously colored hair?
Yes, but with caution. If you have multiple layers of color, the results may be unpredictable. This method works best on virgin regrowth (the new growth at your roots) on hair that already has highlights. Do a strand test first on a small hidden section.
7. What’s the difference between the cap method and foil highlights?
The cap method pulls hair through a plastic cap. It’s faster, easier, and covers more area. The downside is that the highlights are uniform (small dots). The foil method involves painting bleach onto hair sections and wrapping in foil. It’s more precise and allows for varying highlight sizes. For root touch-ups, the cap method is fine. For balayage or a full highlight refresh, foil is better (go to a salon).
8. How often should I do root touch-ups?
Every 6-8 weeks, depending on how fast your hair grows and how noticeable your roots are. If you wait too long (3+ months), you’ll have more than 1 inch of regrowth. The cap method works for up to 1 inch. Beyond that, you may need a full highlight refresh at a salon before resuming DIY touch-ups.
Final Thoughts: Your Roots Don’t Need to Cost a Fortune
Here’s what I want you to take away.
I was spending nearly $2,000 a year on my hair. I told myself it was worth it because my hair looked good. But I was ignoring the math. I was ignoring the fact that I could learn a simple skill and save thousands.
The L’Oreal Frost & Design kit is not a secret. It’s been on drugstore shelves for decades. Our mothers and grandmothers used it. They saved money too.
I’m not saying you should never go to a salon. I still go once a year for a full refresh. But for root touch-ups? Every six weeks? For $150 each time? No. That’s not necessary. That’s a luxury you can easily replace with a $10 kit and an hour of your time.
So this week, look at your roots. If they’re showing, go to the drugstore. Buy the kit. Watch a YouTube video. Sit in your bathroom with a cap and a hook.
You might mess up. You might have to wear your hair up for a few days. But you’ll learn. And by the third attempt, you’ll be a pro.
And when you look at your bank account at the end of the year and see thousands of dollars you didn’t spend on highlights, you’ll smile.
That’s the frugal glow. And it’s growing out of your head right now. 💛
For more DIY beauty tutorials, hair care tips, and money-saving lifestyle strategies, visit The Frugal Glow.