

The 15-Minute Wall Workout: Tone Your Entire Body Using Just a Flat Wall
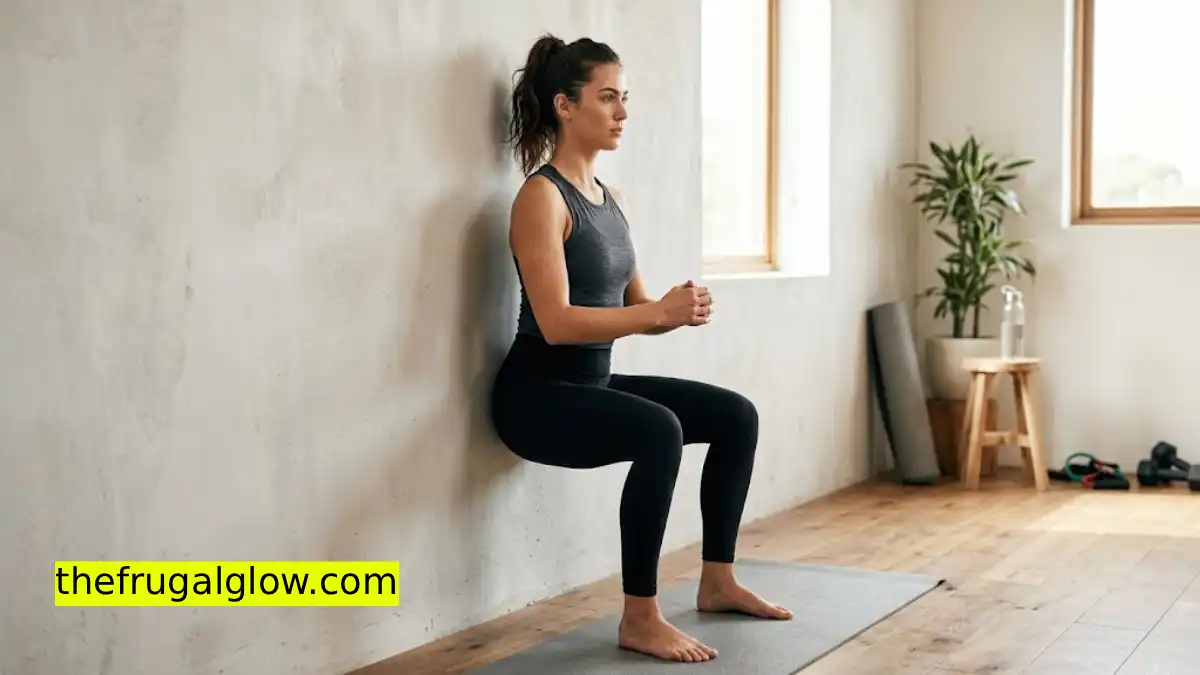
Gym memberships, home equipment, resistance bands, dumbbells — the fitness industry has convinced a lot of people that a real workout requires real gear. It doesn’t. A completely flat, empty wall is genuinely one of the most versatile pieces of “equipment” available, and it’s already sitting in every single room of your home, free of charge.
This 15-minute wall workout hits your quads, glutes, core, shoulders, chest, and back using nothing but bodyweight and a wall for support and resistance. No mat required (though one adds comfort), no equipment to buy, and no gym membership to justify. Just a clear stretch of wall and 15 focused minutes.
Jump Links
- Why a Wall Workout Actually Works
- What You’ll Need
- Warm-Up (2 Minutes)
- The Full 15-Minute Wall Workout
- Exercise Breakdown Table
- Muscle Group Coverage Table
- Cool-Down (2 Minutes)
- Modifications for Different Fitness Levels
- How to Progress This Workout Over Time
- Safety Tips and Form Cues
- FAQ
- The Bottom Line
Why a Wall Workout Actually Works
The wall isn’t just a backdrop here — it’s functioning as actual resistance and stability equipment. Pressing your body against a wall provides extra support and resistance while you move and exert force against it, which is exactly what gives wall-based exercises their unique training effect compared to doing the same movements in open space.
This support-and-resistance combination makes wall workouts especially effective for a few specific reasons. First, the wall provides joint-friendly support, since it reduces the load on joints like the wrists, shoulders, and knees compared to floor-based versions of similar movements, making it a genuinely solid option for people managing joint sensitivity or building strength gradually. Second, the wall’s flat surface forces attention to alignment and posture, since your body has immediate, obvious feedback the moment your form drifts off the wall. Third, wall exercises work the entire body relatively evenly rather than isolating just upper or lower body, which is part of why fitness experts specifically highlight wall-based training for creating balanced, full-body engagement compared to workouts that skew heavily toward one muscle group.
What You’ll Need
- A clear, flat stretch of wall (roughly 6 feet of clearance is plenty)
- A yoga mat or towel for floor-based portions (optional, but adds comfort)
- Comfortable workout clothes that allow full range of motion
- Water nearby
That’s genuinely the entire equipment list.
Warm-Up (2 Minutes)
Never skip the warm-up phase, even when diving into a quick 15-minute session. Cold, stiff muscle fibers are significantly more vulnerable to strains, micro-tears, and joint discomfort. A proper dynamic warm-up elevates your heart rate, increases synovial fluid lubrication in your joints, and prime your central nervous system—making the main body of your workout noticeably more effective and comfortable.
- Arm circles (30 seconds): Stand with feet hip-width apart away from the wall. Extend your arms out to the sides at shoulder height and make small, controlled forward circles for 15 seconds, then reverse the direction for 15 seconds. Gradually increase the diameter of the circles to open up your chest, activate your deltoids, and lubricate the shoulder sockets.
- Bodyweight squats (30 seconds): Perform slow, deliberate air squats away from the wall to awaken your quads, hamstrings, glutes, and hip flexors. Focus on sitting your hips back as if lowering into an invisible chair, keeping your chest tall and core engaged to prepare your lower body for wall-supported resistance.
- Wall angels (30 seconds): Stand with your heels, glutes, upper back, and head pressed flat against the wall. Position your arms at 90-degree angles like a goalpost, keeping elbows and wrists in contact with the wall. Slowly slide your hands overhead, reaching as high as possible without letting your lower back arch away from the wall, then lower back down. This movement serves as a vital dynamic stretch for shoulder mobility and thoracic spine alignment.
- Standing torso twists (30 seconds): Stand tall with feet slightly wider than shoulder-width apart and soft knees. Gently rotate your torso from side to side, letting your arms swing naturally and allowing your back heel to pivot as you turn. This gentle rotational movement loosens up the spinal column, activates the obliques, and prepares your core for stabilization during the main routine.
The Full 15-Minute Wall Workout
Perform each of the seven exercises listed below using the recommended duration or rep count, moving seamlessly from one move to the next. Once you finish the entire circuit, rest for 60 seconds, then repeat the full circuit twice more for a complete, high-efficiency 15-minute session (averaging roughly 4 to 5 minutes per round, depending on transition speed).
- Wall Sit (30–45 seconds)
Stand with your back against the wall and step your feet about two feet forward, hip-width apart. Slide your torso down until your thighs are completely parallel to the floor, creating a strict 90-degree angle at your knees and hips. Ensure your knees are stacked directly over your ankles, not pushing past your toes, and press your lower back flat into the wall to eliminate any arch. Engage your core and hold. This isometric staple serves as an incredible gauge of quad, glute, and core endurance without putting stress on your joints. - Wall Push-Ups (12–15 reps)
Face the wall at arm’s length, placing your palms flat against the surface slightly wider than shoulder-width apart at chest height. Step your feet back onto your toes to create a slight forward angle. Keeping your body in a rigid plank line from head to heels, bend your elbows to lower your chest toward the wall, tucking your elbows at a 45-degree angle rather than flaring them outward. Press firmly through your palms to return to the starting position. This move targets the chest, front deltoids, and triceps with reduced resistance, making it an exceptional entry-level progression toward floor push-ups. - Wall Angels (10–12 reps)
Stand tall with your head, shoulder blades, glutes, and heels touching the wall. Bend your elbows at 90 degrees in a “goalpost” position, pressing the backs of your hands, wrists, and elbows flat against the wall surface. Slowly slide your arms upward overhead while maintaining continuous contact with the wall at all key points, then squeeze your mid-back muscles as you pull your elbows back down toward your ribs. This movement specifically corrects rounded posture, enhances shoulder mobility, and strengthens the upper back and rear deltoids. - Wall Bridge / Glute Bridge with Feet on Wall (12–15 reps)
Lie flat on your back on a mat, placing your feet flat against the wall with your knees bent at a 90-degree angle and your hips roughly 12 to 18 inches away from the baseboard. Pressing your heels firmly into the wall, lift your hips toward the ceiling until your body forms a straight line from your shoulders to your knees. Pause and squeeze your glutes intensely at the top of the range for a full second, then lower your hips back down with controlled tension. Elevating your feet onto the wall increases the range of motion and drastically amplifies hamstring and glute activation compared to a standard floor bridge. - Wall Plank (20–30 seconds)
Place your forearms flat against the wall at chest height, elbows aligned directly under your shoulders. Walk your feet back until your body forms a straight diagonal line from your head to your ankles. Tuck your pelvis slightly under (posterior pelvic tilt) to lock in your rectus abdominis, pull your belly button toward your spine, and hold the position firmly without letting your lower back sag or your hips pike upward. This wall-supported isometric hold builds foundational core stability and shoulder girdle endurance. - Calf Raises with Wall Support (15–20 reps)
Stand facing the wall with your feet hip-width apart and lightly place your fingertips against the wall at chest height purely for balance, not leverage. Press through the balls of your feet to raise your heels as high as possible, pausing briefly at the peak of the contraction to squeeze your calf muscles (gastrocnemius and soleus). Lower your heels back down under slow, controlled control until they barely hover off the floor before starting the next rep. - Side Plank with Feet Against Wall (15–20 seconds per side)
Lie on your side with your bottom forearm resting flat on the floor, elbow directly beneath your shoulder. Place the soles of both feet flat against the wall for lateral support and stability. Lift your hips off the ground until your body forms a long, straight line from your ankles to your head, and extend your top arm straight toward the ceiling. Pressing your feet into the wall anchors your lower body, drastically intensifying oblique activation and lateral core stability compared to a traditional floor side plank.
Exercise Breakdown Table
| Exercise | Duration/Reps | Primary Focus |
|---|---|---|
| Wall Sit | 30–45 seconds | Quads, core |
| Wall Push-Ups | 12–15 reps | Chest, shoulders, triceps |
| Wall Angels | 10–12 reps | Shoulders, upper back, posture |
| Wall Bridge | 12–15 reps | Glutes, hamstrings, core |
| Wall Plank | 20–30 seconds | Core, shoulders |
| Calf Raises | 15–20 reps | Calves, balance |
| Side Plank (feet on wall) | 15–20 seconds/side | Obliques, core, shoulders |
Muscle Group Coverage Table
| Muscle Group | Exercises Targeting It |
|---|---|
| Quads | Wall Sit |
| Glutes/Hamstrings | Wall Bridge, Wall Sit |
| Core (overall) | Wall Plank, Side Plank, Wall Sit, Wall Bridge |
| Obliques | Side Plank with Rotation variation |
| Chest | Wall Push-Ups |
| Shoulders | Wall Push-Ups, Wall Angels, Wall Plank |
| Upper Back/Posture | Wall Angels |
| Calves | Calf Raises |
This spread genuinely covers the major muscle groups across the entire body within a single 15-minute session, which is exactly the kind of balanced, full-body engagement wall-based training is specifically noted for compared to routines that lean heavily toward just upper or lower body work.
Cool-Down (2 Minutes)
- Standing wall calf stretch (30 seconds per side): Place hands on the wall, step one foot back, and gently press the back heel toward the floor.
- Wall roll-down (30 seconds): Standing arm’s length from the wall or facing away from it, slowly roll your spine down toward the floor one vertebra at a time, then roll back up — this move specifically increases spinal flexibility while cooling down the core.
- Deep breathing (30–60 seconds): A few slow, deep breaths to bring your heart rate down before finishing.
Modifications for Different Fitness Levels
Beginner:
- Reduce wall sit and plank hold times to 15–20 seconds
- Perform wall push-ups with hands higher on the wall (closer to shoulder height) for reduced resistance
- Take extra rest between exercises as needed
Intermediate (as written above):
- Follow the timing and rep ranges listed in the main workout
Advanced:
- Extend wall sit and plank holds to 45–60 seconds
- Add a second full circuit for a 20-minute version
- Slow down the tempo on wall push-ups and wall bridges (a 3-second lowering phase) to increase time under tension
How to Progress This Workout Over Time
- Increase hold times gradually rather than jumping dramatically — adding just 5–10 seconds to your wall sit or plank each week builds real, sustainable progress.
- Add a fourth round once three rounds feel consistently manageable, extending the session to roughly 20 minutes.
- Slow down your tempo on rep-based exercises like wall push-ups and wall bridges, which increases difficulty without needing any added equipment.
- Track your numbers (hold times, rep counts) weekly to actually see progress, since wall workouts don’t have an obvious “add more weight” progression the way equipment-based training does.
Safety Tips and Form Cues
- Keep your lower back pressed into the wall during wall sits and wall angels; if it arches away from the wall, that’s a sign to adjust your positioning or depth.
- Watch your knee alignment during wall sits, keeping knees stacked directly over ankles rather than pushing forward past the toes.
- Don’t rush wall push-ups. Move slowly and with control rather than speed to maximize muscle engagement and reduce injury risk.
- If your arms lift off the wall during wall angels, that’s a sign of tight shoulders — this is completely normal and simply something to work on gradually rather than force through.
- Stop and rest if you feel sharp pain (as opposed to normal muscle fatigue), since pushing through genuine pain increases injury risk without adding training benefit.
- This workout is low-impact and joint-friendly, but anyone with existing joint issues, recent injuries, or health concerns should check with a healthcare provider before starting any new exercise routine.
📌 YOU MIGHT ALSO LIKE:
5 ‘Amazon’ Fitness Gems Under $15 That Actually Replace Heavy Gym Machines
FAQ
Can a wall workout really tone your entire body without any equipment?
Yes, absolutely. By strategically leveraging a wall for both leverage, support, and bodyweight resistance, this routine simultaneously targets major muscle groups—including your quads, glutes, core, chest, shoulders, and upper back. The wall provides continuous stability that allows you to maintain peak muscle contraction and proper form without relying on expensive gym machinery or free weights.
Is this workout appropriate for complete beginners?
Yes, wall exercises are inherently scalable and joint-friendly. Beginners can easily adjust the difficulty by shortening isometric hold times (like reducing wall sits to 15–20 seconds) or altering leverage angles (such as placing hands higher on the wall for push-ups). The added stability from the wall reduces shear force on joints, making these movements far more accessible than traditional floor-based alternatives.
How often should I do this 15-minute wall workout for best results?
For optimal progress, aim to perform this routine 3 to 5 times per week. Because bodyweight resistance exercises require manageable recovery time compared to heavy weightlifting, this frequency allows for consistent muscle activation and cardiovascular conditioning. Always schedule at least one or two rest days or light active recovery sessions to give your muscle fibers adequate time to repair and rebuild.
Do I need a yoga mat or any special gear for this workout?
No special equipment is required, though using a standard exercise or yoga mat is highly recommended for floor-based movements like the wall bridge and side plank to cushion your spine, forearms, and elbows. If you are practicing on a carpeted or comfortably padded surface, a mat is entirely optional.
Will this 15-minute wall workout help with weight loss?
Yes, as part of a well-rounded fitness regimen. Full-body resistance circuits elevate your heart rate, boost calorie burn during the session, and help build lean muscle tissue, which naturally elevates your baseline metabolic rate over time. While targeted fat reduction in specific body areas is a myth, pairing this workout with a balanced calorie-conscious diet directly supports overall body fat loss and muscle definition.
Is wall Pilates the same thing as this wall workout?
While both approaches share the foundational concept of using a wall for stability and bodyweight resistance, they differ in structure. Wall Pilates emphasizes precise, low-impact micro-movements, breath control, and core stabilization techniques. This routine, on the other hand, is structured as a dynamic bodyweight strength-building circuit designed to improve functional muscle endurance, functional strength, and cardiovascular health.
The Bottom Line
A completely free, always-available piece of home equipment has been sitting in every room of your house the whole time: a flat wall. Fifteen minutes, seven simple movements, and zero gym membership required is genuinely enough to work your quads, glutes, core, chest, shoulders, and back in a single, balanced session — proof that an effective workout doesn’t require an expensive setup to actually deliver results.
For more budget-friendly wellness and home workout guides, check out more posts over at The Frugal Glow.