The $5 Walmart Secret to Heatless Curls That Look Like a Professional Blowout

🔗 Jump Links
- Why Heat Styling Is Quietly Destroying Your Hair
- The $5 Walmart Find That Changes Everything
- What You Need Before You Start
- Step-by-Step: How to Get Perfect Heatless Curls
- The Secret to Making Them Look Like a Blowout
- How to Make Your Curls Last All Day
- Heatless Curl Methods Compared: Which One Wins?
- Common Mistakes That Ruin Heatless Curls
- Frequently Asked Questions (FAQ)
Introduction
Okay, real talk — if you’ve been frying your hair with a curling iron three times a week trying to get those gorgeous, bouncy curls you see all over Instagram and TikTok, I need you to stop what you’re doing and read this. Because there is a better way. A cheaper way. A way that actually makes your hair healthier instead of slowly turning it into a dry, brittle, split-end disaster.
And it lives at Walmart. For five dollars.
I know. I know what you’re thinking. “Five dollars? That sounds like a TikTok trend that looks amazing in a 30-second video and does absolutely nothing in real life.” I hear you — I was skeptical too. But after years of spending money on heat protectants, expensive curling irons, professional blowouts that lasted exactly one day, and countless deep conditioning treatments trying to repair the damage I kept doing… I was desperate enough to try anything.
So I grabbed a heatless curl rod from Walmart on a random Wednesday night, followed the method I’m about to walk you through, went to sleep, and woke up to the best hair day I’d had in months. Bouncy. Defined. Frizz-free. Volumized. Literally looked like I’d just walked out of a salon.
And my hair? It was genuinely starting to feel healthier from not being heat-styled constantly. That’s the glow-up nobody tells you about.
In this post I’m breaking down exactly what the $5 Walmart product is, the precise method that makes it look professional instead of Pinterest-fail, every single tip and trick to customize it for your hair type, and the common mistakes that make heatless curls look bad (so you can skip all of them). Let’s get into it.
Drugstore Gems: 5 Affordable Hair Tools That Perform Exactly Like Dyson
Why Heat Styling Is Quietly Destroying Your Hair
Before we talk about the solution, let’s talk about what we’re solving — because understanding why heat is so damaging makes you way more motivated to find an alternative that actually works.
The Science of Heat Damage (In Plain English)
Your hair strand is made up of a protein called keratin, organized in a structure held together by hydrogen bonds and disulfide bonds. These bonds are what give your hair its natural texture, strength, and elasticity. When you apply heat — whether from a curling iron, flat iron, or blow dryer — here’s what happens:
At 300°F and above (which is basically every curling iron setting): The hydrogen bonds in your hair break and reform in the shape of the heat tool. That’s technically how heat styling “works” — you’re literally breaking your hair’s structure and reshaping it temporarily. The problem is that repeated breaking and reforming of these bonds weakens the overall structural integrity of the strand over time.
Moisture evaporation: Heat drives moisture out of your hair shaft rapidly. Hair that’s chronically heat-styled loses its natural moisture balance — it becomes drier, more porous, and less able to retain hydration even after deep conditioning.
Cuticle damage: Your hair’s outer layer (the cuticle) is made of overlapping scales that lie flat on healthy hair. Heat causes these scales to lift and sometimes permanently separate — which is what causes frizz, dullness, and that rough, straw-like texture that no amount of conditioner seems to fix.
The cumulative effect: One curling session doesn’t ruin your hair. But three sessions a week for months? That’s when you start seeing the real damage — breakage, split ends traveling up the shaft, significant loss of shine, and hair that just won’t hold a style the way it used to.
Rosemary Water 101: How to Make the Viral Hair Growth Spray at Home for Under $2
The Financial Cost of Heat Styling
Let’s also talk about what heat styling actually costs, because this is a budget beauty blog and the math is worth knowing:
- A good curling iron: $30–$150
- Heat protectant spray (used every single time, or you’re making it worse): $8–$25
- Deep conditioning treatment to repair the damage: $15–$40
- Professional blowout when your home results aren’t cutting it: $45–$85
- Hair cut to remove the split ends: $30–$65 every 6–8 weeks
That’s a lot of money, a lot of time, and a lot of heat — for hair that’s literally getting worse with each styling session.
The heatless curl method doesn’t just give you great curls. It breaks the whole expensive cycle.
The $5 Walmart Find That Changes Everything
Alright, let’s talk about the actual product.
The star of this whole situation is a heatless curl rod — specifically, the foam or silk-covered flexible rod that’s been blowing up on social media and is available at Walmart in the hair accessories section for around $4–$6. You might also see it listed as a “heatless curling ribbon,” a “heatless curl headband,” or a “no-heat curl rod.”
The concept is beautifully simple: it’s a long, flexible rod (usually foam-covered or wrapped in satin/silk fabric) that you wrap sections of your hair around, sleep in overnight, unwrap in the morning, and walk away with gorgeous curls. No heat. No damage. No $85 salon appointment.
Why This Specific Method Works Better Than Other Heatless Options
You’ve probably seen or tried other heatless curl methods — rag curls, braids, pin curls, sock buns. And while all of those can work, here’s why the curl rod method specifically tends to give the most blowout-like results:
The silk/satin surface: The smooth surface of the rod reduces friction as your hair dries around it, which means less frizz and more defined, polished curls — very different from the frizzy results you can get from rougher DIY methods like rag curls.
The consistent tension: Wrapping hair around a single rod creates even, consistent tension across the entire section of hair, which gives you uniform curl formation rather than the uneven waves you sometimes get from braids or twists.
The diameter: The rod is sized to create loose, voluminous curls rather than tight spirals — which is exactly what gives that blowout look. It mimics what a large-barrel curling iron does, just without the heat.
The flexibility: You can adjust how you wrap (tighter or looser, closer to the root or starting mid-shaft) to completely customize the curl type you get. More on this below.
Where to find it at Walmart: Head to the hair care / hair accessories aisle. Look near the rollers, bobby pins, and hair elastics section. Brands like Conair, Scünci, or generic store-brand options all work — honestly, at this price point, the brand matters less than the material (go for satin or silk-covered over bare foam for less frizz).
If you can’t find it in-store, it’s also available on Walmart.com — search “heatless curl rod” or “no heat curl ribbon.” Usually arrives in two days and costs the same.
How to Master the “Butterfly Cut” at Home: Save $150 on Your Next Salon Appointment
What You Need Before You Start
Good news: you probably already have most of this stuff. Here’s the full setup:
The non-negotiables:
- Your $5 heatless curl rod from Walmart ✅
- A spray bottle with plain water (or a mixture of water + a tiny bit of leave-in conditioner)
- Hair ties or claw clips to secure the ends — the rod usually comes with these included
- A wide-tooth comb or Denman brush for detangling
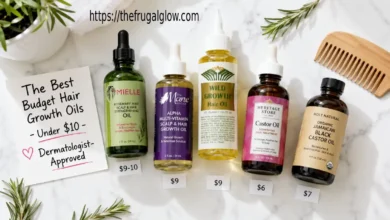
The upgrades (optional but they make a real difference):
- A lightweight mousse or curl-enhancing foam (drugstore options like Herbal Essences or Aussie are under $5 and work great)
- A few bobby pins for extra security
- A silk or satin pillowcase if you’re doing this overnight — reduces friction while you sleep and helps curls stay defined
Hair state going in:
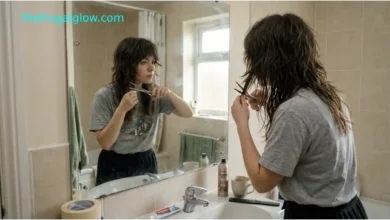
This method works on hair that is slightly damp — not soaking wet, not completely dry. This is important and I’ll explain why in the next section. About 70–80% dry is the sweet spot. Either air dry after washing until you hit that point, or lightly mist dry hair with your spray bottle until it’s just barely damp throughout.
Step-by-Step: How to Get Perfect Heatless Curls
Here’s the full method, broken down so clearly that you literally cannot mess it up. I’m going to walk you through the overnight version (most popular, best results) and the daytime version too.
The Overnight Method (Best Results)
Step 1: Prep Your Hair
Start with clean hair that’s about 70–80% dry. If you washed your hair tonight, let it air dry for a bit or hit it with a blow dryer on low heat for just a couple of minutes to get rid of the excess water. Hair that’s too wet will take forever to dry on the rod and may not set properly. Hair that’s fully dry won’t curl as well because there’s nothing for the style to “set” into as it finishes drying.
Detangle completely with your wide-tooth comb. Any tangles will show up in your finished curls and are a pain to deal with after the fact.
Step 2: Apply Your Product (Optional but Recommended)
If you’re using a mousse or curl foam, apply a golf-ball sized amount to your damp hair and scrunch it through from mid-shaft to ends. This gives your curls more hold, definition, and longevity. Skip the roots — product at the roots weighs hair down and can make it look greasy.
Step 3: Place the Rod
Take your heatless curl rod and place it at the center-top of your head, running from front to back like a headband. The rod should sit on top of your head with equal length hanging down on both sides.
Step 4: Section and Wrap
Take a section of hair from one side — start with a 1–2 inch section from the front. Wrap it around the rod in a downward spiral motion, rolling the hair around the rod as you work toward the end of the strand. Think of it like wrapping ribbon around a gift — you want even, overlapping wraps all the way down.
When you reach the end of the section, secure with the included hair tie or a bobby pin to keep it from unraveling.
Repeat on the other side with a matching section of hair. Continue alternating sides — taking sections from the same position on each side — until all your hair is wrapped around the rod.
Pro tip on curl direction: For the most natural, blowout-like look, wrap all sections in the same direction (all wrapping away from your face). This gives you that uniform, intentional curl pattern rather than a mix of directions that can look chaotic.
Step 5: Secure and Sleep
Once all your hair is wrapped, the rod should be sitting comfortably across the top of your head. You can tie the ends of the rod together under your chin if your rod has string attachments, or just make sure it’s sitting securely. It sounds weird but it’s genuinely comfortable to sleep in — way more comfortable than foam rollers or rag curls.
Sleep on your silk pillowcase. Seriously, the difference in frizz between a cotton pillowcase and a silk one overnight is noticeable.
Step 6: The Unwrap
In the morning (after at least 6–8 hours — the longer the better), carefully unwrap your hair from the rod. Start from the bottom sections and work upward. Unwrap slowly and gently — don’t yank.
Your hair will come off the rod in perfect spirals. Don’t panic if they look too tight at first — that’s normal and exactly what you want.
Step 7: The Finish (This Is Where the Blowout Magic Happens)
This step is everything. With dry fingers or a wide-tooth comb, gently separate and loosen the curls. Run your fingers through from root to tip to break up the spirals into loose, voluminous waves. Add a tiny drop of hair oil or serum to your palms, rub together, and lightly scrunch through the ends for shine and frizz control.
Flip your head upside down, scrunch upward at the roots for volume, flip back, and tousle with your fingers until you have that full, effortless blowout look.
That’s it. That’s the whole thing.
Scalp Oiling on a Budget: The Best $10 Drugstore Oils That Beat $60 Luxury Brands
The Daytime Version (3–4 Hours)
If you don’t want to sleep in the rod, you can do the exact same method during the day and let it set for 3–4 hours while you work from home, run errands, or watch TV. The results are slightly less defined than the overnight version but still really good. The key is making sure your hair is truly fully dry before you unwrap — if it’s still damp when you take it out, the curls won’t hold.
The Secret to Making Them Look Like a Blowout
Here’s the thing that separates okay heatless curls from “wait, did you just get a blowout?” curls. It’s all in the finishing technique.
Secret #1: The finger-separation technique
Never brush out heatless curls with a regular brush — it creates a triangle of frizz that’s not cute. Always use your fingers or a wide-tooth comb to separate. Work in sections, starting from the bottom, and pull curls apart gently to loosen them into waves.
Secret #2: The volume flip
Flip your head completely upside down, scrunch at the roots with both hands for 15–20 seconds, then flip back up and tousle. This breaks up any flatness at the root and creates that voluminous, full-body bounce that makes blowouts look so good.
Secret #3: The oil seal
One small drop — seriously, we’re talking the size of a pea — of a lightweight hair oil (argan oil, jojoba, or any drugstore version) rubbed between your palms and scrunched lightly through the mid-lengths and ends. This gives your curls that glossy, polished finish that makes them look intentional and salon-done rather than air-dried.
Secret #4: Don’t over-touch
Once you’ve done your separation and volume flip, step away from your hair. The more you touch it after finishing, the more it frizzes and falls flat. Do your thing, seal it with a light-hold hairspray if you want, and leave it alone.
Secret #5: The light-hold spray
A few spritzes of a flexible-hold hairspray (not the crunchy, stiff kind — look for “light hold” or “flexible hold”) from about 12 inches away while your head is flipped upside down locks everything in place without making your hair look or feel stiff.
The $5 Silk Pillowcase Hack: How to Wake Up with Perfect Hair Without Expensive Stylers
How to Make Your Curls Last All Day
Getting gorgeous curls in the morning is one thing. Keeping them through a full day is another. Here’s how to make them last:
Avoid humidity exposure in the first 30 minutes. Don’t step outside into humid air right after unwrapping — give the style a few minutes to fully settle and cool. Humidity attacks curls that haven’t fully set yet.
Refresh with a dry shampoo. A light spritz of dry shampoo at the roots mid-day lifts volume and absorbs any oil that’s developed since morning, keeping your curls looking fresh.
Don’t put your hair up and down repeatedly. Every time you pull your hair into a ponytail and release it, you’re loosening and disrupting the curl pattern. If you need your hair up for part of the day, put it up and leave it — then take it down only when you’re ready to show off the curls.
Sleep in a loose pineapple for day 2. Gather your curls loosely at the very top of your head in a soft scrunchie before bed (called “pineappling”). In the morning, release it, scrunch with a tiny bit of water or curl refresher spray, and your curls come right back to life for day two. Heatless curls actually tend to look better on day two once they’ve fully relaxed — less defined, more natural and effortless.
Heatless Curl Methods Compared: Which One Wins?
There are several popular heatless curl methods floating around the internet. Here’s the honest comparison so you know why the rod method is worth the $5 investment:
Braids / Boxer Braids
Results: Crimped waves rather than true curls. Works better for a beachy, textured look than a blowout.
Effort: Requires braiding skill.
Damage level: Zero.
Verdict: Great for a boho wave look, not ideal for blowout curls.
Rag Curls / T-Shirt Strips
Results: Tighter, more defined curls — can look great but often frizzy due to fabric friction.
Effort: Moderate — requires cutting fabric and tying multiple sections.
Damage level: Zero, but friction can cause frizz.
Verdict: Works, but more effort and less polished finish than the rod method.
Flexi Rods / Foam Rollers
Results: Very defined, springy curls — beautiful but can look more “set” than natural.
Effort: High — requires many individual rollers and time to set each one.
Cost: $8–$20 for a set.
Verdict: Great for defined curls, but more time-intensive and less blowout-like.
The $5 Heatless Curl Rod (Our Method)
Results: Loose, voluminous, blowout-style waves and curls.
Effort: Low — one rod, simple wrapping technique, sleep, done.
Cost: $4–$6 at Walmart.
Damage level: Zero.
Verdict: Best combination of ease, results, and price. Wins.
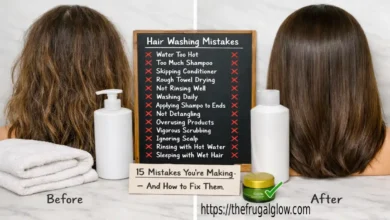
Common Mistakes That Ruin Heatless Curls
I’ve been doing this long enough to know exactly where people go wrong. Avoid these and you’re basically guaranteed great results:
Mistake #1: Hair is too wet when you wrap it.
This is the number one mistake. Hair that’s soaking wet takes too long to dry on the rod, won’t set properly, and can come out limp or damp in the morning. Always start at 70–80% dry.
Mistake #2: Sections are too thick.
Thick sections mean the inner layers of hair don’t dry fully by morning, and you end up with curls that fall flat within an hour. Keep your sections at 1–2 inches for best results.
Mistake #3: Unwrapping too early.
Your hair needs to be completely dry before you take it off the rod. If you unwrap and any part of your hair still feels cool or damp to the touch, it’s not done. Those sections won’t hold their curl.
Mistake #4: Using a cotton pillowcase.
Cotton creates friction that roughens up your hair cuticle overnight, leading to frizz and less defined curls in the morning. A satin or silk pillowcase (also very cheap — you can find them at Walmart for under $10) makes a genuinely noticeable difference.
Mistake #5: Brushing the curls out.
A regular bristle brush through heatless curls = immediate frizz explosion. Always use fingers or a wide-tooth comb only. Always.
Mistake #6: Skipping the finishing step.
A lot of people unwrap their curls, see tight spirals, panic, and think it didn’t work — then they don’t do the separation and volume steps and end up with a result they’re not happy with. The finishing technique is not optional. It’s literally where the blowout transformation happens.
Frequently Asked Questions (FAQ)
1. Does the heatless curl rod work on all hair types?
The heatless curl rod works on a wide range of hair types — straight, wavy, and loosely coily hair all respond well to this method. For very fine or silky straight hair, using a light-hold mousse before wrapping helps the curls grip and hold longer. For thicker or coarser hair, make sure sections are not too thick and give extra time for the hair to fully dry on the rod — sometimes 8–10 hours overnight rather than just 6. For tightly coiled natural hair, this particular method may not give dramatic results since the natural curl pattern is already present, but it can be used to stretch and elongate curls beautifully.
2. How long do heatless curls last?
With proper technique and finishing steps, heatless curls typically last 1–2 full days for most hair types. Fine hair may see some loosening by the end of day one, while thicker hair often holds the curl well into day two. Using a light-hold hairspray and sleeping with hair in a loose pineapple on night one significantly extends the style into a great day-two look. Humidity is the main enemy of longevity — in humid weather, a humidity-blocking hairspray helps a lot.
3. Can I do heatless curls on dry hair?
Technically yes, but the results won’t be nearly as good. Heatless curls work by setting the hair as it dries in the wrapped position — the drying process is what creates and locks in the curl shape. On completely dry hair, there’s no setting happening, so the curls tend to be much looser and fall out faster. If your hair is fully dry, mist it lightly with water or a water-and-leave-in-conditioner mixture from a spray bottle until it’s slightly damp throughout, then proceed with the method. This gives you the best of both worlds — you don’t have to wash your hair, but you still get proper curl formation.
4. What products should I use with heatless curls?
Less is more here. For fine hair, a light curl mousse or foam applied before wrapping is the sweet spot — adds hold without weight. For medium hair, the same applies, or you can skip product entirely if your hair holds a style well. For thick or coarse hair, a lightweight curl cream or leave-in conditioner helps with definition and frizz control. After unwrapping, a tiny amount of hair oil or serum on the ends adds shine and polish. Avoid heavy creams, thick serums, or oil applied before wrapping — they weigh hair down and prevent proper curl formation.
5. Is the heatless curl method good for damaged or color-treated hair?
It’s genuinely one of the best things you can do for damaged or color-treated hair. Heat is one of the primary causes of damage in color-treated hair — it lifts the cuticle, causes color to fade faster, and exacerbates the dryness and brittleness that come with chemical processing. Switching to heatless styling even just 3–4 days a week gives your hair a significant recovery window. Combined with a good bond-repair treatment like Olaplex No. 3 (available at Walmart) used once a week, most people see noticeable improvement in hair health within 4–6 weeks of reducing heat styling.
6. How is this different from sleeping in braids or a bun?
Braids and buns create waves and texture but generally don’t give you the defined, voluminous, blowout-style curl that the rod method produces. Braids create a crimped, slightly angular wave pattern — great for beachy texture but not for polished curls. A bun creates a wave or slight curl at the ends but not much movement through the mid-lengths. The rod method creates consistent, uniform spiral curls throughout the entire length of your hair that, once separated, look like they came from a large-barrel curling iron. The finish is significantly more polished and intentional-looking than braids or a bun.
7. Can I use this method on short hair?
Yes — but the technique adapts slightly for shorter lengths. For hair that’s shoulder-length or just below, the standard wrapping method works perfectly. For hair that’s chin-length or above, you may need to use smaller sections and wrap more carefully to make sure the hair stays on the rod overnight without slipping off. Some people with shorter hair prefer to use the daytime version (3–4 hours) rather than overnight, as shorter hair dries faster and may be fully set before morning anyway. Flexi rods or smaller diameter curl rods also work better for very short hair.
8. What’s the best way to sleep with the heatless curl rod without it being uncomfortable?
The rod is genuinely more comfortable to sleep in than most people expect — it’s soft and flexible, not rigid. The key is placement: make sure the rod sits flat across the very top of your head, running front to back. Sleeping on your back is the most comfortable position with the rod in, and it also protects the curl pattern best. If you’re a side sleeper, place a silk pillowcase under your head and try to rest on the side of the rod rather than on the wrapped sections of hair. Most people find they completely forget it’s there within a few minutes of lying down.
9. Why do my heatless curls fall flat so fast?
There are a few common reasons. First: your hair wasn’t fully dry when you unwrapped — damp hair can’t hold a curl shape. Second: your sections were too thick and the inner layers didn’t dry completely. Third: your hair type is naturally resistant to holding a style and needs a stronger-hold product before wrapping. Fourth: you live in a high-humidity environment that relaxes curls quickly — use an anti-humidity or humidity-blocking spray as your final step. Fifth: you’re touching your curls too much after styling, which breaks down the curl pattern rapidly. Address whichever of these applies and your staying power will improve significantly.
10. How do I find the heatless curl rod at Walmart specifically?
Head to the hair care aisle — it’s usually in the section with rollers, hair accessories, and styling tools rather than with the shampoos and conditioners. Look for it near foam rollers, flexi rods, or hair clip sections. It might be labeled as a “heatless curl rod,” “no-heat curl headband,” “heatless curling ribbon,” or similar. Brands you might see include Conair, Scünci, or Walmart’s own Great Value accessories line. If you can’t find it in-store, search “heatless curl rod” on Walmart.com — it’ll ship to your door or be available for free in-store pickup, usually the same day. The whole thing should run you between $4 and $6.
Final Thoughts
Here’s the bottom line: you don’t need an expensive curling iron, a $90 blowout, or hours in front of a mirror to have gorgeous, bouncy, salon-worthy curls. You need a $5 piece of foam and satin from Walmart, a spray bottle, and a good night’s sleep.
That’s it. That’s the whole secret.
The beauty industry has spent decades convincing us that great hair requires expensive tools, pricey products, and professional appointments. And yeah, some of that stuff is genuinely nice to have. But when a $5 heatless curl rod gives you the same result as a $150 curling iron while your hair actually gets healthier in the process? That’s not a compromise — that’s an upgrade.
Your hair doesn’t know how much your styling tools cost. It knows whether it’s being treated gently or damaged repeatedly. And when you start treating it gently? It shows. Fuller, shinier, healthier, bouncier hair — the kind that makes people stop and ask what you’re doing differently.
And when you tell them? “$5. Walmart. Goodnight.” — that’s the kind of answer that makes people’s jaws drop.
That’s exactly the energy we’re all about at The Frugal Glow — finding the shortcuts, the hacks, and the budget finds that actually deliver, so you can glow up without the financial hangover. Because your hair deserves to look amazing, and your wallet deserves a break. 💛