The $2 Pantry Secret to Making Your Cheap Costume Jewelry Shine Like New
The Frugal Glow | Accessories | Smart Shopping
Jump Links
- Tarnished Jewelry and the $15 Cleaner Scam
- Why Costume Jewelry Tarnishes — And Why That’s Fixable
- The $2 Pantry Secret: The Complete Method
- The Formula Variations: Gold-Tone, Silver-Tone, and Rhinestones
- For Gold-Tone Jewelry
- For Silver-Tone Jewelry
- For Rhinestone and Crystal Pieces
- What I Restored in One Afternoon
- What Never to Do to Costume Jewelry
- How to Keep Jewelry Shining After You Clean It
- The Frugal Glow Verdict
- FAQ
Tarnished Jewelry and the $15 Cleaner Scam
I want to start with something that probably describes your jewelry drawer right now.
Somewhere in your home there is a collection of costume jewelry — rings, necklaces, earrings, bracelets — in various stages of tarnish. Some of it is green. Some of it is black. Some of it has turned from a warm gold tone to a flat, lifeless gray that makes you wonder why you bought it in the first place. Most of it hasn’t been worn in months because it looks too bad to justify putting on, and throwing it away feels wasteful because it was perfectly good jewelry three months ago.
You have probably, at some point, stood in the cleaning products aisle at CVS or Target looking at the $12 to $18 “jewelry cleaners” — the little bottles with the basket inside, the polishing cloths, the ultrasonic cleaning machines that range from $20 to $80 — and wondered whether they would bring your jewelry back.
Some of them work. Most of them work on the jewelry they were designed for — sterling silver, gold plating — and fail or actively damage the base metals and plating of costume jewelry. And all of them cost money that is completely unnecessary to spend.
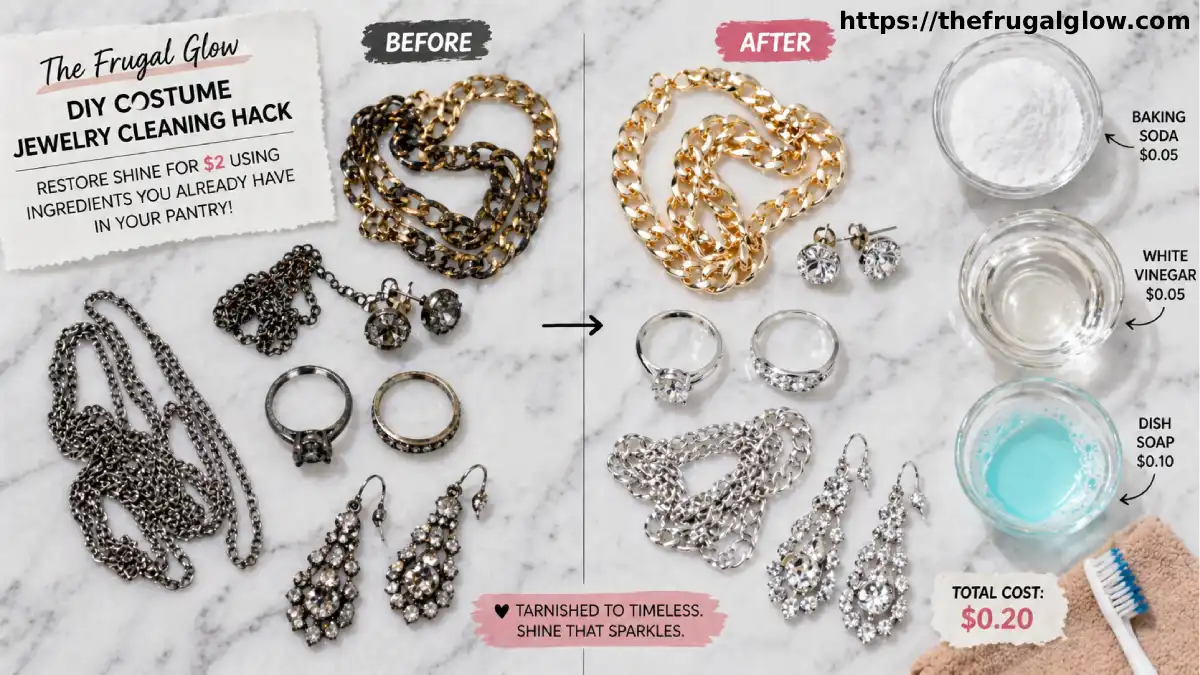
The baking soda and dish soap sitting in your kitchen pantry right now is the most effective costume jewelry cleaner available at any price. The method costs approximately $2 worth of household supplies — and you almost certainly already have both — and takes under ten minutes from start to finish. It restores tarnished, dull, green-tinged costume jewelry to a shine that looks genuinely new.
I know this because last month I cleaned seventeen pieces of costume jewelry in a single Sunday afternoon — rings, chains, earrings, a bracelet — using three items from my kitchen. Every single piece came out looking better than I remembered buying it.
Here is exactly what I did.
Why Costume Jewelry Tarnishes — And Why That’s Fixable
Understanding why tarnish forms is what makes the cleaning chemistry make sense — and what prevents you from making the mistakes that damage jewelry rather than restore it.
Costume jewelry is typically made from base metals — zinc alloy, copper, brass, or nickel — with a thin plating of gold, silver, or rhodium over the surface. The tarnish you see is not happening to the plating. It is happening to the base metal underneath, which oxidizes and bleeds through microscopic gaps in the plating as the plating wears.
Gold-tone tarnish: The gold plating remains relatively stable, but the brass or copper base metal underneath oxidizes and creates a darkening around links, settings, and any areas where the plating has been worn thin by friction. This produces the flat, aged look that makes gold-tone costume jewelry look cheap.
Silver-tone tarnish: Silver and rhodium plating oxidizes into silver sulfide on contact with sulfur compounds in the air — the same process that turns sterling silver black. The result is the dark, matte blackening that makes silver-tone pieces look neglected rather than simply old.
The green discoloration: Copper in the base metal reacts with oxygen and body acids — sweat, skin oils, lotions — to form copper carbonate, which is green. This is the same chemical process that turned the Statue of Liberty from copper-brown to verdigris green. On jewelry, it appears at the backs of earrings, on ring shanks, and anywhere the piece has extended contact with skin.
Why this is all fixable: Tarnish is a surface chemical reaction. The metal underneath it is completely intact. The right mild acid or cleaning combination dissolves the tarnish compounds without damaging the base metal or plating — which is exactly what the $2 pantry method does.
The $2 Pantry Secret: The Complete Method
What you need:
| Ingredient | Approximate Cost | What It Does |
|---|---|---|
| Baking soda | $0.10 per tablespoon | Gentle abrasive + mild alkaline cleaner |
| Dish soap (Dawn or any clear formula) | $0.05 per drop | Cuts oils and surface residue |
| White vinegar | $0.05 per tablespoon | Mild acid that dissolves tarnish compounds |
| Warm water | $0.00 | The medium for everything |
| Total per cleaning session | ~$0.20 |
You also need a soft toothbrush (an old one you were going to throw away), a soft cloth or paper towels, and a small bowl.
The Basic Method (works for most costume jewelry):
Step 1: Fill a small bowl with warm — not hot — water. Add two drops of dish soap and stir briefly.
Step 2: Place your jewelry in the soapy water and let it soak for five minutes. This loosens surface oils, skin residue, and any loose tarnish that will release easily without mechanical action.
Step 3: Remove one piece from the soak. Sprinkle a small amount of baking soda — approximately half a teaspoon — directly onto the wet jewelry or onto a damp soft toothbrush.
Step 4: Gently scrub the jewelry with the baking soda using the soft toothbrush. Use circular motions on flat surfaces and light back-and-forth strokes on chains and textured areas. The baking soda acts as a mild abrasive that physically removes tarnish while its alkaline chemistry reacts with the tarnish compounds to break them down.
Step 5: Rinse thoroughly under warm running water, making sure to remove all baking soda residue — baking soda left in crevices can leave a white residue when it dries.
Step 6: Pat dry with a soft cloth. Do not rub — rubbing can scratch freshly cleaned plating. Pat gently and then allow to air dry completely before storing.
The Upgraded Method (for stubborn tarnish):
Add one tablespoon of white vinegar to your soapy water soak. The mild acetic acid in white vinegar specifically targets the sulfide and carbonate tarnish compounds, dissolving them chemically before the baking soda physically removes them. For heavily tarnished silver-tone or significantly green pieces, this combined approach produces dramatically better results than either ingredient alone.
The Formula Variations: Gold-Tone, Silver-Tone, and Rhinestones
Different costume jewelry materials respond differently to cleaning — and using the wrong approach can damage pieces that the right approach would restore beautifully. Here are the specific variations for each major jewelry type.
For Gold-Tone Jewelry
The formula: Dish soap + warm water soak only, with gentle baking soda scrub for stubborn tarnish.
The approach:
Gold plating is thinner and more delicate than silver plating — typically only a few microns thick on costume jewelry. The baking soda abrasive should be used very gently and sparingly on gold-tone pieces, focusing on dark areas and link crevices rather than rubbing across broad flat surfaces. The dish soap soak alone handles surface dulling effectively for lightly tarnished gold-tone pieces. Reserve the baking soda scrub for areas of visible darkening only.
What to avoid for gold-tone: Vinegar. The acetic acid in white vinegar can react with the copper base metal of gold-plated pieces in ways that accelerate dulling rather than reversing it. Use the soapy soak without vinegar for gold-tone jewelry.
The result: Gold-tone chains and earrings that looked flat and lifeless typically regain approximately 70 to 80 percent of their original brightness with this method. The remaining 20 to 30 percent of the original brightness reflects plating that has physically worn through and cannot be restored by cleaning alone — only re-plating can address this.
For Silver-Tone Jewelry
The formula: Dish soap + white vinegar soak + baking soda scrub. The most comprehensive formula produces the most dramatic results on silver-tone tarnish.
The approach:
Silver sulfide tarnish responds beautifully to the mild acid of white vinegar — the acetic acid dissolves the tarnish compounds quickly and effectively. After a five-minute vinegar-soda water soak, the baking soda scrub removes the loosened tarnish and any remaining surface residue, revealing the bright silver-tone underneath.
The aluminum foil enhancement for very heavy tarnish:
For silver-tone pieces with severe black tarnish that the standard method doesn’t fully address, add a piece of aluminum foil to the bottom of your soaking bowl before adding water, vinegar, and a tablespoon of baking soda. The chemical reaction between the aluminum, baking soda, and vinegar creates a mild electrochemical environment that pulls the sulfide compounds away from the silver surface — the same principle used in professional silver cleaning equipment. This enhanced method can restore silver-tone pieces that appear beyond saving.
The result: Silver-tone jewelry cleaned with the vinegar-enhanced method typically restores to 85 to 95 percent of its original brightness. The most dramatic transformations I’ve personally achieved — pieces that looked black and unwearable — were silver-tone items cleaned with the aluminum foil method.
For Rhinestone and Crystal Pieces
The formula: Dish soap only. No vinegar. No baking soda on the stones. Dry immediately and thoroughly.
The approach:
This is the most cautious category and the one where wrong technique causes permanent damage. Rhinestones — whether glass crystal or plastic — are set in metal backings with adhesive or prong settings. The adhesive used in rhinestone jewelry is water-soluble over extended exposure, meaning long soaking can loosen stones. The vinegar’s acid can cloud certain types of crystal. The baking soda abrasive can scratch the coating on less expensive stones.
The correct rhinestone method: Use a soft damp cloth or cotton swab dipped in very dilute dish soap solution to clean the metal settings around stones. Use a dry soft cloth to immediately remove any moisture from the stones themselves. For stones that have become dull or cloudy, a drop of glass cleaner (Windex) on a cotton swab applied carefully to the stone surface — avoiding the setting and backing — can restore clarity. Do not submerge rhinestone pieces. Do not use vinegar. Work quickly and dry immediately and completely.
The result: Rhinestone pieces cleaned carefully this way can go from dull and dusty-looking to sparkling without risk of stone loss or clouding.
What I Restored in One Afternoon
I want to make this concrete by sharing what I personally cleaned during the Sunday afternoon that inspired this article — because I think specific examples are more convincing than general claims.
A gold-tone layered chain necklace that had turned from warm gold to a flat, grayish-brown. Dish soap soak for five minutes, gentle baking soda scrub on the darkened links. Result: approximately 75 percent of original brightness restored. Completely wearable. Photographed beautifully.
Four silver-tone stacking rings that had developed significant black tarnish from daily wear. Vinegar-enhanced soak for five minutes, baking soda scrub. Result: bright silver-tone restored across all four. One ring had a small area of permanent base metal exposure where the tarnish had been so deep the plating had worn through — but 80 percent of each ring’s surface was restored to essentially new appearance.
Two pairs of rhinestone drop earrings that had dulled from product and dust accumulation. Damp cloth with dilute dish soap on the settings, Windex on a cotton swab for the stones. Result: stones sparkling, settings clean, completely transformed from “I forgot I owned these” to “I need to wear these this week.”
A green-tinged copper-base ring — the worst of the lot, with obvious verdigris on the inside of the shank. Dish soap, baking soda scrub on the green area, then vinegar rinse. The green came off completely. The ring looked significantly better than I had expected based on its starting condition.
Total cleaning time for all seventeen pieces: approximately forty-five minutes including soaking time. Total cost in supplies: approximately $0.40. The same number of pieces sent to a professional jewelry cleaner would cost $30 to $60.
What Never to Do to Costume Jewelry
The cleaning method above works because it is specifically calibrated to the delicate plating and base metals of costume jewelry. Here are the approaches that will damage rather than restore:
Never use commercial silver polish or silver dip. These products are formulated for sterling silver — their chemical concentration is far too aggressive for the thin silver plating of costume jewelry and will strip the plating entirely.
Never use toothpaste. Toothpaste is commonly recommended as a jewelry cleaner and is genuinely effective for sterling silver. For costume jewelry plating, the abrasives in toothpaste are too aggressive and will scratch and dull the finish rather than restore it.
Never put costume jewelry in an ultrasonic cleaner. The vibration of ultrasonic cleaners can loosen rhinestone settings and cause prongs to fatigue and release stones. Not worth the risk.
Never use bleach or ammonia-based cleaners. Both will cause immediate damage to base metals and plating. Even a brief exposure can cause permanent discoloration.
Never soak for extended periods. Even the gentle dish soap soak should be limited to five minutes for most pieces. Extended soaking can loosen adhesive-set rhinestones and can cause plating to lift at the edges of worn areas.
Never use very hot water. Hot water can expand and contract the metal and adhesive components at different rates, loosening settings and causing stress fractures in weaker plating.
How to Keep Jewelry Shining After You Clean It
Cleaning restores the shine. Storage prevents it from returning. Here is what actually works for maintaining the appearance of clean costume jewelry:
Store in airtight or low-humidity conditions. Most tarnish forms through oxidation and reaction with airborne sulfur compounds — both processes that require air exposure. Storing jewelry in small zip-lock bags, sealed compartments in a jewelry organizer, or anti-tarnish cloth pouches dramatically slows the rate of re-tarnishing.
Apply a thin coat of clear nail polish to the inside of rings and the backs of earrings. This creates a barrier between the metal and skin contact — the primary source of the green discoloration and accelerated tarnishing that comes from oils and acids in sweat. Apply thin, reapply when it peels, and the piece will last significantly longer between cleanings.
Keep away from perfume, hairspray, and lotion. The chemicals in these products react with the metals in costume jewelry and accelerate tarnishing dramatically. Put jewelry on last — after all products have been applied and dried.
Do not shower or swim wearing costume jewelry. Water alone is not the problem — it is the chlorine in pool water, the minerals in tap water, and the soaps and shampoos that contact the jewelry during a shower. Even brief repeated exposure significantly shortens the lifespan of costume jewelry plating.
The Frugal Glow Verdict
One Sunday afternoon. Seventeen pieces of jewelry. Forty-five minutes. Forty cents worth of pantry staples. A jewelry drawer full of pieces that went from “I forgot I owned this” to “I need to wear this immediately.”
The $2 pantry method — baking soda, dish soap, and white vinegar in the right combination for the right jewelry type — is not a compromise solution when you can’t afford a real jewelry cleaner. It is demonstrably more effective than most commercial costume jewelry cleaners for the specific chemistry of tarnish removal on plated base metals. The baking soda’s mild abrasive removes what the vinegar’s acid dissolves. The dish soap handles surface residue that neither acid nor abrasive addresses efficiently. The combination is the right chemistry for the job.
Your tarnished costume jewelry is not beyond saving. It is not cheap because it tarnished — it is cheap because it was made from base metals with thin plating, which is the nature of the category. The tarnish is chemistry. The chemistry is reversible. The reversal costs twenty cents and ten minutes.
That seventeen-piece jewelry drawer full of pieces that looked unwearable last month? I have worn six of them in the three weeks since I cleaned them. I bought none of them again to replace versions I thought were ruined. I spent $0.40 to restore jewelry that would have cost me $100 to replace.
That is the frugal glow in its most literal form.
At The Frugal Glow, this is what we live for — the moment when a $2 pantry solution outperforms a $15 commercial product and a drawer full of jewelry gets a second life. Bookmark us, share this with the friend who has been quietly meaning to throw away her tarnished jewelry for months, and come back for more honest DIY beauty and lifestyle content that proves the best solutions have always lived in your kitchen. 💚✨
FAQ
1. How do you clean cheap jewelry to make it look new?
Cleaning cheap costume jewelry to restore its original shine requires a mild abrasive combined with a gentle acid — a combination available in any kitchen pantry. The most effective method uses a warm water and dish soap soak for five minutes to loosen surface oils and residue, followed by a gentle scrub with a soft toothbrush dipped in baking soda to physically and chemically remove tarnish. For silver-tone pieces with significant black tarnish, adding a tablespoon of white vinegar to the soak dramatically improves results by dissolving the sulfide tarnish compounds before the baking soda removes them. Rinse thoroughly, pat dry, and allow to air dry completely. The key differentiations for different jewelry types are: avoid vinegar on gold-tone pieces, avoid all abrasives on rhinestones, and never soak any piece for more than five minutes to prevent adhesive loosening in stone settings.
2. How do you remove tarnish from fake jewelry?
Removing tarnish from fake or costume jewelry requires understanding what the tarnish actually is — silver sulfide compounds on silver-tone pieces, copper carbonate (the green verdigris) on copper-based pieces, and general oxidation on gold-tone pieces — and using chemistry that dissolves these specific compounds without damaging the thin plating underneath. White vinegar’s acetic acid is the most effective household tarnish-dissolving agent for silver sulfide and copper carbonate tarnish, while baking soda provides the mild abrasive action needed to physically remove the loosened compounds. Combined with dish soap as a degreasing agent and applied with a soft toothbrush, this pantry combination dissolves and removes tarnish from most costume jewelry in under ten minutes. The one category requiring a different approach is rhinestone jewelry, where the water-sensitive adhesive and scratch-prone stone surfaces require a dry or near-dry cleaning approach with dilute dish soap on a cotton swab rather than submersion.
3. Does baking soda damage jewelry?
Baking soda is safe to use on most costume jewelry when used correctly — as a mild abrasive applied with a soft toothbrush rather than rubbed aggressively across surfaces. The important limitations are: baking soda should not be used on soft gemstones (pearls, opals, turquoise) because its mild alkalinity can damage the stone surface; it should not be used as a dry scrub on highly polished gold plating because even its mild abrasive quality can produce micro-scratches that dull a mirror finish; and it should not be left in place and allowed to dry in crevices, where it leaves visible white residue that is difficult to remove without re-wetting and re-rinsing. For the base metals and standard plating of costume jewelry — zinc alloy, copper, brass with gold or silver plating — baking soda used with a soft toothbrush in a wet scrubbing motion is safe and effective. The critical technique distinction is gentle scrubbing versus aggressive rubbing.
4. How do you keep costume jewelry from tarnishing?
Preventing costume jewelry from tarnishing quickly after cleaning requires addressing the primary causes of tarnish formation: air exposure, moisture, skin contact chemistry, and product chemical exposure. The most effective prevention strategies are storing jewelry in sealed, low-humidity conditions — individual small zip-lock bags or anti-tarnish cloth compartments — that limit the air and humidity exposure that drives oxidation. Applying a thin coat of clear nail polish to the inside of rings, backs of earrings, and anywhere the metal contacts skin creates a physical barrier between the metal and skin acids that accelerate tarnishing. Putting jewelry on as the last step after all skincare, makeup, hairspray, and fragrance have been applied and dried prevents chemical exposure from these products. Removing jewelry before showering, swimming, and exercise prevents the combined damage of water minerals, chemicals, and sweat that dramatically shortens costume jewelry lifespan.
5. Is it worth cleaning costume jewelry or should you just replace it?
In most cases, cleaning tarnished costume jewelry is significantly more cost-effective than replacing it, and the cleaning results are typically better than people expect before trying. Tarnish is a surface phenomenon — the metal underneath is intact — and the right cleaning method reverses it without permanently damaging the piece. The threshold for replacement rather than cleaning is when the base metal is physically exposed in significant areas (the plating has worn through completely in visible locations), when there is structural damage (broken clasps, loose prongs, cracked settings), or when rhinestones have been lost and the piece is incomplete. For tarnished pieces without structural damage, the pantry cleaning method described in this article restores 70 to 95 percent of the original appearance in under ten minutes at a cost of approximately $0.20. The same piece replaced new costs whatever you originally paid. Cleaning before replacement is always worth attempting — the downside of a ten-minute cleaning attempt is ten minutes; the downside of replacing unnecessarily is the full replacement cost.
Twenty cents. Forty-five minutes. A full jewelry drawer brought back to life. At The Frugal Glow, we find the pantry solutions, test the DIY methods, and tell you honestly what works so your money stays where it belongs — in your wallet, not in a $15 jewelry cleaner bottle. Bookmark us, share this with the friend who has been meaning to throw out her tarnished jewelry for months, and come back for more honest DIY solutions that prove the best fixes have always been sitting in your kitchen. 💚✨