

The ‘Visible Mending’ Trend: How to Turn a Hole in Your Sweater Into a $100 Art Piece
Let me tell you about the sweater that made me cry.
It was my grandmother’s. A chunky, oatmeal-colored, slightly itchy-but-in-a-cozy-way wool cardigan. She wore it every winter for twenty years. And when she passed away, my mom gave it to me.
I wore that sweater every single chilly morning of my first year of motherhood. I wore it while nursing my son at 3 AM. I wore it while pacing the floor with a colicky baby. I wore it to the pediatrician, to the grocery store, to the park. That sweater held me together when I was falling apart.
And then my son, in a fit of two-year-old chaos, grabbed the sleeve and pulled. Hard.
Riiiiip.
A hole. Right on the forearm. Not small. Not fixable with a quick stitch. A ragged, ugly, gaping hole.
I put the sweater in a drawer. I couldn’t throw it away. I couldn’t look at it. It just sat there for eight months, reminding me of everything I had lost and everything that had been ruined.
And then I discovered visible mending.
Now, eight months later, that same sweater hangs in my closet. But it doesn’t look ruined. It looks better than it ever did. The hole is gone. In its place is a hand-stitched cherry blossom branch, pink flowers climbing up my forearm like a tattoo.
People stop me on the street to ask where I bought it.
I tell them, “My grandmother’s closet and a $3 embroidery hoop.”
That is the magic of visible mending. It takes your broken, holey, “unwearable” clothes and turns them into something even more beautiful than before. And today, I am going to show you exactly how to do it.
No experience. No expensive supplies. Just a needle, some thread, and a little bit of courage.
Jump Links
- What Is Visible Mending? (And Why It’s Taking Over Fashion)
- The Secret Psychology: Why We Love ‘Flaws’ That Look Intentional
- Project 1: The Starburst (Perfect for Tiny Sweater Holes)
- Project 2: The Woven Patch (For Jeans Knees and Elbow Holes)
- Project 3: The Embroidery Flower Garden (For Big Holes You Want to Celebrate)
- Project 4: The Sashiko Wave (Japanese-Inspired Geometric Mending)
- Project 5: The ‘Mended Heart’ (For the Hole Right Over Your Actual Heart)
- The Supplies You Actually Need (Stop Overcomplicating This)
- How to Stabilize a Hole Before You Start Stitching
- Frequently Asked Questions (FAQ)
What Is Visible Mending? (And Why It’s Taking Over Fashion)
You know how your mom used to mend your clothes? She would take a hole and stitch it closed with matching thread, trying to make it invisible. The goal was to hide the repair. To pretend it never happened.
Visible mending is the opposite.
In visible mending, you take that hole and you make it loud. You use bright thread. You use bold patterns. You add flowers, stars, geometric shapes, little hearts. You turn the “flaw” into the focal point.
It started in Japan with a technique called Sashiko (which means “little stabs” — adorable, right?). Fishermen and farmers would mend their work clothes with thick white thread, creating beautiful geometric patterns. The repairs were functional, but they were also beautiful. They told a story. They said, “This garment is loved. This garment is worth saving.”
Then the trend hit Instagram a few years ago. Suddenly, everyone was mending their ripped jeans with rainbow thread and their holey sweaters with tiny embroidered mushrooms. Fashion brands noticed. Now you can buy “pre-mended” jeans from designer brands for $300.
But here is the secret: You don’t need to spend $300. You can do it better. And you can do it tonight.
The reason visible mending is so popular right now is simple. We are tired of throwing things away. We are tired of fast fashion. We are tired of our clothes falling apart after six washes. And we are tired of feeling like “damaged” things are worthless.
Your holey sweater is not worthless. It’s an opportunity.
The Secret Psychology: Why We Love ‘Flaws’ That Look Intentional
There is a reason visible mending makes us happy. And it’s not just the dopamine of a DIY project.
Reason 1: It tells a story.
A perfectly pristine sweater is boring. It has no history. But a sweater with a bright pink star stitched over a hole? That sweater has lived. That sweater has been loved. When someone sees your visible mending, they don’t think “she ruined her clothes.” They think “she took the time to fix something she loves.” That’s powerful.
Reason 2: It’s anti-perfection.
We are so sick of perfection. Perfect Instagram feeds. Perfect homes. Perfect bodies. Perfect clothes. Visible mending is a rebellion. It says, “I am not perfect, and I am not trying to be. And that is beautiful.”
Reason 3: It’s meditative.
I am not a calm person. I yell at traffic. I lose my keys weekly. My patience with my children is measured in seconds, not minutes. But when I sit down with a needle and thread and a hole to fix? Everything slows down. My breathing slows. My heart rate drops. Visible mending is cheaper than therapy and comes with a pretty sweater at the end.
Reason 4: It saves money.
This is the frugal part. A $100 sweater with a hole is not $100 anymore. It’s garbage or a cleaning rag. But a $100 sweater with a hole that you turn into a piece of art? That sweater is now priceless. You just saved $100. And you spent $3 on thread.
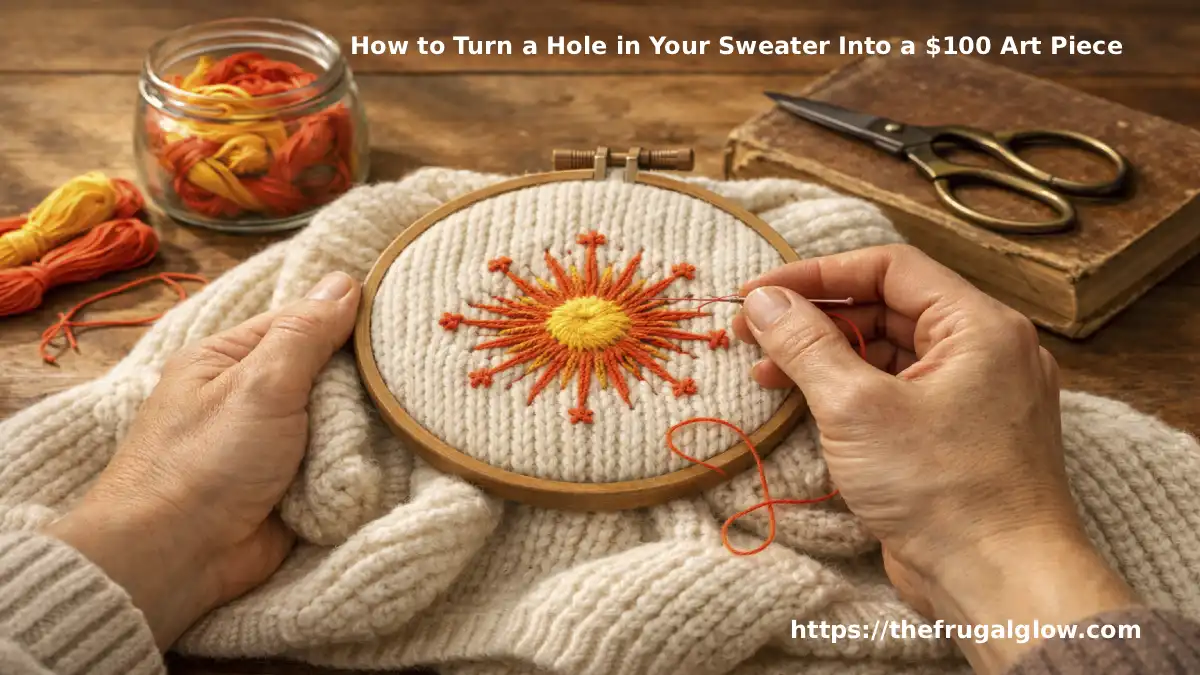
Project 1: The Starburst (Perfect for Tiny Sweater Holes)
This is the easiest project for beginners. If you have never sewn anything in your life, start here. A starburst is just a bunch of straight lines radiating out from the center of a hole.
Best for: Small holes (size of a dime or smaller) on sweaters, socks, or t-shirts.
What you need:
- A hole (obviously)
- Embroidery floss in 2-3 bright colors
- A needle with a big eye (embroidery needle)
- Scissors
- An embroidery hoop (optional but helpful)
Step-by-step:
Step 1: Secure the hole.
Put your garment in an embroidery hoop (if you have one). This keeps the fabric taut. If you don’t have a hoop, just hold the fabric tight with your non-dominant hand.
Step 2: Choose your colors.
Pick a bright color for the center (yellow, hot pink, turquoise) and one or two lighter colors for the rays. I like yellow center + orange rays + coral tips. Very sun-like.
Step 3: Thread your needle.
Cut a piece of embroidery floss about 18 inches long. Separate the 6 strands into 3 strands (pull them apart gently). Thread your needle. Tie a knot at the end.
Step 4: Make the first stitch.
Come up from the back of the fabric right at the edge of the hole. Pull the thread through until the knot catches. Then go back down through the fabric about half an inch away from the hole. That’s one ray.
Step 5: Make a sunburst.
Keep making rays. Start from the edge of the hole and go outward. Space them evenly around the hole. Make 8 to 12 rays total. The hole will slowly close as you pull each stitch tight.
Step 6: Add a second color.
Switch to your second color. Stitch shorter rays between the longer ones. This adds depth.
Step 7: Fill the center.
Once all your rays are done, take your needle and make tiny little straight stitches in a circle right over the hole itself. This covers any remaining gap and creates a solid center.
Step 8: Tie off.
Flip your garment over. Tie a knot. Trim the excess thread.
That’s it. You just fixed a hole. And it looks like a tiny sun is living on your sweater.
I did this on a black turtleneck that got a small hole near the collar. I used silver and white thread. It looks like a little star. People think it’s a brooch.
Project 2: The Woven Patch (For Jeans Knees and Elbow Holes)
Knees and elbows get holes. It’s just a fact of life. Especially if you have kids (or if you are a person who crawls on the floor to find lost Legos under the couch, no judgment).
This technique creates a woven patch that is incredibly strong. It’s perfect for high-friction areas.
Best for: Jeans knees, sweater elbows, shirt cuffs.
What you need:
- A hole (medium to large, up to the size of a quarter)
- Embroidery floss (a contrasting color looks best)
- A needle
- Scissors
Step-by-step:
Step 1: Trim the hole.
Use your scissors to trim any loose, fuzzy threads around the edge of the hole. You want a clean opening, not a ragged one.
Step 2: Create the “warp” threads.
Take your thread. Starting from about half an inch above the hole, stitch straight down to half an inch below the hole. Stitch back up next to that first line. Keep doing this until you have a series of parallel vertical lines covering the entire hole. This creates the “warp” (the base of your weave). You should have 6 to 10 vertical threads.
Step 3: Start weaving.
Now take your needle and thread. Instead of going up and down, you are going to go over and under. Weave your needle horizontally across the hole, going over one vertical thread and under the next. Over, under, over, under. Pull gently.
Step 4: Keep weaving.
When you reach the other side, go back the other direction. This time, go under the threads you went over before, and over the ones you went under. This creates a woven checkerboard pattern.
Step 5: Pack it tight.
Keep weaving back and forth until the entire hole is filled and you can’t see the original hole anymore. The woven patch will be slightly raised and textured. That’s the look.
Step 6: Secure the edges.
Take your needle and stitch a border around the entire woven patch. This locks everything in place and makes it look intentional.
I did this on my son’s jeans knee. He had a massive hole from sliding on the playground. I used bright red thread. The woven patch looks like a little racing stripe. He thinks it’s the coolest thing ever. He asks for “racing stripes” on all his pants now.
Project 3: The Embroidery Flower Garden (For Big Holes You Want to Celebrate)
Okay, big hole. Like, “I can fit three fingers through this” size. Don’t panic. Big holes are not a problem. They are a garden waiting to bloom.
Best for: Large holes on sweaters, hoodies, or canvas jackets.
What you need:
- A large hole (be brave)
- A small piece of scrap fabric (a different color is fun)
- Embroidery floss in 4-5 flower colors (pink, purple, yellow, green)
- A needle
- An embroidery hoop (highly recommended for this one)
Step-by-step:
Step 1: Patch the back.
Cut a piece of scrap fabric slightly larger than your hole. Slide it inside your garment, behind the hole. Pin it in place or hold it with your hand. This is your “canvas” for the flowers. The scrap fabric will cover the hole so you can stitch on top of it.
Step 2: Stitch the patch in place.
Use a simple running stitch to sew the scrap fabric to the garment around the edge of the hole. The hole is now “closed” (though the patch is visible from the front). That’s fine. You’re going to cover it.
Step 3: Make a rose (the centerpiece).
Take pink thread. Make a small star (5 straight stitches radiating from the center). Then, using the same thread, weave the needle under and over the star points without going through the fabric. This creates a woven rose. It sounds complicated but it’s easy—search “woven rose embroidery” on YouTube for a 30-second video.
Step 4: Add leaves and stems.
Use green thread to stitch little stems coming out from the rose. Add small leaves (just tiny straight stitches at an angle).
Step 5: Add smaller flowers.
Use yellow thread to make tiny French knots (wrap the thread around the needle twice, then push it back down next to where you came up). Use purple thread to make little daisies (a circle of small straight stitches).
Step 6: Fill the space.
Keep adding flowers, leaves, and tiny dots until the entire patch is covered. Don’t worry about perfection. A garden is supposed to look wild.
Step 7: Done.
Seriously. That’s it. Your big hole is now a meadow.
I did this on a denim jacket that had a tear on the shoulder. I made a whole garden of lavender and daisies. People literally stop me in Target to ask where I bought it. I tell them, “My closet, a hole, and three episodes of The Office.”
Project 4: The Sashiko Wave (Japanese-Inspired Geometric Mending)
Sashiko is the traditional Japanese technique I mentioned earlier. It’s usually done with white thread on indigo blue fabric, creating beautiful repeating geometric patterns.
But you can do Sashiko over a hole. The hole just becomes part of the pattern.
Best for: Multiple small holes or worn-thin areas (like the inner thigh of jeans).
What you need:
- A garment with worn or thinning fabric
- White or cream embroidery floss (thick thread is traditional)
- A needle
- A ruler or measuring tape (optional)
- A washable fabric pen or chalk (to draw guidelines)
Step-by-step:
Step 1: Draw your grid.
Use your fabric pen to draw a grid of dots on your garment around the hole. Space the dots about half an inch apart in a straight line. Draw parallel lines of dots, like graph paper.
Step 2: Thread your needle.
Use all 6 strands of embroidery floss (don’t separate them). Sashiko uses thick, bold stitches. Tie a knot.
Step 3: Stitch the running stitch.
Sashiko is just a simple running stitch (in and out, in and out). But the magic is in the spacing. Each stitch should be about the same length as the space between stitches. Think: stitch length = gap length. This creates a dashed line effect.
Step 4: Follow your dots.
Stitch along your grid lines. When you reach the hole, just stitch right over it. The thread will bridge the gap. That’s the point! The hole becomes a negative space within your pattern.
Step 5: Keep going.
Stitch line after line. Create a grid. Create waves. Create zigzags. The repetition is meditative.
Step 6: Wash your garment.
Use cold water to wash out your fabric pen marks. The white thread on blue denim (or cream thread on a dark sweater) will look stunning.
I did this on the inner thighs of my favorite jeans. You know the spot. They were thinning and about to rip. Instead of waiting for a hole, I Sashiko stitched a wave pattern over the whole area. Now the jeans look intentional and artsy instead of “about to be trash.”
Project 5: The ‘Mended Heart’ (For the Hole Right Over Your Actual Heart)
This one is sentimental. Save it for a garment you truly love.
Best for: A single small-to-medium hole over the left chest area (or anywhere you want to make a statement).
What you need:
- A hole over your heart (the location, not a metaphor, but a metaphor also works)
- Red or pink embroidery floss
- A needle
- Scissors
Step-by-step:
Step 1: Stabilize the hole.
If the hole is larger than a dime, use a small piece of scrap fabric behind it (like the flower garden method). If it’s tiny, just go for it.
Step 2: Draw a heart outline.
Using your needle without thread, poke small holes in the fabric around the hole to outline a heart shape. The hole should be somewhere inside the heart (not at the edge).
Step 3: Stitch the outline.
Using red thread, stitch a running stitch along the heart outline. Use a backstitch (where each stitch goes backward into the previous stitch) for a solid line.
Step 4: Fill the heart.
Now fill in the heart with a satin stitch (parallel straight stitches close together). When you reach the hole, just stitch over it. The red thread will cover the hole completely.
Step 5: Add a center.
For extra love, add a tiny French knot or a small star right in the center of the heart.
I did this on my grandmother’s sweater. The hole was right over my heart. Now there is a bright red heart covering it. Every time I wear that sweater, I feel like she is hugging me.
You cannot buy that at Anthropologie.
Why I Never Throw Away Old Jeans: 5 Genius Ways to Turn Them Into ‘Anthropologie’ Style Decor
The Supplies You Actually Need (Stop Overcomplicating This)
Listen. You do not need a $200 embroidery kit. You do not need specialty threads. You do not need a degree in textile arts.
Here is everything you need to get started. Most of it is already in your house.
The absolute basics (under $5 total):
- A sewing needle (any needle with an eye large enough for thread)
- Thread or embroidery floss (you can use regular sewing thread, but floss is thicker and more visible)
- Scissors (any scissors that can cut thread)
- Your holey garment
The nice-to-haves (under $15 total, one-time purchase):
- Embroidery hoop (wooden hoop, $3-5 at any craft store)
- Embroidery floss in a rainbow of colors ($0.50 each, get 10 colors = $5)
- A needle threader (if you struggle to thread needles, $1)
- Small, sharp embroidery scissors ($5-8)
Where to buy supplies for almost nothing:
- Dollar Tree: Needles, thread, small scissors
- Walmart: Embroidery floss for $0.50 each
- Thrift stores: Old embroidery hoops for $1
- Buy Nothing groups: People give away craft supplies constantly
I have never spent more than $10 on visible mending supplies in a single year. And I have mended over 30 garments.
How to Stabilize a Hole Before You Start Stitching
This is the most important skill. If you skip this, your mend will fall apart.
For tiny holes (smaller than a dime):
You don’t need a patch. Just stitch directly over the hole. The stitches themselves will hold the fabric together.
For medium holes (dime to quarter size):
You need a small piece of scrap fabric behind the hole. Cut a piece of fabric slightly larger than the hole. Slide it inside the garment. Pin it or hold it in place. Stitch through both garment and scrap fabric. Trim any excess scrap fabric from the back.
For large holes (bigger than a quarter):
Same as medium holes, but use a larger piece of scrap fabric. Also consider using a product called “iron-on interfacing” (a sticky fabric you iron onto the back of the hole). It costs $3 for a big sheet and adds major stability.
What fabric should you use for patches?
- For stretchy sweaters: Use a piece of old t-shirt (stretchy)
- For jeans: Use a piece of old jeans (same weight)
- For thin shirts: Use a piece of cotton from an old pillowcase
- For wool: Use a piece of old wool sweater (felted in the washing machine)
Do not use thick fabric for a thin garment. It will feel weird and bulky.
Frequently Asked Questions (FAQ)
Q: I have never sewn anything in my life. Can I really do this?
Yes. I promise. Start with the starburst project on a small hole. It’s literally just straight lines. You cannot mess it up. If you can draw a sun, you can stitch a sun. The first thing I ever mended was a sock with a hole in the toe. I used bright purple thread. It looked like a little grape. It was adorable.
Q: What if I make it ugly?
Then you cut the stitches out and try again. Or you leave it and call it “folk art.” Ugly mending is still charming. Visible mending is not about perfection. It’s about intention. A lopsided heart is still a heart. Crooked rays on a starburst just look like a wiggly sun. Embrace the imperfection.
Q: Will the mend hold up in the washing machine?
Yes, if you do it correctly. Always tie a knot at the beginning and end of your thread. Use a backstitch or a running stitch with small gaps. For high-friction areas (jeans knees, sock heels), use the woven patch method—it’s very strong. Wash your mended garments on a gentle cycle and air dry them for the first few washes. After that, they’re solid.
Q: What about holes in knit sweaters? Won’t they unravel more?
Knit sweaters are tricky because the hole can continue to unravel. Before you mend, take a tiny drop of clear nail polish or fabric glue on the cut edges of the knit. Let it dry. This seals the fibers so they won’t keep unraveling. Then mend as usual. This saved my grandmother’s sweater.
Q: Can I use regular sewing thread instead of embroidery floss?
Yes, but embroidery floss is thicker and more visible. The whole point of visible mending is that you see the mending. Regular thread is thin and might disappear into the fabric. If you want your mend to pop, use embroidery floss. If you want it to be subtle, use regular thread in a matching color (that’s called “invisible mending,” the old-school way).
Q: How long does visible mending take?
- Starburst on a small hole: 15 minutes
- Woven patch on a knee: 30 minutes
- Flower garden on a big hole: 1-2 hours
- Sashiko waves on a large area: 2-3 hours
- Mended heart: 20 minutes
Most projects can be done while watching one episode of something. That’s the beauty of it.
Q: My kids want to try visible mending. Can they?
Yes! My 7-year-old has mended three of his own shirts. Use a plastic needle (they sell them for kids) and blunt-tip scissors. Start with the starburst on an old piece of fabric, not a beloved garment. Once they get the hang of it, let them mend their own clothes. It teaches patience, creativity, and not throwing things away.
Q: What if the hole is on the seam?
Seam holes are actually easier. Just stitch along the original seam line using a backstitch. Use thread that matches the garment color if you want it to blend, or use a contrasting color to celebrate the repair. A bright blue seam on a black shirt looks surprisingly cool.
Q: Can I do visible mending on non-clothing items?
Absolutely. Visible mending works on:
- Throw pillows with holes
- Canvas tote bags with ripped corners
- Upholstery on chairs (a small tear can become a flower)
- Stuffed animals (my son’s bear has a red stitched heart over a seam rip)
- Blankets and quilts
The same techniques apply. If it’s fabric and it’s broken, you can mend it visibly.
Q: I have a hole in a really expensive sweater. I’m scared to mess it up.
I understand. Practice first. Take an old t-shirt or a pair of holey socks. Practice the starburst three times. Practice the woven patch once. When you feel confident, then mend the expensive sweater. Or take it to a tailor and ask them to do visible mending (yes, some tailors offer this now). But I believe in you. You can do it.
The Sweater That Started It All
Remember my grandmother’s sweater? The one with the hole on the forearm?
I didn’t mend it right away. I was too scared. It sat in that drawer for eight months.
And then one night, after the kids were asleep and the house was quiet, I took it out. I bought an embroidery hoop for $4. I bought pink and green thread for $1. I watched a five-minute YouTube video about how to stitch a cherry blossom branch.
And then I just… started.
My first few stitches were ugly. Too big. Too loose. I pulled them out and tried again. My second attempt was better. My third attempt was actually pretty.
Three hours later, I had a branch of pink cherry blossoms climbing up the forearm of my grandmother’s sweater. The hole was gone. Completely covered by a small cluster of flowers.
I put the sweater on. I looked in the mirror. And I cried.
Not because the sweater was saved. But because I saved it. Me. With my own two hands and $5 worth of supplies.
That sweater is not a garment anymore. It’s a story. It’s my grandmother’s love and my own stubbornness and a reminder that broken things can be made whole again.
Sometimes, they can be made even more beautiful than before.
Now go find your holey sweater. Your ripped jeans. Your sock with a toe poking through.
Don’t throw them away.
Mend them. Make them visible. Make them art.
This article was stitched together with love, a lot of patience, and the firm belief that the best things in life are the ones we fix instead of replace.
Proudly published by The Frugal Glow — where we believe that being frugal isn’t about buying less. It’s about loving what you have enough to take care of it. Every stitch is a small rebellion against a world that wants you to throw things away. Keep mending. Keep glowing. And never underestimate what a needle and thread can do.