

Why I Never Throw Away Old Jeans: 5 Genius Ways to Turn Them Into ‘Anthropologie’ Style Decor
Let me tell you about the pair of jeans that broke my heart.
They were my perfect jeans. You know the ones. The pair that fit just right after two babies. The pair that made my butt look like it belonged to a person who does yoga regularly (I do not). The pair that had been with me through road trips, bad haircuts, and one very questionable karaoke night.
And then my thigh rubbed through them.
You know the spot. Right there, where your legs touch when you walk. One day they were fine. The next day, there was a hole. And then the hole got bigger. And then it was embarrassing to wear them in public.
I stood in my closet holding those jeans. I could not throw them away. They were too sentimental. Too perfect. Too mine.
My husband walked by and said, “Just toss them. They’re destroyed.”
I almost cried.
But then I had an idea. A crazy, glue-gun-fueled, Pinterest-inspired idea. What if I didn’t throw them away? What if I turned them into something beautiful?
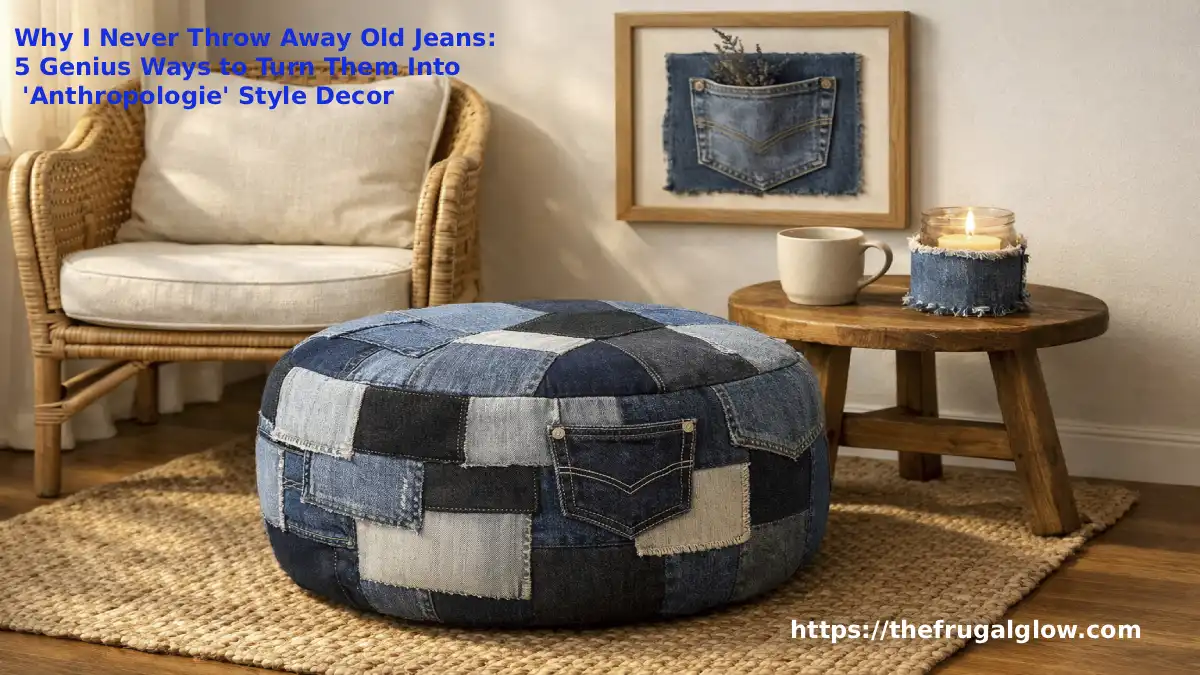
Three weeks later, I had a denim patchwork ottoman that my friend literally asked, “Oh my god, did you get that at Anthropologie?”
I laughed. And then I told her the truth. “No. It’s my old jeans and a cardboard box.”
That was two years ago. Now I haven’t thrown away a single pair of old jeans since. Every torn pair, every pair that my kids outgrow, every pair that my husband “just doesn’t like the fit of anymore” goes into my Denim Stash Box.
And today, I am going to show you exactly what to do with yours.
Because old jeans are not trash. They are fabric. They are history. They are memories. And they can be the most stunning, Anthropologie-worthy decor in your house for exactly zero dollars.
Jump Links
- Why Denim Is the Perfect Free Material for DIY Decor
- Project 1: The Denim Patchwork Ottoman (That Looks Like a $300 Pouf)
- Project 2: Framed Pocket Organizers (For Mail, Flowers, or Jewelry)
- Project 3: No-Sew Denim Coasters (10 Minutes, I Promise)
- Project 4: Frayed Edge Denim Garland (For That Boho Vibe)
- Project 5: The ‘Ugly Lamp’ Makeover with Denim Scraps
- How to Prep and Cut Your Old Jeans for Maximum Fabric
- The Tools You Need (Almost Everything Is Already in Your House)
- Frequently Asked Questions (FAQ)
Why Denim Is the Perfect Free Material for DIY Decor
Before I show you the projects, let me convince you why denim is basically a gift from the DIY gods.
Reason 1: It’s indestructible.
Denim is thick. It does not fray easily. It does not pill. It does not stretch out over time like t-shirt fabric. You can glue it, sew it, cut it, step on it, spill coffee on it, and it still looks great. This is fabric that survived your thighs rubbing together for two years. It can survive being a coaster.
Reason 2: The colors are gorgeous.
Think about all the shades of blue in your closet. Light wash, medium wash, dark wash, black, gray, even white denim. When you put them together, they create this stunning, intentional, tonal look. It’s not matchy-matchy. It’s curated. It’s exactly what Anthropologie charges $400 for.
Reason 3: The texture is unmatched.
Denim has that woven, slightly rough, lived-in texture. It feels cozy but structured. When you use it for home decor, it adds warmth without being fussy. A denim pillow doesn’t scream “craft project.” It whispers “boho chic.”
Reason 4: It holds its shape.
Unlike flimsy fabrics that flop over, denim stands up. This makes it perfect for ottomans, organizers, and anything that needs structure. You don’t need interfacing or stabilizers. The jeans themselves are the structure.
Reason 5: It’s free.
This is the biggest one. You already have old jeans. Your friends have old jeans. Your neighbors have old jeans. Put a post on your local Buy Nothing group asking for “torn denim jeans for crafts” and you will get 20 pairs by the weekend. Free. Zero dollars. You cannot beat that price.
I have a bin in my garage labeled “Dead Jeans.” Every time someone in my family outgrows or destroys a pair, into the bin they go. I have not bought fabric for a home decor project in 18 months.
Project 1: The Denim Patchwork Ottoman (That Looks Like a $300 Pouf)
This is the project that started my obsession. It looks expensive. It looks complicated. It is neither.
What you need:
- 4 to 6 pairs of old jeans (different washes look best)
- One large cardboard box (like a diaper box or Amazon shipping box)
- Scissors or a rotary cutter
- Hot glue gun and lots of glue sticks
- Polyfill stuffing or old pillows/blankets you were going to toss
- A sturdy needle and thick thread (optional, for extra security)
Step-by-step:
Step 1: Make your base.
Find a sturdy cardboard box. I used a diaper box. Cut it down so it’s about 12 inches tall, 12 inches wide, and 12 inches deep. You want a cube. It does not have to be perfect. This is the skeleton of your ottoman.
Step 2: Cut your denim patches.
Take your old jeans and cut them apart. Remove the legs from the waist. Cut the legs open along the seam so you have flat pieces of denim fabric. Then cut those flat pieces into squares. Any size works, but I like 4×4 inch squares. Don’t measure perfectly. Imperfect squares look more “boho” anyway.
Step 3: Arrange your patches.
Lay your cardboard box on its side. Start gluing your denim squares onto the box with hot glue. Overlap them slightly, like shingles on a roof. Mix up your washes. Put a light square next to a dark square. Leave the pocket or the waistband seam visible for extra character. I glued the back pocket of my favorite jeans right onto the top of the ottoman as a secret little pouch.
Step 4: Cover all sides.
Do the top, all four sides, and the bottom. Yes, the bottom too. It just looks more finished. The hot glue dries in seconds, so this whole step takes about 30 minutes while watching an episode of something.
Step 5: Stuff it.
Leave one side partially unglued, like a flap. Shove polyfill stuffing into the box until it’s firm and puffy. If you don’t have polyfill, use old pillows, old blankets cut into pieces, or even plastic grocery bags (I’ve done it). Close the flap with more hot glue.
Step 6: The finishing touch (optional but amazing).
Take the waistband from one pair of jeans. Wrap it around the bottom edge of the ottoman like a trim. Glue it on. It covers any messy edges and looks incredibly intentional.
That’s it. You now have a $300 Anthropologie pouf that cost you nothing but an hour of your time and a few glue sticks.
My kids use ours as a footrest, a seat, and a step stool. It has survived two years of abuse. It looks better now than the day I made it—more worn in, more loved.
DIY Sneaker Surgery: How I Made My $5 Thrifted Nikes Look Brand New for $2
Project 2: Framed Pocket Organizers (For Mail, Flowers, or Jewelry)
This is the project that makes people gasp. Every single time someone comes over, they ask where I bought the “denim pocket wall art.”
What you need:
- One pair of old jeans with nice back pockets
- A picture frame (any size, thrift store frames work great)
- Scissors
- Hot glue or a stapler
- Cardboard or foam board (cut to the size of your frame)
Step-by-step:
Step 1: Cut out the pockets.
Take your old jeans and carefully cut out the back pockets. Leave about an inch of denim around each pocket. You want the pocket itself plus a border. Cut out both pockets. You can also cut out the front little coin pocket—it’s adorable for small things.
Step 2: Prepare your frame.
Take your picture frame. Remove the glass (you don’t need it). Keep the cardboard backing. Or cut a new piece of cardboard or foam board to fit inside the frame.
Step 3: Arrange your pockets.
Lay your pockets on the cardboard backing. Play with the arrangement. Side by side? One above the other? Angled? I did two back pockets side by side, then the little coin pocket in the corner like a cute accent.
Step 4: Attach the pockets.
Hot glue or staple the pockets to the cardboard backing. Only glue the top edge and the side edges. Leave the bottom edge unglued—that’s the opening of the pocket. You want to be able to slide things in.
Step 5: Frame it.
Put the cardboard backing with the pockets into your frame. Close up the back of the frame. Hang it on the wall.
What do you put in the pockets?
- Dried flowers or lavender (this is my favorite—it looks so romantic)
- Mail or cards you want to display
- Jewelry (earrings, rings, small necklaces)
- Kids’ little treasures (rocks, feathers, drawings on tiny paper)
- A small succulent in a tiny pot (if the pocket is deep enough)
I have one of these in my entryway with dried eucalyptus sticking out of the pockets. It looks like something from a $400 home decor catalog. And it cost me a frame I already had and five minutes of cutting.
The $0.00 Closet Flip: 5 Ways to Turn Your Husband’s Old Shirts Into Trendy Crop Tops
Project 3: No-Sew Denim Coasters (10 Minutes, I Promise)
You need coasters. You know you do. Your coffee table has water rings. Your nice tablecloth has stains. But coaster sets are weirdly expensive? $20 for four little circles? No thank you.
Denim coasters take ten minutes. They look like Anthropologie. And they work better than any coaster I’ve ever bought because denim is absorbent.
What you need:
- One pair of old jeans (any wash)
- Scissors
- A cup or bowl to trace around (about 4 inches in diameter)
- Fabric glue or hot glue (optional, for the edges)
Step-by-step:
Step 1: Trace your circles.
Lay your jeans flat. Take a cup or a small bowl and trace around it with a pen or chalk. Trace as many circles as you can fit. You want at least 4 coasters, but make 8 so you have extras.
Step 2: Cut out the circles.
Cut along your traced lines. You will have rough circles. That’s fine. Imperfect is better.
Step 3: Make them double-sided (optional but nice).
Cut a second set of circles from a different wash of denim. Glue two circles together back-to-back with fabric glue or hot glue. Now your coaster has a light side and a dark side. Flip it depending on your mood.
Step 4: Fray the edges (the magic step).
Here is the secret to making them look expensive. Take your scissors and gently scrape them along the edge of each circle. Little threads will come loose. This is called fraying. Keep scraping until the edge is soft and fuzzy. It gives the coasters that “I bought this at a fancy market in Brooklyn” look.
Step 5: Done.
Seriously. That’s it. Put them on your coffee table. They absorb condensation. They look beautiful. When they get dirty, throw them in the washing machine. They are jeans. They can handle it.
My mom came over for Christmas and asked where I got my “designer coasters.” I told her they were made from my husband’s old work jeans. She didn’t believe me until I showed her the frayed edge.
Upcycling Grandma’s Vintage Scarves: 5 Chic Ways to Turn Them into Trendy Halter Tops
Project 4: Frayed Edge Denim Garland (For That Boho Vibe)
You have seen these garlands on Pinterest. They hang across mantels, along shelves, or draped over mirrors. They are made of fabric triangles or circles on a string. And they cost $40 on Etsy.
Or you can make one in 20 minutes from a single pair of old jeans.
What you need:
- One pair of old jeans (light wash works best for this)
- Scissors
- Twine, jute string, or embroidery floss
- A hole punch (or just cut small slits with scissors)
Step-by-step:
Step 1: Cut your denim into shapes.
Cut your jeans into strips about 2 inches wide and 6 inches long. Then cut those strips into triangles (like little pennant flags) or circles or hearts. I like triangles because they look like bunting.
You will need about 20 to 30 triangles for a standard mantel-length garland.
Step 2: Fray the edges.
This is the same fraying technique from the coasters. Scrape your scissors along all the edges of each triangle. The more you fray, the softer and more “boho” the garland looks. Go crazy.
Step 3: Punch holes.
Use a hole punch to make two small holes at the top of each triangle (about half an inch apart). If you don’t have a hole punch, just cut two small slits with scissors.
Step 4: String them.
Cut a piece of twine or jute as long as you want your garland. Thread the twine through the holes of each triangle. Loop it in one hole and out the other, like threading a needle. Space the triangles evenly.
Step 5: Hang it up.
Drape your garland across your mantel, bookshelf, or headboard. The frayed edges will catch the light. The denim will hang nicely because it’s heavy enough to stay straight.
I made one of these for my daughter’s bedroom. She wanted a “boho vibe” but I wasn’t spending $100 on decor. We used her old outgrown jeans. She cried when she saw it hanging above her bed. Not because it was fancy. Because it was made from her jeans. The ones she wore every day in kindergarten.
That’s the magic of this project. It’s not just decor. It’s memory.
Project 5: The ‘Ugly Lamp’ Makeover with Denim Scraps
You have an ugly lamp. Everyone has an ugly lamp. It’s the one your mother-in-law gave you. Or the one you bought in college. Or the one that came with the apartment. It’s functional but hideous.
Denim can fix it.
What you need:
- One ugly lamp with a plain drum shade
- Denim scraps (small pieces, leftover from the other projects)
- Fabric glue or Mod Podge
- A paintbrush
- Scissors
Step-by-step:
Step 1: Cut your denim into strips.
Cut your denim into long, thin strips about 1 inch wide. The length doesn’t matter. You can sew multiple strips together if you want a really long piece, but I like using shorter strips for a patchwork look.
Step 2: Fray the edges of every strip.
Again with the fraying. This is the signature Anthropologie look. Frayed denim is textured. Textured is expensive-looking.
Step 3: Glue the strips onto the lampshade.
Start at the bottom edge of the lampshade. Brush a thin layer of Mod Podge or fabric glue onto a small section of the shade. Press a denim strip onto the glue, wrapping it around the shade horizontally. Let it dry for a minute. Then add the next strip above it, slightly overlapping. Work your way up to the top of the shade.
Step 4: Mix your washes.
Use light strips, dark strips, and maybe one black strip for contrast. The random, uneven look is what makes it feel “designed.”
Step 5: Trim the edges.
Once all the glue is dry, trim any excess denim hanging over the top and bottom edges of the shade. Then fray those trimmed edges too.
Step 6: Put the lamp back together.
Reattach the shade to the lamp base. Turn it on. The light will glow softly through the denim. It will cast the most beautiful warm blue shadows on your wall.
I did this to a $5 thrift store lamp that was covered in some weird gold floral pattern. Now it sits on my nightstand. I have had three different people ask if it’s “vintage designer.” Nope. It’s jeans.
DIY Sneaker Surgery: How to Restore and Whiten Yellowed Soles for Under $10
How to Prep and Cut Your Old Jeans for Maximum Fabric
Before you start any of these projects, you need to prep your jeans. Don’t just grab a pair and start cutting. Follow this system to get the most fabric possible.
Step 1: Wash them.
Wash your old jeans. Even if they look clean. You don’t want to spend hours making something beautiful only to have it smell like old gym clothes.
Step 2: Cut off the waistband.
Cut right below the waistband. Save the waistband separately. Waistbands are great for trim, handles, and edges.
Step 3: Cut off the legs.
Cut along the inseam of each leg so you have two flat pieces of denim fabric instead of two tubes. This is important. A flat piece is usable. A tube is not.
Step 4: Save the pockets whole.
Don’t cut pockets into smaller pieces unless you have to. Pockets are special. They have shape, stitching, and character. Use them whole for the framed organizer project or as accent patches.
Step 5: Sort by color.
Put light wash pieces together, medium together, dark together. This makes it easier when you want a specific shade for a project.
Step 6: Store them flat.
Fold your denim pieces and put them in a bin. Do not wad them up. Wrinkled denim is a pain to iron later.
I have a bin labeled “Denim Stash.” It lives under my bed. Every time I finish a project, I put the scraps back in the bin. Nothing goes to waste.
The Tools You Need (Almost Everything Is Already in Your House)
You do not need a sewing machine for these projects. I own a sewing machine. I never use it for denim crafts because hot glue and fabric glue work just fine.
Here is your complete tool list. Most of it is already in your junk drawer.
Must-haves:
- Sharp scissors (kitchen scissors work, but fabric scissors are better)
- Hot glue gun and a big pack of glue sticks (buy the good ones, the cheap glue sticks don’t hold)
- Ruler or measuring tape
- Pen or chalk for marking
Nice-to-haves (but not necessary):
- Rotary cutter and cutting mat (if you have one, use it)
- Fabric glue (for projects where hot glue is too bulky)
- A needle and thick thread (if you want to sew instead of glue)
- Hole punch
What you do NOT need:
- A sewing machine (I promise)
- Expensive denim (old jeans are free)
- Interfacing or stabilizers (denim is sturdy enough on its own)
The first project I ever did, I used a pair of dull kitchen scissors, a glue gun from the dollar store, and a diaper box. It turned out great. Do not let perfect tools stop you from starting.
Frequently Asked Questions (FAQ)
Q: I don’t have any old jeans. Where can I get them for free or cheap?
Go to your local Buy Nothing group on Facebook. Post: “ISO old denim jeans, any size, any condition, for crafts.” You will get at least 10 pairs by the weekend. Also ask friends and family. Thrift stores often have jeans for $3-5, but free is better. Avoid jeans with stretchy spandex (like jeggings) because they don’t hold their shape as well. Look for 100% cotton denim.
Q: What if my jeans are stretchy or have spandex?
Stretchy denim (often labeled as 2% spandex or elastane) is harder to work with. It frays differently and doesn’t hold its shape as well. You can still use it for small projects like coasters or garlands, but avoid using it for the ottoman or lamp shade where structure matters. For the best results, look for 100% cotton denim. The tag will tell you.
Q: Do I need to sew, or can I really do all of this with glue?
You can absolutely use glue for every single project here. Hot glue is incredibly strong on denim. The only time I recommend sewing is if you are making something that will get heavy use (like a bag or a pillow that kids will jump on). For decor items like ottomans, coasters, garlands, and wall art, glue is totally fine. I have a glue-only ottoman that has lasted two years.
Q: How do I clean denim decor?
Most denim decor can be spot-cleaned with a damp cloth and a tiny bit of dish soap. For coasters, you can throw them in the washing machine on a gentle cycle, then air dry. For the ottoman, vacuum it with the brush attachment. Do not put a cardboard-based ottoman in the washing machine (obviously). For the lampshade, just dust it or use a lint roller.
Q: My jeans have stains or holes. Can I still use them?
Yes! Stains and holes add character. A small stain on a denim coaster looks like “intentional distressing.” A hole in the ottoman patchwork can be covered by another patch. The only thing you should avoid is mold or mildew. If the jeans smell bad even after washing, toss them. Otherwise, embrace the worn-in look.
Q: How many pairs of jeans do I need for each project?
- Coasters: 1 pair (makes 8-10 coasters)
- Garland: 1 pair (makes a 6-foot garland)
- Framed pockets: 1 pair (gives you 2-3 pockets)
- Lamp shade: 1-2 pairs (depending on the size of the shade)
- Ottoman: 4-6 pairs (for a 12-inch cube)
Q: Can I use colored denim (black, white, gray) or just blue?
Use all of them! The best projects mix blue, black, gray, and white denim together. The contrast is stunning. I have a pair of black jeans that I use for “accent” patches in every project. It makes the blue pop. White denim is great for summer projects or to brighten up a dark patchwork.
Q: My kids want to help. Can they do these projects?
Yes, with supervision. Kids can cut denim (with safety scissors), arrange patches, and glue things (with a low-temp glue gun or fabric glue). The coaster project is great for kids because it’s simple and fast. The garland is also kid-friendly. Just do the hole-punching yourself. My 6-year-old made a set of coasters for his teacher and she cried.
Q: What if I make a mistake and glue something wrong?
Hot glue peels off denim pretty easily if you do it while it’s still warm. If you mess up, just peel it off and try again. If the glue has cooled completely, use a hair dryer to warm it up, then peel. Denim is tough. It can handle a few mistakes.
Q: I’m not crafty at all. Which project should I start with?
Start with the coasters. They take 10 minutes. You cannot mess them up. Even if your circles are wonky and your fraying is uneven, they will still look cute. Once you make coasters and realize “oh, I can actually do this,” move on to the garland, then the framed pockets, then the lamp, and finally the ottoman. Build your confidence.
The Jeans That Started It All
I still have the first pair. The one my thigh rubbed through. The one my husband told me to throw away.
I didn’t use them for any of these projects. I couldn’t. They were too special.
Instead, I cut out the back pockets and sewed them onto a canvas tote bag. Now I carry that tote bag to the grocery store every week. It holds my produce, my reusable bags, and one granola bar for the inevitable toddler meltdown in the dairy aisle.
Every time I look at that tote bag, I remember. I remember wearing those jeans when I was pregnant. I remember spilling coffee on them at a playground. I remember my son drawing on the knee with a washable marker that was not, in fact, washable.
Clothes hold memories. And when they die, those memories don’t have to die with them.
So please. Next time you go to throw away a pair of old jeans, stop. Put them in a bin. Let them sit there. And one day, when you have an hour and a glue gun, turn them into something beautiful.
Your home will look like Anthropologie. Your wallet will stay full. And your jeans will live on.
That’s not crafting. That’s magic.
This article was written in a living room decorated entirely with dead jeans, a hot glue gun, and absolutely no shame.
Proudly published by The Frugal Glow — where we believe that the most beautiful things in your home shouldn’t cost a fortune. They should come from your closet, your hands, and your willingness to see treasure where other people see trash. Keep glowing, keep creating, and never throw away a pair of jeans again.