

Don’t Buy New Curtains! How to Upcycle Vintage Bed Sheets Into ‘Boho-Chic’ Window Treatments
Let me tell you about the $300 curtain shame spiral.
Last year, I decided my living room needed new curtains. The old ones were beige. Boring. Sad. They looked like they belonged in a dentist’s waiting room from 1998.
So I went to a home decor store. I found some “boho-chic” curtains that I loved. Soft linen. Beautiful fringe. That perfect slightly sheer, slightly textured look that makes your entire room feel like a boutique hotel.
I flipped over the price tag.
$149 per panel.
I needed two panels. That’s almost $300. Plus tax. Plus shipping because they didn’t have them in stock.
I stood there in the store, holding that curtain like it was made of gold, and I felt this horrible sinking feeling. I couldn’t afford $300 curtains. I have a mortgage and kids and a car that needs new tires. I don’t have “$300 for curtains” money.
So I put them back. I went home. I sulked on my couch with my sad beige curtains.
And then I went to Goodwill the next weekend to cheer myself up with cheap books.
That’s when I saw it.
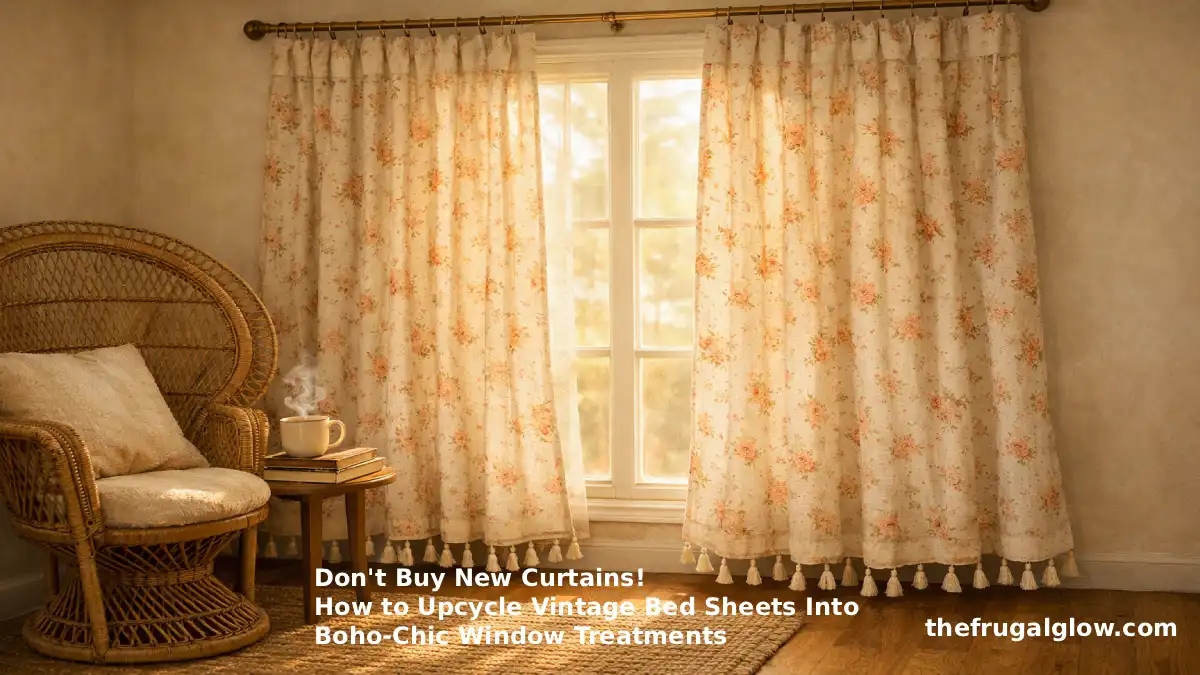
A rack of vintage bed sheets. Floral. Faded. Soft as butter from decades of washing. And the pattern? Dusty pink roses and tiny orange buds on a cream background. It looked exactly like the $300 curtains I had cried over.
Price: $3.99.
I bought four of them. Different patterns. Different colors. I spent less than $20.
And over the next two weekends, I turned those old bed sheets into four sets of stunning, boho-chic curtains that my friends literally ask me to make for them.
Today, I am going to show you exactly how to do it. No sewing machine required (though it helps). No fancy skills. Just a thrift store, a pair of scissors, and twenty bucks.
By the end of this article, you will never buy new curtains again.
Jump Links
- Why Vintage Bed Sheets Are Perfect for Curtains (And Why Nobody Knows This)
- How to Find the Perfect Vintage Sheets at Thrift Stores
- Project 1: The No-Sew ‘Rod Pocket’ Curtain (15 Minutes)
- Project 2: The Boho Tassel Hem (Adds $100 of Value in 30 Minutes)
- Project 3: The ‘Scalloped Edge’ Curtain for Cottage Vibes
- Project 4: Layered Sheer + Floral (The Anthropologie Dupe)
- Project 5: The Duvet-to-Curtain Transformation (For Extra-Long Windows)
- How to Hang Vintage Sheet Curtains Without Looking Cheap
- The $10 Tool Kit You Need (Mostly Things You Already Own)
- Frequently Asked Questions (FAQ)
Why Vintage Bed Sheets Are Perfect for Curtains (And Why Nobody Knows This)
You might be thinking, “Sheets? For curtains? Won’t they look like… a dorm room?”
No. And here is why.
Reason 1: The fabric is already soft and broken in.
New curtains from the store are stiff. They have chemicals on them to keep them crisp on the shelf. Vintage sheets have been washed hundreds of times. They are soft. They drape beautifully. They have that relaxed, lived-in look that boho style is all about.
Reason 2: The patterns are unique.
Every house on Instagram has the same Target curtains. The same beige linen. The same geometric print. But a vintage floral sheet from the 1970s? Nobody else has that. Your curtains will be one of a kind. That’s not “cheap.” That’s “curated.”
Reason 3: They are already hemmed on three sides.
This is the secret. A flat sheet comes with perfectly finished hems on all four edges. The top hem, the bottom hem, and the side hems are already done. You don’t have to sew anything if you don’t want to. The sheet is ready to become a curtain.
Reason 4: They are the perfect width.
A standard flat sheet is about 90 inches wide. That is exactly the width you need for one curtain panel (you want your panel to be 1.5 to 2 times the width of your window). A queen sheet is even wider. You don’t have to sew two pieces together.
Reason 5: They cost almost nothing.
Goodwill sheets: $3-8. Target curtains: $30-150 per panel. Do the math. You are saving 90% or more.
Reason 6: They are sustainable.
The fashion and home textile industry is one of the biggest polluters on the planet. Every time you buy new curtains, you are voting for more pollution. Every time you upcycle a vintage sheet, you are keeping fabric out of a landfill and saying no to fast home decor.
I am not a perfect environmentalist. I drive a minivan and use plastic baggies sometimes. But this one small thing? It makes a difference. And it saves me money.
How to Find the Perfect Vintage Sheets at Thrift Stores
Not every vintage sheet is a good candidate for curtains. Here is exactly what to look for.
The Goldilocks Fabric:
- Look for: 100% cotton. Percale is great (crisp but soft). Soft flannel works for winter curtains. Avoid polyester blends unless you want curtains that don’t breathe and collect static.
- The touch test: Rub the fabric between your fingers. It should feel soft but not flimsy. If it feels like tissue paper, it will look cheap as curtains. If it feels like cardboard, keep walking.
The Pattern Test:
- Yes to: Faded florals, small geometric prints, ticking stripes, paisley, subtle botanicals.
- No to: Cartoon characters (unless it’s for a kid’s room, then go wild), neon bright colors (they look dated, not vintage), large novelty prints (palm trees? pineapples? no).
- The exception: A solid color sheet in a rich mustard, rust, or sage green is a goldmine. Solid sheets make amazing neutral curtains.
The Damage Check:
- Hold the sheet up to the light. Look for thin spots, holes, or stains.
- Small stains near the edge? You can cut around them.
- Holes in the middle? Pass. Not worth the work.
- Yellowing? Sometimes it washes out with OxiClean. Sometimes it doesn’t. If it’s bad, leave it.
The Size Matters:
- Twin flat sheet: 66 x 96 inches. Good for small windows or kids’ rooms.
- Full flat sheet: 81 x 96 inches. Good for standard windows.
- Queen flat sheet: 90 x 102 inches. The sweet spot. Great width for most windows.
- King flat sheet: 108 x 102 inches. Perfect for wide windows or sliding glass doors.
Pro tip: Go to thrift stores in wealthy neighborhoods. Rich people donate really nice sheets. I found a 100% Italian linen king sheet for $6 once. That fabric would have cost $200 new.
Pro tip 2: Wash everything before you cut it. Hot water. A cup of white vinegar in the rinse cycle (it removes musty smells). Dry on high heat. Iron it if you want to be fancy. I don’t iron anything because I am a monster.
Project 1: The No-Sew ‘Rod Pocket’ Curtain (15 Minutes)
This is the easiest project. You need zero sewing skills. If you can use a pair of scissors and some iron-on tape, you can do this.
Best for: Beginners, renters (no permanent changes), anyone who wants instant gratification.
What you need:
- One flat sheet (full or queen size)
- Scissors
- Iron
- Stitch Witchery or any iron-on hem tape ($3 at Walmart)
- A curtain rod
Step-by-step:
Step 1: Measure your window.
Measure the width of your window. Your curtain panel should be 1.5 to 2 times that width. A queen sheet (90 inches wide) works for windows up to 60 inches wide.
Step 2: Cut the sheet to length.
Decide how long you want your curtains. Floor length? Just below the windowsill? Measure from your curtain rod to where you want the curtain to end. Add 4 inches for the rod pocket. Cut the bottom of the sheet to that length. Keep the original hem at the bottom if you can.
Step 3: Create the rod pocket.
Fold the top edge of the sheet down by 2 inches. Iron it flat. Fold it down another 2 inches. Iron again. You now have a 4-inch folded flap.
Step 4: Use the hem tape.
Slide a strip of iron-on hem tape inside the fold. Run your hot iron over the fabric for 10-15 seconds. The tape melts and sticks the fold in place. Congratulations, you just made a rod pocket.
Step 5: Slide the rod through.
Put your curtain rod through the pocket you just created. Hang it up.
Step 6: Admire your work.
That’s it. Fifteen minutes. You have curtains. They cost you $4 and a little bit of ironing.
I made these for my daughter’s room. She wanted “rainbow boho.” I found a vintage sheet with faded rainbow stripes. The no-sew rod pocket took ten minutes. She thinks I am a wizard.
Project 2: The Boho Tassel Hem (Adds $100 of Value in 30 Minutes)
This is the project that makes people gasp. A plain floral sheet with a tassel hem looks like something from a $400 Anthropologie catalog.
Best for: Adding instant “expensive” energy to basic curtains.
What you need:
- One finished curtain panel (from Project 1 or store-bought)
- Embroidery floss or thin yarn in a matching or contrasting color
- A large needle with a big eye
- Scissors
- A ruler
Step-by-step:
Step 1: Prepare your tassels.
Cut a piece of cardboard about 4 inches wide. Wrap your embroidery floss around the cardboard 20-30 times. Slide the loops off the cardboard. Cut a small piece of floss and tie it tightly around the top of the loops. Cut the bottom loops open. You now have a tassel. Make 20-30 of these.
Side note: You can also buy pre-made tassels on Amazon for $5 for a pack of 20. I won’t tell anyone.
Step 2: Mark your spacing.
Use a ruler to mark where each tassel will go along the bottom hem of your curtain. Space them 2-3 inches apart. Use a fabric pen or a piece of chalk.
Step 3: Attach the tassels.
Thread your needle with a piece of embroidery floss. Push the needle through the bottom hem of the curtain from the back to the front. Loop it through the top knot of your tassel. Push the needle back through the hem. Tie a knot. Trim the excess.
Step 4: Repeat.
Attach all your tassels. This takes time but it’s mindless. Put on a podcast. Drink some wine. Enjoy the rhythm.
Step 5: Hang and enjoy.
Every time a breeze blows, the tassels will dance. It is so charming. I did this on a pair of plain white sheets (from the thrift store, $4 each) and they look exactly like the $150 tassel curtains at Urban Outfitters.
Project 3: The ‘Scalloped Edge’ Curtain for Cottage Vibes
Scalloped edges are everywhere right now. They are soft. They are feminine. They are surprisingly easy to make.
Best for: Cottagecore, farmhouse, or romantic bedrooms.
What you need:
- One finished curtain panel
- A small bowl or cup (for tracing the scallop curve)
- A fabric pen or chalk
- Scissors
- A sewing machine (or a lot of patience with hand sewing)
Step-by-step:
Step 1: Trace your scallops.
Lay your curtain flat. Along the bottom edge, use your bowl to trace half-circles. Each scallop should be about 3-4 inches wide. Trace them all the way across.
Step 2: Cut carefully.
Cut along your traced lines. You are cutting the bottom edge of the curtain into a wavy scalloped shape.
Step 3: Hem the scallops.
This is the tricky part. You need to fold the raw edge of each scallop under by half an inch and sew it down. A sewing machine makes this fast. Hand sewing takes longer but is totally doable. Just use a small running stitch.
Step 4: Iron the edges.
Iron each scallop flat. This gives them a crisp, professional look.
Step 5: Hang them up.
The scalloped edge will create the most beautiful shadow line on your floor. It’s incredibly romantic.
I made these for my own bedroom using a vintage sheet with tiny roses. Every morning when I wake up, I feel like I live in a cottage in the English countryside. I do not. I live in a suburb. But the curtains help.
The ‘Visible Mending’ Trend: How to Turn a Hole in Your Sweater Into a $100 Art Piece
Project 4: Layered Sheer + Floral (The Anthropologie Dupe)
Anthropologie sells layered curtains for $200+ per panel. They have a sheer inner layer and a printed outer layer. It’s gorgeous.
You can make the exact same thing for $10.
Best for: Living rooms, master bedrooms, anywhere you want drama.
What you need:
- One flat sheet in a sheer or lightweight fabric (a white or cream sheet works perfectly)
- One flat sheet in a floral or patterned fabric
- Curtain rings with clips (amazon: $10 for 20 rings)
- Two curtain rods (or one double rod)
Step-by-step:
Step 1: Prep both sheets.
Hem both sheets to the same length using the no-sew rod pocket method from Project 1. Or leave them unhemmed and use clip rings (even easier).
Step 2: Use clip rings.
This is the secret. Curtain rings with little alligator clips cost almost nothing. You clip them directly to the top edge of the sheet. No sewing. No rod pocket.
Step 3: Layer them.
Hang the sheer sheet on the back rod (closer to the window). Hang the floral sheet on the front rod (closer to the room). Or use clip rings on the same rod—put the sheer sheet on the rings first, then the floral sheet on the same rings. They will layer beautifully.
Step 4: Adjust for fullness.
Pull the floral sheet to one side. Let the sheer sheet show. Or keep them both fully closed. The layered look creates depth and texture.
The result:
The sheer sheet softens the light. The floral sheet adds pattern. Together, they look like you spent a fortune. You spent $8 on two thrift store sheets.
I have these in my living room. The sheer sheet is from a white cotton pillowcase set (I cut the pillowcases open and sewed them together—easy). The floral sheet is a 1970s daisy print. My neighbor asked if I hired a decorator.
Why I Never Throw Away Old Jeans: 5 Genius Ways to Turn Them Into ‘Anthropologie’ Style Decor
Project 5: The Duvet-to-Curtain Transformation (For Extra-Long Windows)
Do you have extra-long windows? Floor-to-ceiling? A sliding glass door? A standard flat sheet might not be long enough.
But a duvet cover? A duvet cover is huge.
Best for: Sliding glass doors, patio doors, tall windows, or when you want dramatic floor-length curtains.
What you need:
- One duvet cover (thrift store, $5-10)
- Scissors
- Sewing machine or iron-on tape
- Curtain rings with clips
Step-by-step:
Step 1: Cut the duvet cover apart.
A duvet cover is two giant sheets sewn together. Cut along the seams to separate them into two large rectangles. Congratulations, you now have two curtain panels.
Step 2: Trim to size.
Measure your window. Cut the duvet rectangles to the correct width. Keep the original finished edges wherever possible.
Step 3: Hem the cut edges.
Use iron-on hem tape or a sewing machine to finish any raw edges.
Step 4: Hang with clip rings.
Because duvets are heavy, use strong clip rings. Clip them every 4-5 inches along the top edge.
Step 5: Enjoy your dramatic curtains.
Duvet curtains are heavy. They hang straight. They block light beautifully. They feel luxurious.
I made these for my sliding glass door using a vintage floral duvet cover. The pattern is enormous—giant peonies. It’s too much for a bed. But on a sliding door? It’s perfect. Dramatic. Bold. My house looks like a magazine.
How to Hang Vintage Sheet Curtains Without Looking Cheap
The curtains are cheap. But they shouldn’t look cheap. Here is how to style them.
Use a nice curtain rod.
A brass rod. A black iron rod. A wooden rod with finials (the little balls on the ends). A $10 rod from Walmart looks fine. A $2 plastic rod from the dollar store looks terrible. Spend $15 on a decent rod. It makes all the difference.
Hang them high.
Do not hang your rod right above the window frame. Hang it 4-6 inches above the frame. This makes your ceilings look taller and your windows look bigger. It’s a rental-friendly trick that works every time.
Let them kiss the floor.
Curtains should just touch the floor. Not hover an inch above (that looks like you messed up the length). Not puddle on the floor (that’s a trip hazard and collects dust). Just a gentle kiss. Measure twice, cut once.
Iron your sheets.
I know. I said I don’t iron. But for curtains? Iron them. Wrinkled sheets look like wrinkled sheets. Smooth sheets look like linen curtains. Take the 10 minutes. Your windows will thank you.
Add a tie-back.
Use a piece of ribbon, a leather strap, or even a silk scarf to pull your curtains to the side during the day. It adds another layer of boho texture.
The $10 Tool Kit You Need (Mostly Things You Already Own)
You do not need a craft room full of supplies. Here is everything.
The absolute basics (you already own these):
- Scissors (kitchen scissors are fine)
- An iron (you own an iron, right? please say yes)
- A measuring tape or a ruler
- A flat surface (floor, table, bed)
The $10 shopping list (one-time purchases):
- Iron-on hem tape / Stitch Witchery ($3)
- Curtain rings with clips ($10 for 20 rings on Amazon)
- A pack of embroidery floss for tassels ($2)
The nice-to-haves (if you want to get fancy):
- A sewing machine (check your local library—some lend them!)
- Fabric scissors (sharp ones, $8 at Joann Fabrics with a coupon)
- A fabric pen or chalk ($2)
Total investment if you buy everything new: $25.
Total investment if you use what you have: $0.
You cannot beat free. And you cannot beat $4 curtains.
Stop Getting Scammed! How to Spot ‘Fake Sales’ at Kohls and TJ Maxx
Frequently Asked Questions (FAQ)
Q: Won’t my curtains look like I hung a bedsheet over my window?
Only if you use a sheet with a giant “80% cotton 20% polyester” tag still attached. Remove the tags. Iron the sheet. Hang it properly. I have had sheets hanging in my house for two years and not a single person has ever said “hey, those are sheets.” They say “I love your curtains.”
Q: What about light blockage? Do sheets block enough light?
A cotton sheet is sheer to medium-light blocking. If you want total blackout curtains, you need to line them. Here is the hack: Buy a cheap blackout curtain panel (Walmart has them for $10). Sew or clip it to the back of your sheet. Now you have the pretty pattern on the front and total darkness on the back.
Q: Can I wash my sheet curtains?
Yes. They are sheets. They were literally made to be washed. Throw them in the washing machine on cold. Dry on low. Iron them while they are still slightly damp. Do this every few months to keep them fresh.
Q: What if my sheet has a stain I can’t remove?
Cut around it. Use the clean parts of the sheet. Or embrace it as “character.” A small, faint stain on a curtain is barely visible. If it bothers you, use that part for the top or bottom hem where it will be folded over.
Q: I don’t have a sewing machine. Are these projects still possible?
Yes. Every single project in this article can be done with iron-on hem tape and clip rings. I have made all of them without a sewing machine. The tape is surprisingly strong. It survives washing machines. I have never had a hem come undone.
Q: How many sheets do I need per window?
For a standard window (36-48 inches wide), one queen flat sheet makes one panel. You want two panels (one for each side), so you need two sheets. For a wide window or sliding door, use king sheets or duvet covers.
Q: Can I dye my vintage sheets to a different color?
Yes! Rit dye is $3 at the grocery store. A white sheet with a faded floral pattern can be dyed sage green or rust orange. The flowers will absorb the dye differently than the background, creating a tonal, moody effect. It’s beautiful. Test a small corner first.
Q: My vintage sheet smells like thrift store. How do I fix that?
Wash it with hot water, a cup of white vinegar in the rinse cycle, and a half cup of baking soda in the wash. Then dry it in the sun. Sunlight is a natural deodorizer. If it still smells, do it again. Stubborn smells might need a soak in oxygen bleach (OxiClean) for 24 hours.
Q: I found a sheet I love but it’s a fitted sheet. Can I still use it?
Fitted sheets have elastic corners. Cut the elastic off. Cut the corners so the sheet becomes a flat rectangle. You will lose some fabric in the corners, but you can still get a good panel from a fitted queen or king sheet. Just check the dimensions before you buy.
Q: What’s the best curtain rod for sheet curtains?
A simple metal rod with clip rings. The clip rings grip the fabric without any sewing. You can find a set of rods and rings for $15-20 on Amazon or at Target. IKEA has great budget options. Do not use a tension rod for heavy curtains—they will fall.
Q: My windows are weird sizes. Can I still do this?
Absolutely. That’s the beauty of making your own curtains. You cut the sheet to exactly the size you need. Too wide? Cut it narrower. Too short? Use a duvet cover or sew two sheets together (a straight line of stitching, very easy). Custom-sized curtains from a store cost a fortune. You can make them for $4.
The Window That Changed Everything
There is a window in my living room that faces the street. For three years, it had those sad beige curtains. The ones that looked like a dentist’s office.
I walked past that window every single day. I never really looked at it. It was just… there.
The day I hung my first pair of vintage sheet curtains—the dusty pink roses on cream—I stood in front of that window for five minutes. Just staring. The sun was coming through the fabric, turning the whole room soft and pink and warm. The tassels I had added at the bottom swayed in a tiny breeze from the heating vent.
My three-year-old ran up to me and said, “Mama, the window is pretty now.”
That was it. No “I love you, Mama.” No “great job.” Just “the window is pretty now.”
And you know what? That was enough.
That window is pretty now. And it cost me $7 and a Saturday afternoon.
Your windows can be pretty too. You don’t need $300. You don’t need a decorator. You don’t need a sewing machine or fancy skills.
You just need a thrift store, a pair of scissors, and the willingness to see a bedsheet as something more.
Go find your sheets. Go make your curtains. And every time the sun comes through them, remember: you did that. With your own hands. For almost nothing.
That’s not frugal. That’s magic.
This article was written in a living room with four pairs of vintage sheet curtains, three thrift store lamps, and absolutely zero shame about any of it.
Proudly published by The Frugal Glow — where we believe that the most beautiful homes aren’t the most expensive ones. They’re the ones made with patience, creativity, and a willingness to see treasure where other people see thrift store castoffs. Keep glowing. Keep creating. And for the love of all that is holy, stop buying new curtains.