The $85 hoodie was sitting in my online cart. It was black with a subtle, faded, almost acid-washed tie-dye pattern. It looked expensive. It looked like something a stylist would pull for a photo shoot.
Then I looked at the product description. It was 100% cotton. It was dyed black. And the “designer” pattern was created using a bleaching process.
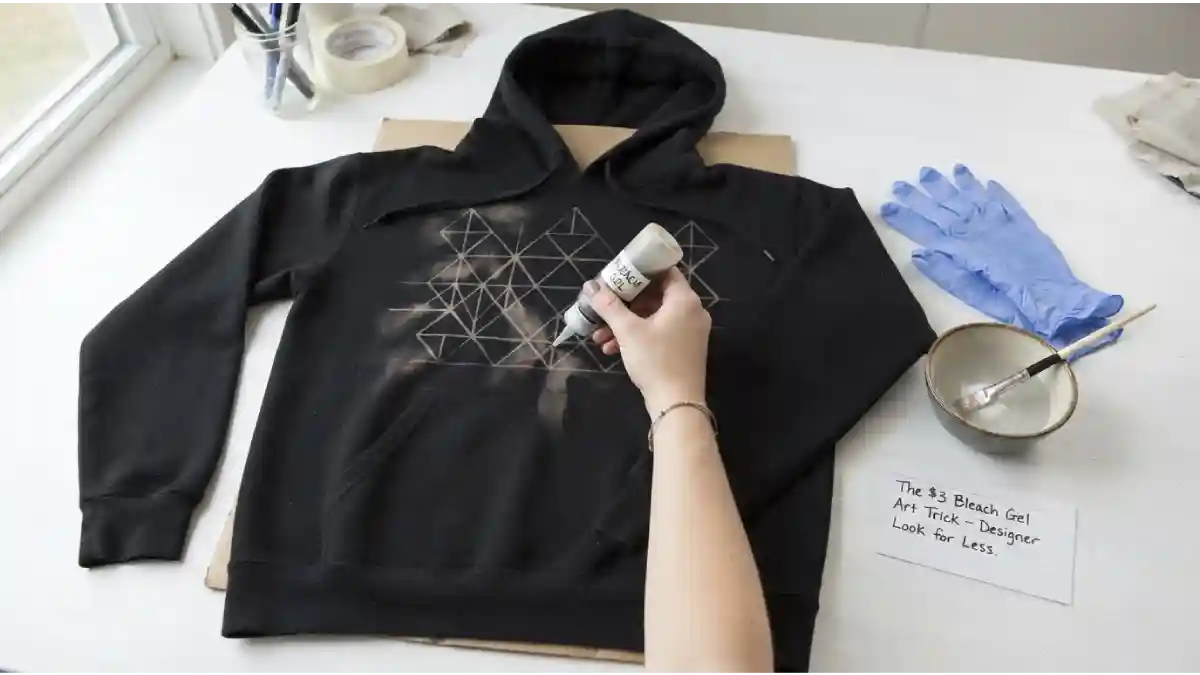
I closed the tab. I went to the store. I bought a plain black hoodie for $12. I went home, mixed up a batch of homemade bleach gel using cornstarch and chlorine bleach, drew on the hoodie, and created a piece that looked almost identical to the $85 version.
That was three years ago. I’ve been doing this ever since. I’ve transformed plain t-shirts, jeans, and hoodies into pieces that look like they came from a high-end boutique. And I’ve saved hundreds of dollars.
This is the complete guide to the $3 bleach gel art trick. The technique. The patterns. The mistakes. And why you should never, ever pay $85 for a hoodie that was just a bleach stain.
Jump Links
- The $85 “Designer” Hoodie That Was Just a Bleach Stain
- Why DIY Bleach Gel Works (And Why It’s Better Than Liquid Bleach)
- How to Make Your Own Bleach Gel Pen (For Under $3)
- What You Actually Need (For Under $5)
- The Prep Work: Setting Up Your Workspace
- Step-by-Step: The Bleach Gel Art Technique
- 3 Designer-Inspired Patterns You Can Actually Draw
- How to Neutralize the Bleach (The Crucial Step)
- How to Wash and Care for Your New Hoodie
- My Biggest Mistakes (So You Don’t Make Them)
- The Math: What I Saved in One Year
- Frequently Asked Questions (FAQ)
- Final Thoughts: Your Closet Is a Canvas
The $85 “Designer” Hoodie That Was Just a Bleach Stain
Let me explain how the fashion industry creates the “distressed” look that sells for $85.
The technique: Designers take a plain black garment (usually cotton) and apply bleach to specific areas. The bleach removes the black dye, revealing the natural color of the cotton underneath. The result is a faded, mottled, tie-dye effect that looks intentional and expensive.
The markup: The garment costs $12 to manufacture. The bleaching process costs maybe $2 in materials and labor. The brand charges $85 because the pattern looks unique and “designer.”
The reality: You can do the exact same thing at home for $3. And you have complete control over the pattern, the intensity, and the placement. You’re not limited to what the brand decided to produce.
What a fashion designer told me: “The distressed, bleached look is one of the easiest effects to create at home. It’s just bleach on cotton. The expensive part is the marketing, not the technique.”
Why DIY Bleach Gel Works (And Why It’s Better Than Liquid Bleach)
You might be wondering why you need a gel instead of a bottle of liquid bleach.
The difference: Liquid bleach is thin and uncontrollable. It spreads. It bleeds. It creates a mess. A bleach gel has a thicker formula that stays where you put it. You can draw precise lines, dots, and patterns. You have control.
The control factor: A bleach gel lets you create fine lines, intricate patterns, and intentional designs. Liquid bleach creates a random, splattered, chaotic effect. If you want the “designer” look, you need the control of a gel.
The safety factor: Working with a gel is less hazardous than working with liquid bleach. It’s easier to handle, less likely to splash, and easier to store. You still need to be careful, but the risk is lower.
What a DIY expert told me: “Homemade bleach gel is the best-kept secret in DIY fashion. It gives you the precision of a marker with the power of bleach. It’s the perfect tool for creating intentional patterns.”
How to Make Your Own Bleach Gel Pen (For Under $3)
Since commercial bleach pens have become hard to find (many have been discontinued), making your own is the most reliable and cheapest option. Here’s the recipe.
What you need:
| Ingredient | Amount | Cost |
|---|---|---|
| Cornstarch | 1 tablespoon | $0.10 |
| Cold water | 1/2 cup | $0.00 |
| Chlorine bleach (standard household bleach) | 1/4 cup | $0.50 |
| A small squeeze bottle or an empty (clean) glue stick container | 1 | $1.00 |
| Total | ~$1.60 |
Instructions:
- In a small saucepan, whisk the cornstarch into the cold water until it’s completely dissolved.
- Heat the mixture over low heat, stirring constantly, until it thickens into a translucent gel. This should take about 2-3 minutes. Remove from heat and let it cool completely.
- Once the gel is cool, slowly stir in the bleach. Mix well.
- Transfer the mixture to your squeeze bottle or cleaned glue stick container. Use a funnel if needed.
Safety note: Always wear gloves when handling bleach. Work in a well-ventilated area. Never mix bleach with ammonia or other cleaning products.
What a crafter told me: “Making your own bleach gel is so easy and cheap. You can make a batch for less than the price of a coffee, and it gives you complete control over the thickness and strength.”
What You Actually Need (For Under $5)
You probably already have most of what you need.
Essential items:
| Item | Cost |
|---|---|
| Homemade bleach gel (see recipe above) | $1.60 |
| Plain black hoodie (100% cotton) | $12 |
| Cardboard or a plastic bag (to insert inside the hoodie) | $0 |
| Rubber gloves | $1 |
| Old towel or newspaper (to protect your workspace) | $0 |
| Total | ~$14.60 |
Why 100% cotton matters: Bleach works by removing color from natural fibers. It works well on cotton, linen, and rayon. It does not work on polyester, nylon, or synthetic blends. If your hoodie is a cotton-polyester blend, the bleach will only lighten the cotton fibers, creating a dull, uneven result. Always check the label and choose 100% cotton for the best results.
What a crafter told me: “The fabric content is the single most important thing. If you use a synthetic blend, the bleach won’t work the way you want it to. Stick with 100% cotton.”
The Prep Work: Setting Up Your Workspace
The prep work is just as important as the drawing. Bleach is a chemical. You need to protect yourself and your workspace.
Step 1: Protect your workspace. Cover your table or floor with newspaper, an old towel, or a plastic drop cloth. Bleach will permanently stain surfaces. Don’t skip this step.
Step 2: Insert a barrier. Slide a piece of cardboard or a plastic bag inside the hoodie. This prevents the bleach from bleeding through to the back of the hoodie. It also gives you a smooth, flat surface to draw on.
Step 3: Put on gloves. Bleach can irritate your skin. Wear rubber gloves. It’s not worth the risk of a chemical burn.
Step 4: Test the gel. Before you draw on the hoodie, test the bleach gel on an inconspicuous area (like the inside hem). This lets you see how the bleach reacts with the fabric and how fast it works.
Step 5: Plan your design. Don’t just start drawing. Use a piece of paper to sketch your design. Decide where you want the pattern. Mark the placement with chalk or a fabric marker.
Step-by-Step: The Bleach Gel Art Technique
Here’s the exact process I use. It takes about 30 minutes to set up and 1-2 hours to complete, depending on the complexity of the design.
Step 1: Lay the hoodie flat.
Lay the hoodie flat on your protected workspace. Smooth out any wrinkles. The cardboard or plastic should be inside the hoodie.
Step 2: Draw your design.
Using your homemade bleach gel pen, draw your design. Apply gentle, steady pressure. The gel should flow smoothly. Don’t squeeze too hard—you’ll get a blob of bleach instead of a line.
Step 3: Work in sections.
If you’re doing a complex pattern, work in sections. Start with the front, then move to the sleeves, then the back. This ensures even application and prevents the bleach from drying unevenly.
Step 4: Let the bleach work.
The bleach needs time to react with the fabric. Depending on the strength of the gel and the darkness of the fabric, it can take 15 to 45 minutes to reach the desired lightness. Check the progress every 10 minutes.
Step 5: Blot (don’t rub).
If you need to remove excess bleach or stop the process, blot the area with a paper towel. Don’t rub—rubbing spreads the bleach and creates a smeared, chaotic effect.
Step 6: Rinse and neutralize.
Once the design is at the desired lightness, rinse the hoodie thoroughly with cold water. Then wash it with a neutralizing solution (see below).
3 Designer-Inspired Patterns You Can Actually Draw
Here are three patterns that look expensive and are easy to create with a bleach gel pen.
Pattern #1: The “Acid Wash” Splatter
This is the classic distressed look. Use the bleach gel pen to create random dots and short lines across the hoodie. Vary the size and spacing. The result is a mottled, faded, acid-washed effect that looks like it came from a high-end brand.
Pattern #2: The “Geometric” Line Art
This is the modern, minimal look. Use the bleach gel pen to draw straight lines, geometric shapes, or a grid pattern. The result is a structured, intentional design that looks like a designer collaboration. Focus on the sleeves or the chest area for maximum impact.
Pattern #3: The “Floral” Outline
This is the romantic, vintage look. Use the bleach gel pen to draw simple flower outlines, leaves, or vines. The result is a delicate, hand-painted effect. Don’t try to be perfect—the slight imperfections are what make it look authentic and expensive.
What a designer told me: “The best bleach gel designs are the ones that look intentional but not perfect. The slight variations and imperfections are what make it look like a high-end, handmade piece.”
How to Neutralize the Bleach (The Crucial Step)
This is the step most people skip, and it’s the most important one. If you don’t neutralize the bleach, it will continue to eat away at the fabric over time. Your hoodie will develop holes and disintegrate.
The neutralizing solution: Mix one part hydrogen peroxide with three parts water. This stops the bleaching process and neutralizes the chemicals.
The process:
- Rinse the hoodie thoroughly with cold water to remove the bulk of the bleach.
- Soak the hoodie in the neutralizing solution for 10-15 minutes.
- Rinse again with cold water.
- Wash the hoodie with a gentle detergent in cold water.
- Air dry (do not put it in the dryer—the heat can set the bleach and damage the fabric).
What a crafter told me: “The neutralizing step is non-negotiable. If you skip it, the bleach will keep working. Your hoodie will look great for a week, then it will fall apart. Don’t skip it.”
How to Wash and Care for Your New Hoodie
Once your hoodie is neutralized and washed, here’s how to care for it so it lasts.
Wash it inside out. This protects the bleached design from friction and fading.
Wash in cold water. Hot water can damage the bleached areas and cause them to fray.
Use a gentle detergent. Harsh detergents can strip the color and weaken the fabric.
Air dry. The dryer can shrink the hoodie and damage the bleached fibers. Hang it or lay it flat to dry.
Avoid ironing the bleached areas. The heat can damage the weakened fibers. If you must iron, use a low setting and iron around the design.
What a crafter told me: “A well-cared-for bleach gel hoodie can last for years. The key is to treat it gently and avoid heat.”
My Biggest Mistakes (So You Don’t Make Them)
I made plenty of mistakes when I first started doing this. Learn from me.
Mistake #1: Using a synthetic blend.
My first attempt was on a cotton-polyester hoodie. The bleach only lightened the cotton fibers, creating a dull, uneven, patchy result. Always use 100% cotton.
Mistake #2: Not inserting a barrier.
I didn’t put cardboard inside the hoodie. The bleach bled through to the back, creating a mess. Always insert a barrier.
Mistake #3: Squeezing the pen too hard.
I squeezed the bleach gel pen too hard, creating a blob of bleach that spread and ruined the design. Apply gentle, even pressure.
Mistake #4: Not neutralizing the bleach.
I skipped the neutralizing step on my first hoodie. It looked great for a week, then it developed holes. Always neutralize.
Mistake #5: Rubbing instead of blotting.
I tried to rub off excess bleach with a paper towel. It smeared the design and created a chaotic mess. Blot, don’t rub.
Mistake #6: Not testing the gel first.
I started drawing on the hoodie without testing the gel. The bleach was stronger than I expected, and it lightened the fabric too much. Always test first.
Mistake #7: Expecting a “perfect” result.
Bleach gel art is not precise. The bleach spreads, the lines are uneven, and the result is always a little unpredictable. That’s what makes it look handmade and expensive. Embrace the imperfections.
The Math: What I Saved in One Year
Let me break down the actual dollars.
If I bought the $85 designer hoodie:
| Item | Cost | How Often | Annual Cost |
|---|---|---|---|
| Designer hoodie | $85 | Once | $85 |
What I actually spend:
| Item | Cost | How Often | Annual Cost |
|---|---|---|---|
| Plain black hoodie | $12 | Once | $12 |
| Homemade bleach gel | $1.60 | Once | $1.60 |
| Total | $13.60 |
Savings: $71.40
Over 5 years: $357
And I have a one-of-a-kind hoodie that I designed myself.
📌 YOU MIGHT ALSO LIKE:
The 10-Minute No-Sew Hack to Turn an Oversized Thrifted Blazer into a Chic Cropped Jacket
The Iron-On Hemming Tape Guide: How to Shorten Full-Length Dresses in 5 Minutes
Frequently Asked Questions (FAQ)
1. Does the bleach gel work on any color?
No. Bleach works by removing color, so it only works on dyed fabrics. It works best on black, navy, dark brown, and dark green. It won’t show up on white or light-colored fabrics.
2. Can I use liquid bleach instead of a bleach gel?
You can, but it’s harder to control. Liquid bleach spreads and bleeds, creating a random, messy effect. A bleach gel gives you the precision to create intentional designs.
3. How long does the bleach take to work?
It depends on the strength of the gel and the darkness of the fabric. It can take anywhere from 15 to 45 minutes. Check the progress every 10 minutes.
4. Do I need to neutralize the bleach?
Yes. If you don’t neutralize the bleach, it will continue to eat away at the fabric. Your hoodie will develop holes over time. Use a mixture of hydrogen peroxide and water to neutralize.
5. Can I do this on a hoodie with a graphic or a logo?
Yes, but be careful. The bleach will affect the graphic or logo, often fading it or altering its color. If the graphic is important to you, avoid applying bleach near it.
6. How do I wash a bleach-gel hoodie?
Wash it inside out in cold water with a gentle detergent. Air dry. Don’t put it in the dryer or iron the bleached areas.
Final Thoughts: Your Closet Is a Canvas
The $85 hoodie is sitting on a shelf somewhere. My $13.60 DIY hoodie is on my body. It’s one-of-a-kind. It’s comfortable. And I made it myself.
The $3 routine:
- Buy a 100% cotton black hoodie
- Make your own bleach gel (cornstarch + water + bleach)
- Insert a cardboard barrier
- Draw your design
- Let it react for 15-45 minutes
- Neutralize with hydrogen peroxide and water
- Wash and air dry
That’s it. A designer-quality hoodie for less than the price of a coffee.
I’ve been doing this for three years. My closet is full of one-of-a-kind pieces. My wallet is happy. And I’ve saved hundreds of dollars.
That’s not cheap. That’s smart.
That’s the frugal glow. And it’s waiting for you in your closet. 🖤💛
*For more DIY fashion tutorials, budget style strategies, and money-saving wardrobe guides, visit The Frugal Glow.*