The wool sweater was sitting in my donation pile. It was beautiful—a thick, cable-knit cream sweater that I had worn for years. But the elbows had worn thin, and there was a small hole near the collar. I couldn’t wear it anymore, but I couldn’t bring myself to throw it away.
Then I saw a video on TikTok of someone turning an old sweater sleeve into a pair of mittens. It looked simple. It looked cozy. And it looked like something I could actually do without a sewing machine.
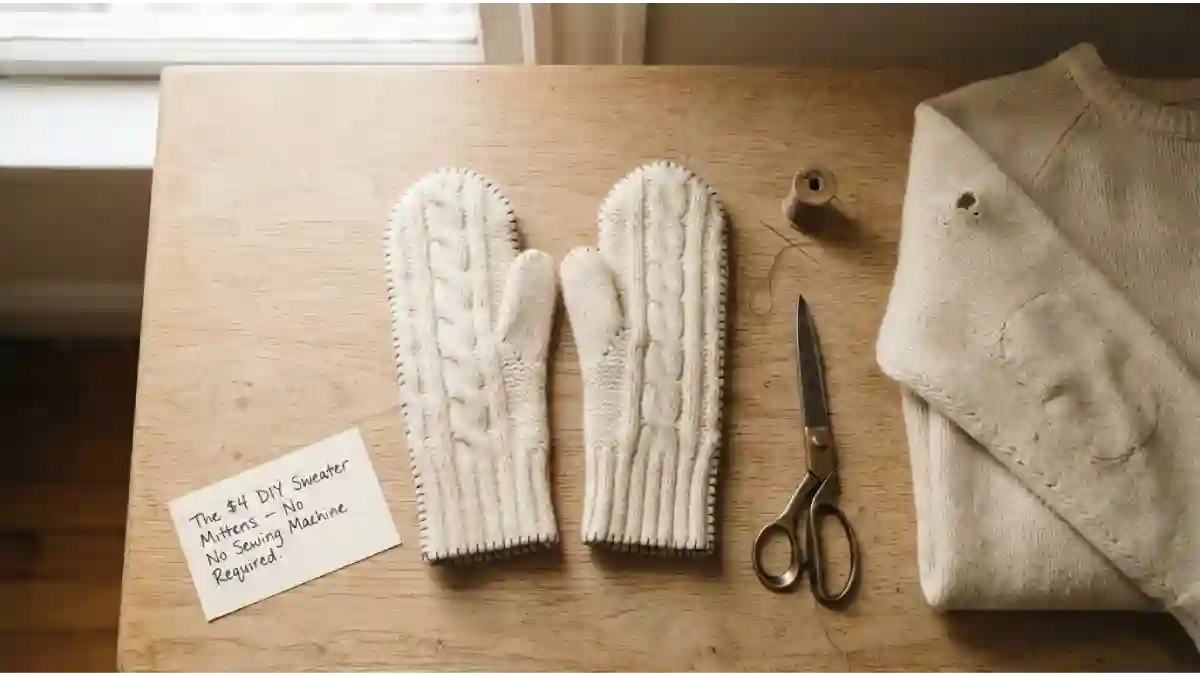
I pulled the sweater out of the donation pile. I cut off the sleeves. I followed the tutorial. And an hour later, I had a pair of thick, warm, one-of-a-kind mittens that looked like they came from a boutique.
That was three years ago. I’ve been making mittens from old sweaters ever since. I’ve made them for myself, for friends, and for family. I’ve saved hundreds of dollars on winter accessories. And I’ve kept perfectly good wool out of landfills.
This is the complete guide to turning worn sweater sleeves into cozy DIY winter mittens. The technique. The no-sew version. The mistakes. And why you should never, ever throw away an old sweater again.
Jump Links
- The Sweater That Almost Went in the Trash
- Why Sweater Sleeves Are Perfect for Mittens
- What You Actually Need (No Sewing Machine Required)
- Step-by-Step: How to Make Mittens from Sweater Sleeves
- The “No-Sew” Version (For People Who Hate Needles)
- How to Make Your Mittens Warmer (The Felt Lining Trick)
- Customizing Your Mittens (Cuffs, Thumb Holes, and Embellishments)
- My Biggest Mistakes (So You Don’t Make Them)
- The Math: What I Saved in One Year
- Frequently Asked Questions (FAQ)
- Final Thoughts: The Best Mittens Are the Ones You Made Yourself
The Sweater That Almost Went in the Trash
Let me describe the sweater and why it was the perfect candidate for this project.
The material: It was 100% wool. Thick, warm, and slightly felted from years of washing. The felting was actually a good thing—it made the fabric denser and more wind-resistant.
The condition: The body of the sweater was worn. The elbows were thin, and there was a small hole near the collar. But the sleeves were in perfect condition. They were thick, intact, and the cuffs were still snug.
Why it was perfect: The sleeves of a sweater are already shaped like mittens. They have a natural curve, a tapered end, and a finished cuff. All you have to do is cut them off, turn them inside out, and sew a simple seam. The cuff becomes the wrist of the mitten. The shoulder becomes the top.
What a crafter told me: “Sweater sleeves are the easiest upcycling project in existence. They’re already the right shape. You’re just closing one end and adding a thumb hole. Anyone can do it.”
Why Sweater Sleeves Are Perfect for Mittens
There are a few reasons why sweater sleeves make the best DIY mittens.
They’re already the right shape. A sleeve is a tube that tapers at the wrist and widens at the shoulder. When you cut it off and close the wide end, it becomes a mitten. The cuff is already finished, so you don’t have to hem it.
They’re warm. Sweaters are made of wool, cashmere, or thick cotton. These are the same materials used in expensive winter mittens. A felted wool sweater is especially warm because the fibers have matted together, creating a dense, wind-resistant fabric.
They’re free (or almost free). If you already have an old sweater, the cost is zero. If you buy a sweater from a thrift store specifically for this project, it costs $2 to $5. Compare that to $20 to $40 for a new pair of wool mittens.
They’re unique. Every sweater has a different pattern, color, and texture. Your mittens will be one-of-a-kind. No one else will have a pair exactly like yours.
What a crafter told me: “I’ve made mittens from cable-knit sweaters, Fair Isle sweaters, and even an old cashmere cardigan. They all turned out amazing. The pattern of the sweater makes the mittens look expensive.”
What You Actually Need (No Sewing Machine Required)
You don’t need a sewing machine to make these mittens. You can sew them by hand, or you can use the no-sew version (see below).
Essential items:
| Item | Cost |
|---|---|
| Old sweater (wool, cashmere, or thick cotton) | $0–$5 |
| Fabric scissors | $0 (already have) |
| Needle and thread (or embroidery floss) | $1 |
| Pins or clips | $0 (already have) |
| Chalk or a fabric marker | $0 (already have) |
| Total | ~$1–$6 |
Optional items:
| Item | Cost |
|---|---|
| Felt or fleece for lining | $2 |
| Fabric glue (for the no-sew version) | $3 |
| Buttons, patches, or embroidery thread for embellishment | $2 |
What to look for in a sweater: Wool, cashmere, or a wool blend is best. Avoid acrylic or polyester—they’re not as warm and they don’t felt as nicely. Check the label. If the sweater is at least 70% wool, it will work well.
What a crafter told me: “The best sweaters for this project are the ones that have already been felted in the wash. The fabric is denser and doesn’t unravel as easily.”
Step-by-Step: How to Make Mittens from Sweater Sleeves
Here’s the exact process I use. It takes about 45 minutes to an hour.
Step 1: Cut off the sleeves.
Lay the sweater flat on a table. Cut off both sleeves at the shoulder seam. Cut as close to the seam as possible to get the maximum length.
Step 2: Turn the sleeves inside out.
Turn each sleeve inside out so the seam is on the outside. This makes it easier to sew the mitten closed.
Step 3: Measure and mark the mitten length.
Put your hand flat on the sleeve. The cuff should sit at your wrist. The top of the sleeve should extend about an inch past your fingertips. Mark the spot with chalk or a fabric marker.
Step 4: Pin the top closed.
Fold the top of the sleeve (the wide end) so the two sides meet. Pin it closed. Make sure the curve of the sleeve matches the curve of your hand.
Step 5: Sew the top closed.
Using a needle and thread (or a sewing machine if you have one), sew a seam across the top of the mitten. Use a backstitch for strength. Trim any excess fabric.
Step 6: Create the thumb hole.
Try on the mitten. Mark where your thumb sits. Cut a small slit (about 1 to 1.5 inches long) at that spot. Be careful not to cut too far down—just enough for your thumb to fit through.
Step 7: Finish the thumb hole.
To prevent the thumb hole from unraveling, sew a simple blanket stitch around the edge. Or, if you prefer a cleaner look, fold the raw edge under and sew it down.
Step 8: Turn right side out.
Turn the mitten right side out. Try it on. Adjust the fit if needed.
Step 9: Repeat for the second mitten.
Repeat the process for the other sleeve. Make sure the thumb holes are on opposite sides (one for the left hand, one for the right).
What a crafter told me: “The thumb hole is the trickiest part. If you cut it too big, the mitten will feel loose. If you cut it too small, it will be uncomfortable. Start small and enlarge it gradually.”
The “No-Sew” Version (For People Who Hate Needles)
If you don’t want to sew, you can make these mittens with fabric glue. Here’s how.
Step 1: Cut off the sleeves and turn them inside out.
Same as the sewing version.
Step 2: Fold the top closed and apply fabric glue.
Apply a thick line of fabric glue along the top edge of the sleeve. Press the two sides together. Hold for 30 seconds.
Step 3: Clip and let dry.
Use binder clips or clothespins to hold the seam closed while the glue dries. Let it dry for at least 24 hours.
Step 4: Cut the thumb hole.
Same as the sewing version.
Step 5: Seal the thumb hole with glue.
Apply a thin line of fabric glue around the edge of the thumb hole. Let it dry completely. This prevents fraying.
What a crafter told me: “Fabric glue works, but it’s not as durable as sewing. If you plan to wear the mittens every day, sew them. If you’re making a quick pair for a costume or a gift, glue is fine.”
How to Make Your Mittens Warmer (The Felt Lining Trick)
If you live in a cold climate, you might want to add a lining. Here’s how.
Step 1: Cut a lining piece.
Lay the finished mitten on a piece of felt or fleece. Cut around the mitten, leaving a 1/4-inch seam allowance.
Step 2: Sew the lining closed.
Fold the lining in half and sew the top closed. Trim the excess.
Step 3: Insert the lining.
Turn the mitten inside out. Slide the lining inside the mitten. The lining should sit flat against the inside of the mitten.
Step 4: Sew the lining to the cuff.
Sew the lining to the inside of the cuff with a simple running stitch. This keeps the lining from sliding around.
Step 5: Turn right side out.
Turn the mitten right side out. The lining should be hidden inside.
What a crafter told me: “The lining makes a huge difference. It blocks the wind and adds an extra layer of warmth. It’s worth the extra 15 minutes.”
Customizing Your Mittens (Cuffs, Thumb Holes, and Embellishments)
Here are a few ways to make your mittens even better.
Add a fold-over cuff. If the sweater sleeve is too short, you can add a fold-over cuff made from the body of the sweater. Cut a rectangle, fold it in half, and sew it to the top of the mitten.
Add a button or patch. Sew a decorative button or a leather patch to the back of the mitten. It adds personality and covers any small imperfections.
Use contrasting thread. Instead of matching thread, use a bright color or a contrasting thread. It makes the handmade details stand out.
Make a matching hat. If you have enough sweater left, make a matching beanie. It’s the same process—cut, sew, and wear.
What a crafter told me: “The best part of DIY mittens is that you can make them exactly how you want them. Add a cuff, add a patch, add a lining. It’s your project.”
My Biggest Mistakes (So You Don’t Make Them)
I made plenty of mistakes when I first started making these. Learn from me.
Mistake #1: Cutting the sleeves too short.
My first pair was too short. The mittens didn’t cover my fingertips. Always measure before you cut. Leave an extra inch for the seam.
Mistake #2: Not turning the sleeve inside out before sewing.
I sewed the seam on the outside, and the raw edges were visible. Always turn the sleeve inside out before you sew.
Mistake #3: Cutting the thumb hole too big.
The thumb hole was too large, and my thumb kept slipping out. Start with a small slit and enlarge it gradually.
Mistake #4: Using a synthetic sweater.
My first attempt was with an acrylic sweater. It wasn’t warm, and the fabric didn’t felt nicely. Stick with wool or cashmere.
Mistake #5: Skipping the thumb hole finish.
The raw edge of the thumb hole unraveled after a few wears. Always finish the edge with a blanket stitch or fabric glue.
Mistake #6: Not making the thumb holes mirror each other.
I made both thumb holes on the same side. I ended up with two left mittens. Pay attention to which side you’re cutting.
Mistake #7: Expecting a perfect, store-bought look.
DIY mittens are not going to look like they came from a factory. They’re going to look handmade. That’s the point. Embrace the imperfections.
The Math: What I Saved in One Year
Let me break down the actual dollars.
If I bought new wool mittens:
| Item | Cost | How Often | Annual Cost |
|---|---|---|---|
| Wool mittens | $25 | Once | $25 |
What I actually spend:
| Item | Cost | How Often | Annual Cost |
|---|---|---|---|
| Old sweater (thrifted) | $3 | Once | $3 |
| Needle and thread | $1 | Once | $1 |
| Total | $4 |
Savings: $21
Over 5 years: $105
And I have a one-of-a-kind pair of mittens that I made myself.
📌 YOU MIGHT ALSO LIKE:
How to Shop the Nordstrom Anniversary Sale Without Early Access (and Still Get the Best Deals)
The Best Times to Shop Ulta & Sephora: A Calendar for Paying Less Than Full Price
Frequently Asked Questions (FAQ)
1. What kind of sweater works best for this project?
Wool, cashmere, or a wool blend works best. These fibers are warm, durable, and felt nicely. Avoid acrylic or polyester—they’re not as warm and they don’t felt as well. Check the label for at least 70% wool.
2. Do I need a sewing machine?
No. You can sew the mittens by hand with a needle and thread, or you can use the no-sew version with fabric glue. A sewing machine makes it faster, but it’s not required.
3. How do I make sure the mittens fit?
Measure your hand before you cut. The cuff should sit at your wrist, and the top of the mitten should extend about an inch past your fingertips. Try the mitten on before you finish the thumb hole.
4. What if the sweater is too thin?
If the sweater is thin, you can add a lining made of felt or fleece. This adds warmth and wind resistance. Alternatively, you can use two layers of sweater fabric.
5. Can I wash the mittens?
Yes, but gently. Hand wash in cold water with a mild detergent. Air dry. Don’t put them in the dryer—the heat can shrink the wool and damage the fibers.
6. Can I make these mittens from a sweater that’s not wool?
Yes, but the results will vary. Cotton sweaters work, but they’re not as warm. Synthetic sweaters don’t felt well and may not be as durable. Wool is the best choice.
Final Thoughts: The Best Mittens Are the Ones You Made Yourself
The wool sweater is still in my closet. It’s no longer a sweater. It’s a pair of mittens. They’re warm, they’re cozy, and they’re one-of-a-kind. And I made them from something that was about to go in the trash.
The $4 routine:
- Find an old wool sweater
- Cut off the sleeves
- Turn them inside out
- Sew the top closed
- Cut a thumb hole
- Finish the edges
- Turn right side out
That’s it. A pair of cozy winter mittens for less than the price of a coffee.
I’ve been making these for three years. My hands are warm. My wallet is happy. And I’ve saved hundreds of dollars.
That’s not cheap. That’s smart.
That’s the frugal glow. And it’s waiting for you in your closet. 🧤💛
*For more DIY fashion tutorials, upcycling ideas, and money-saving style guides, visit The Frugal Glow.*