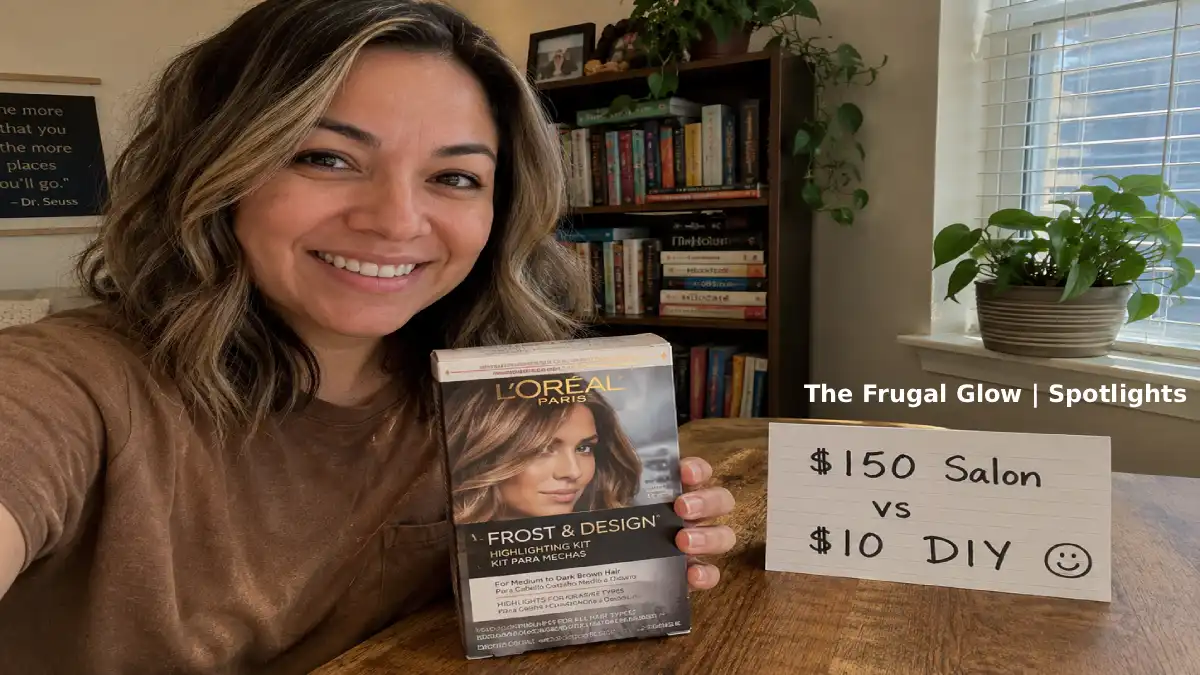
Spotlight: The Houston Teacher Who Replaced Her $150 Salon Visits with a $10 DIY Kit
You know that feeling when you leave the salon with fresh highlights, a perfect blowout, and a credit card receipt that makes you slightly nauseous? Jessica Martinez, a 34-year-old elementary school teacher from Houston, used to feel that every six weeks. $150 for partial highlights. $85 for a cut and style. $60 for toner. Plus tip. Plus the Uber because her salon didn’t have parking. She was spending nearly $3,000 a year on her hair. On a teacher’s salary. Something had to give.
Jump Links
- The Salon Receipt That Changed Everything
- Jessica’s Story: A Teacher on a Mission
- The $10 DIY Kit That Replaced Her $150 Salon Visit
- Step-by-Step: How She Does Her Own Highlights at Home
- The Learning Curve (It Wasn’t Perfect the First Time)
- The Math: What She Saved in One Year
- What About the ‘Professional’ Products? (She Found Dupes)
- The Confidence Factor: What Surprised Her Most
- Other Teachers Who Followed Her Lead
- Jessica’s Tips for First-Timers (From Someone Who Messed Up)
- Frequently Asked Questions (FAQ)
- Final Thoughts: You Don’t Need a Professional License to Save Money
The Salon Receipt That Changed Everything
Jessica didn’t plan to become a DIY hair person. She loved her salon. She loved her stylist. She loved the glass of wine and the scalp massage and the way she felt walking out with bouncy, perfectly-toned hair.
But on a Sunday evening in October 2025, she was scrolling through her banking app, trying to figure out why she was overdrafting again. And there it was. Six transactions from her salon over the past eight months. Total: $1,247. Not including tips.
“I literally started crying,” Jessica told me over Zoom, her third-grade classroom visible behind her. “I have student loans. I have a car payment. I’m trying to save for a down payment on a house. And I was spending almost as much on my hair as I was on groceries.”
That night, she went down a YouTube rabbit hole. “How to highlight your own hair.” “Cheap at-home hair color.” “DIY balayage for beginners.” Three hours later, she had watched seventeen videos and added $47 worth of products to her Amazon cart. Then she got scared and closed the tab.
The next day, she reopened the tab. Then she closed it again. This went on for two weeks.
Finally, she bought a $10 highlighting kit from CVS. Not a fancy one. Just the basic Frost & Glow cap and hook kit she remembered her mom using in the 90s. She figured she’d practice once. If it was a disaster, she’d never tell anyone.
It wasn’t a disaster. It wasn’t perfect. But it was passable. And it cost $10.
That was fourteen months ago. She hasn’t been back to a salon since.
Jessica’s Story: A Teacher on a Mission
Let me tell you more about Jessica.
She’s 34. She’s been teaching third grade in the Houston Independent School District for eleven years. She makes $54,000 a year. After taxes, healthcare, and pension contributions, her monthly take-home is about $3,200.
Her fixed expenses: rent ($1,200), student loan payment ($400), car payment ($300), car insurance ($120), phone ($80), utilities ($150), groceries ($400). That’s $2,650. She has about $550 left for everything else: savings, clothes, eating out, gifts, and yes, hair.
A $150 salon visit eats up nearly 30% of her discretionary spending for the month. Multiply that by six visits per year (every eight weeks), and she was spending $900 annually on color and cut. Add toner treatments ($60 every other visit), deep conditioning treatments ($30 add-on), and tips ($20 per visit), and the real number was closer to $1,400 per year.
“I did the math for the decade,” she said. “$14,000 on my hair. That’s a down payment on a small house in Houston. That’s a used car. That’s six months of my student loan payments. I couldn’t unsee it.”
So she decided to learn. Not to become a stylist. Just to become competent enough that she didn’t need to pay someone else for basic maintenance.
“I’m not doing anything fancy,” she emphasized. “I’m not balayaging or doing fashion colors. I’m touching up my highlights and trimming my split ends. That’s it.”
The $10 DIY Kit That Replaced Her $150 Salon Visit
Here’s exactly what Jessica bought at CVS for $10.37 (including tax):
The Kit: L’Oreal Paris Frost & Design Highlighting Kit – $9.99
What’s inside:
- Highlighting cap with perforated holes
- Metal hook (for pulling hair through)
- Powder lightener (bleach)
- Cream developer
- Plastic gloves
- Instruction booklet
- Conditioning treatment
The only other tools she needed (already owned):
- Old towel (to protect her shoulders)
- Hair clips (to section hair)
- Petroleum jelly (to protect her skin and hairline)
- Timer on her phone
- Handheld mirror (to see the back)
Total one-time investment: $10
Total cost per DIY session: $10 (the kit does one full head of highlights. She uses half for a touch-up and saves the rest in an airtight container for next time – so really about $5 per session.)
Compare that to her salon visit: $150 for partial highlights, plus toner, plus tip, plus Uber.
Savings per session: $140-$145
Step-by-Step: How She Does Her Own Highlights at Home
Jessica was kind enough to walk me through her exact process. She’s done it eleven times now. It takes her about an hour from start to finish.
Step 1: Preparation (10 minutes)
Put on an old t-shirt. Drape an old towel over her shoulders. Apply petroleum jelly along her hairline, ears, and neck to prevent skin staining. Brush her hair to remove tangles.
Step 2: Put on the cap (5 minutes)
The cap is tight. It feels weird. She pulls it over her head like a swim cap and adjusts so the seams are centered.
Step 3: Pull hair through the holes (20 minutes)
This is the tedious part. Using the metal hook, she pulls small strands of hair through the holes in the cap. She only pulls through the sections she wants highlighted – the top and sides, not the underlayer. For a partial highlight, she uses about half the holes. For a full highlight, she uses more.
Pro tip from Jessica: “Start at the front where you can see what you’re doing. Leave the back for last and use a handheld mirror. It’s awkward at first. You get faster.”
Step 4: Mix the lightener (5 minutes)
The kit comes with powder and cream developer. She mixes them in the provided tray according to the instructions. The mixture should be creamy, not runny.
Step 5: Apply the lightener (10 minutes)
Using the brush from the kit (or a small paintbrush), she paints the lightener onto the hair strands sticking through the cap. She makes sure each strand is fully saturated but not dripping.
Step 6: Wait (15-30 minutes)
Processing time depends on her starting color and desired lightness. She checks after 15 minutes by wiping a little lightener off a strand. For her light brown hair, 20 minutes gives her honey highlights. 25 minutes gives her a lighter blonde.
Step 7: Rinse (10 minutes)
She gets in the shower, removes the cap, and rinses thoroughly with cool water. Then she uses the included conditioning treatment to restore moisture.
Step 8: Style as usual
She dries and styles her hair. No special steps.
“I messed up the timing the first time and left it on too long,” she admitted. “My highlights came out almost white. I looked like I was trying to be a pop star from 2002. It faded after a few washes, but I learned my lesson. Start with less time. You can always go darker or re-apply. You can’t un-lighten.”
The Learning Curve (It Wasn’t Perfect the First Time)
Jessica wants me to be very clear about something. Her first DIY highlight job was not salon quality.
“It was uneven,” she said. “Some strands were much lighter than others. I missed a few holes in the back. My roots didn’t blend perfectly.”
She wore her hair up for a week and told her coworkers she was trying a new style.
But by the third attempt, she had figured it out.
What improved:
- She learned which holes to pull through for a natural, face-framing look
- She got faster at pulling hair through (30 minutes → 15 minutes)
- She figured out the right processing time for her hair
- She learned to check the back with two mirrors
What she still struggles with:
- Getting perfectly even coverage on the crown of her head
- Matching the dimension of professional balayage (she doesn’t)
- Trimming her own hair (she still pays $20 for a dry cut at a budget salon every 3-4 months)
“I’m not trying to be a professional,” she said. “I’m trying to save money. And for that, good enough is actually good enough. Most people can’t tell. And the ones who can? They’re spending $150 I’m not spending.”
The Math: What She Saved in One Year
Let me break this down with actual numbers from Jessica’s first year of DIY.
Previous salon costs (per year):
| Service | Frequency | Cost per visit | Annual cost |
|---|---|---|---|
| Partial highlights | Every 8 weeks (6.5x/year) | $150 | $975 |
| Toner | Every other visit (3x/year) | $60 | $180 |
| Deep conditioning | Add-on (2x/year) | $30 | $60 |
| Tips (20%) | Every visit (6.5x/year) | $30 | $195 |
| Uber/Lyft (round trip) | Every visit (6.5x/year) | $25 | $162 |
| Total annual salon cost | $1,572 |
DIY costs (per year):
| Item | Frequency | Cost | Annual cost |
|---|---|---|---|
| Highlighting kit | 3 kits (each lasts 3-4 sessions) | $10 each | $30 |
| Petroleum jelly | 1 jar (already owned) | $0 | $0 |
| Old towel | Already owned | $0 | $0 |
| Total annual DIY cost | $30 |
Plus occasional professional cut: $20 every 4 months = $60 per year
New total annual hair cost: $90 per year
Total savings: $1,572 – $90 = $1,482 saved in the first year
“$1,482 is a car payment for four months,” Jessica said. “It’s a plane ticket to visit my sister. It’s Christmas presents for my whole family. That money was just disappearing into my hair before.”
What About the ‘Professional’ Products? (She Found Dupes)
Jessica was worried that drugstore bleach would ruin her hair. It didn’t. But she also upgraded a few things without spending much more.
Her current DIY kit (slightly better quality, still cheap):
- L’Oreal Paris Superior Preference box dye for touch-ups ($11 at Target)
- But she doesn’t use the box dye – she uses a separate highlighting cap and powder lightener from the brand “Wella” ($12 for powder, $10 for developer, both last 6-8 sessions)
Total upgraded kit cost: $22 for products that last half a year. That’s still $44 per year.
Her toner dupe:
Instead of professional salon toner ($60 per visit), she uses a purple shampoo ($12) and a blue depositing conditioner ($10). She leaves it on for 5 minutes every other wash. It neutralizes brass just like toner, at 1/6th the price.
Her deep conditioning dupe:
Instead of salon treatments ($30 add-on), she uses a drugstore hair mask ($6) plus coconut oil ($5) once a week. She mixes them together, applies to damp hair, leaves for 30 minutes, and rinses. Her hair feels just as soft.
Total annual product cost: $66 for everything – highlights, toner, deep conditioning.
Compare that to salon: $1,572 annually. The difference is staggering.
The Confidence Factor: What Surprised Her Most
When I asked Jessica what surprised her most about this journey, she didn’t say the money.
“The confidence,” she said. “Not from the hair. From doing it myself.”
She explained: “I’m a teacher. I spend my whole day telling my students they can do hard things. But I never applied that to myself. I thought ‘hair is for professionals.’ I thought I wasn’t capable. And then I did it. And it was fine. And now I feel like I can do anything.”
She’s not exaggerating. Since she started doing her own hair, she’s also:
- Learned to do her own gel nails ($8 at home vs $50 at salon)
- Started meal prepping instead of buying lunch ($20/week saved)
- Changed her own car air filter (saved $40)
- Fixed a leaky faucet with a YouTube video
“It’s domino effect,” she said. “Once you realize you don’t have to pay someone for every little thing, your whole life gets cheaper.”
Other Teachers Who Followed Her Lead
Jessica didn’t keep her new skill to herself. She told her coworkers. And some of them tried it too.
Ms. Davis, 4th grade: Was spending $200 on box braids every 6 weeks. Now does them herself with $25 worth of hair. Saves $1,400 per year.
Mr. Chen, 5th grade: Was getting a $35 fade every 2 weeks. Bought $40 clippers. Now cuts his own hair every week. Saves $870 per year.
Mrs. Rodriguez, kindergarten: Was getting $120 balayage touch-ups every 10 weeks. Tried Jessica’s highlighting cap method. Not perfect, but good enough. Saves $600 per year.
“I’m not saying everyone should do their own hair,” Jessica clarified. “Some people have complicated color or very fragile hair. See a professional if you need to. But for basic highlights on healthy hair? It’s not rocket science. It’s a cap and some bleach. You can learn.”
Jessica’s Tips for First-Timers (From Someone Who Messed Up)
Jessica made mistakes so you don’t have to. Here’s her advice for your first DIY highlight attempt.
Tip #1: Start with a partial highlight
Don’t do your whole head the first time. Focus on the top and front – the parts people see. If you mess up the back, nobody will notice.
Tip #2: Do a strand test first
Clip a small section of hair from underneath, apply the lightener, and time it. See how long it takes to reach your desired lightness. Write that number down.
Tip #3: Use a timer. Multiple timers.
Set one for the minimum time. Set another for the maximum. Check your hair every 5 minutes after the minimum.
Tip #4: Less is more
Pull through fewer strands than you think you need. You can always add more. You can’t remove too many highlights.
Tip #5: Don’t skip the petroleum jelly
Bleach stains skin. It also stains towels, shirts, and bathroom counters. Protect everything.
Tip #6: Have a backup plan
Keep a hat nearby. Or a headband. Or a bottle of dark temporary dye. If it turns out terrible, you can cover it until it fades or you can get a professional fix.
Tip #7: Watch multiple YouTube videos
Don’t watch just one. Watch five. Different people have different techniques. Find the one that makes sense for your hair type.
Tip #8: Accept that good enough is good enough
Your first attempt will not be salon quality. That’s fine. You’re saving $140. A slightly imperfect highlight job is worth $140.
How One Brooklyn Couple Saved $20,000 in a Year Without Quitting NYC Social Life
Frequently Asked Questions (FAQ)
1. Is it safe to bleach your own hair at home?
Yes, if you follow instructions and do a patch test first. The kits are designed for home use. The risks are uneven color, over-processing, and skin irritation. Do a patch test on a small skin area 48 hours before. Don’t leave bleach on longer than the instructions say. If you have very damaged or chemically treated hair, see a professional.
2. What if I mess up and my hair turns orange?
You have options. First, use purple or blue shampoo – it neutralizes orange tones. Second, wait two weeks and try again with a lower volume developer (20 volume instead of 30). Third, go to a salon for a color correction (costs $100-$200, still cheaper than a year of full-price salon visits). Fourth, dye over it with a darker shade. Orange is fixable. Don’t panic.
3. How long does a DIY highlight job take compared to the salon?
Jessica’s first attempt took 75 minutes (including fixing mistakes). Now she does it in 45 minutes. Her salon visits took 90 minutes (including waiting, processing, and styling). So DIY is actually faster.
4. Can I do this on curly or textured hair?
Yes, but it’s trickier. The cap method works better on straight or wavy hair. For curls, many DIYers use the “foilyage” method (painting bleach on individual curls and wrapping in foil). Watch videos specifically for curly hair before attempting. Consider a professional consultation first.
5. What about regrowth? How often do I need to touch up?
Jessica touches up her roots every 6-8 weeks, same as salon. But instead of re-bleaching all her highlights, she only bleaches the new growth (about 1/2 inch of root). She protects the already-lightened hair with conditioner before applying bleach.
6. Will DIY highlights damage my hair more than salon highlights?
Potentially, if you leave the bleach on too long or use too high a developer. But salon bleach can also damage hair. The chemical is the same. The difference is experience. Follow the instructions, time yourself, and use a lower volume developer (20 vol) for slower, gentler lightening. Jessica’s hair is healthy after 14 months of DIY.
7. What if I want fashion colors (pink, blue, purple)?
DIY is actually great for fashion colors. Bleach your hair (use the cap method or foil) to a pale yellow, then apply semi-permanent color from brands like Arctic Fox, Manic Panic, or Good Dye Young. Total cost: $30-50. Salon cost for the same: $200+. Many alternative-color enthusiasts do their own hair.
8. What tools do I need that aren’t in the kit?
Jessica recommends: petroleum jelly (to protect skin), a handheld mirror (to see the back), hair clips (to section hair), an old towel (to catch drips), and a timer. That’s it. Everything else comes in the kit.
Final Thoughts: You Don’t Need a Professional License to Save Money
Here’s what I want you to take away from Jessica’s story.
The beauty industry wants you to believe that you need professionals for everything. Hair. Nails. Skin. Eyebrows. Lashes. And for some things, you absolutely do. Complex color corrections? See a pro. Chemical treatments? See a pro. Medical skin concerns? See a derm.
But basic maintenance? Partial highlights on healthy hair? Touching up your roots? Trimming your split ends? These are not mysteries. They are skills. And skills can be learned.
Jessica is not special. She’s a busy third-grade teacher with no formal training. She learned from YouTube. She practiced on herself. She made mistakes. She got better. And she saved nearly $1,500 in her first year.
That’s not cheap. That’s smart.
So if you’re spending $150 every six weeks on highlights, ask yourself: what else could you do with that money? A vacation? Debt payment? Savings? A down payment?
Then ask yourself: could you learn to do it yourself? Probably yes.
Start small. Try once. Mess up. Learn. Try again.
That’s the frugal glow. And it looks great on Jessica. 💛
For more real-life frugal stories, money-saving tips, and honest beauty advice, visit The Frugal Glow.