

The Ice Dyeing Method: How to Give Plain White Basics a Luxury Designer Watercolor Look
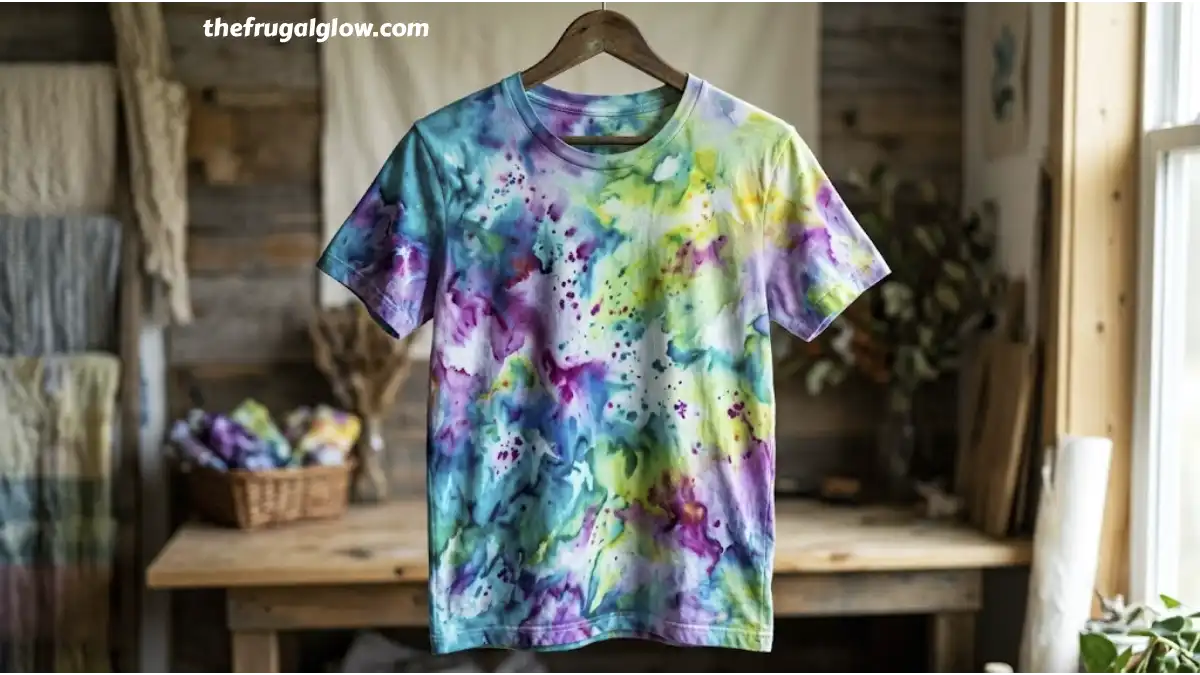
There’s a very specific look that shows up on $200+ designer tees and dresses: soft, blended watercolor patterns that seem to bleed naturally into each other, no two pieces ever exactly alike. It looks expensive because, on those racks, it usually is. What most people don’t realize is that the exact same effect — genuinely the same look, not a knockoff imitation — comes from a fabric dyeing technique you can do in your kitchen sink for the cost of a few packets of dye.
It’s called ice dyeing, and it’s about as close to “art meets laundry” as a DIY project gets. Instead of dunking fabric into a single flat color, you pile ice cubes on top of pre-treated fabric, sprinkle dye powder over the ice, and let it melt slowly over several hours. As the ice melts, the dye particles separate and travel down into the fabric at different rates, creating that soft, blended, unpredictable watercolor effect that looks like it belongs on a runway rather than a basement craft table.
Let’s get into exactly how this works, what you need, and how to do it so your results look intentional and gorgeous instead of muddy.
Jump Links
- Why Ice Dyeing Creates That Designer Watercolor Look
- What You’ll Need
- Choosing the Right Fabric and Garments
- Step-by-Step: The Full Ice Dyeing Process
- Fabric Folding Techniques and the Look They Create
- Color Combination Guide
- Dye Method Comparison Table
- Safety Precautions You Shouldn’t Skip
- Common Mistakes and How to Avoid Them
- Caring for Your Ice-Dyed Pieces Long-Term
- Styling Your Ice-Dyed Basics
- FAQ
- The Bottom Line
Why Ice Dyeing Creates That Designer Watercolor Look
Traditional tie-dye involves mixing dye with water first, then applying that pre-mixed liquid color directly to fabric. Ice dyeing flips that process on its head. Instead of pre-mixing a solid color, you apply dry dye powder directly onto ice sitting on top of the fabric, and as the ice slowly melts, the meltwater carries individual dye particles down into the fibers at different speeds and in different directions.
This matters because most fiber reactive dye colors — especially blacks, purples, and deep blues — aren’t actually a single pigment. They’re blends of multiple individual color components mixed together to create that final shade. When you apply these dyes as a liquid, all those components travel together and land as one uniform color. But when the dye hits melting ice instead, those individual color components separate out and travel at different rates, which is exactly the mechanism that produces the soft, blended, multi-tonal watercolor effect ice dyeing is known for. According to a dye manufacturer’s own ice dyeing guidance, applying dyes as a dry powder over ice allows the dye to separate into its component colors and strike the fabric at different rates, producing results that are surprising, always beautiful, and never quite the same twice.
That unpredictability is the entire appeal. No two ice-dyed pieces come out identical, which is precisely the “one of a kind, boutique-level” quality that makes designer watercolor pieces feel special in the first place — except here, you’re creating that same quality yourself, on a garment you already own.
What You’ll Need
- Plain white cotton basics (t-shirts, tank tops, tote bags, or even a plain cotton dress). Natural fibers are essential here — see the fabric section below for why.
- Fiber reactive dye powder (commonly sold as Procion MX, a name that’s become the generic term for this dye category much like how tissues are often called Kleenex). Available online or at craft stores.
- Soda ash (sodium carbonate) — this is the fixative that activates the dye and helps it bond permanently to natural fibers.
- A large bin, tote, or bucket for the soda ash soak.
- A plastic-coated wire shelf, salad spinner insert, or perforated tray to elevate the fabric above the container so melted ice water can drip through instead of pooling.
- A large tray or container to catch dripping water underneath the elevated fabric setup.
- A generous supply of ice (cubed ice works better than crushed for a more controlled melt).
- Rubber gloves to protect your hands from both the soda ash and the dye powder.
- A dust mask or respirator for safely handling dry dye powder and soda ash.
- Plastic sheeting or a disposable tablecloth to protect your workspace.
- Plastic wrap (optional, to loosely tent over the setup and slow evaporation).
Choosing the Right Fabric and Garments
This is the step people skip and then wonder why their results look faded or patchy. Fiber reactive dyes specifically bond to natural, cellulose-based fibers — cotton, linen, rayon, and hemp are the classic choices, along with protein fibers like silk and wool, which also respond well to this dye category.
What works well:
- 100% cotton t-shirts, tanks, and dresses
- Linen basics
- Rayon or viscose pieces
- Cotton tote bags, pillowcases, and canvas accessories
- Silk scarves (though these need a gentler touch)
What won’t work:
- Polyester or polyester-blend fabrics — synthetic fibers simply don’t bond with fiber reactive dye, so the color will mostly wash out
- Anything with a stain-resistant or water-repellent finish, which blocks dye absorption
- Blends with a high synthetic percentage (over roughly 20–35%), which will look noticeably faded compared to a pure natural fiber piece
Before you commit a favorite piece to this project, check the fabric content tag. A plain white 100% cotton tee from any basics line is the ideal, low-risk starting point if this is your first time trying the technique.
Step-by-Step: The Full Ice Dyeing Process
1. Pre-wash your fabric.
Wash your white basic with a mild detergent (no fabric softener, which leaves a coating that can block dye absorption). This removes manufacturing residue and any sizing that could prevent even dye uptake.
2. Mix your soda ash soaking solution.
Dissolve soda ash into warm water in your large bin — a common ratio is roughly one cup of soda ash per gallon of water, stirred until fully dissolved. This solution is what activates the chemical bond between the dye and the fabric fibers.
3. Soak the fabric.
Submerge your pre-washed garment fully in the soda ash solution and let it soak for 15 to 30 minutes, gently agitating occasionally so the solution reaches every part of the fabric evenly. This step is doing essential chemistry work — skipping it leads to duller, less permanent color.
4. Wring out excess liquid.
Remove the fabric and wring it out well. You want it damp, not dripping, since starting with pre-wetted fabric helps the dye penetrate evenly and blend the way it’s supposed to.
5. Arrange the fabric on your elevated tray.
Scrunch, twist, fold, or pleat the fabric (see the folding technique section below) and place it on your elevated wire rack or perforated tray, positioned over your catch container.
6. Cover the fabric completely with ice.
Pile ice generously over the entire piece of fabric. Don’t worry if it doesn’t reach every single edge perfectly — as the ice melts, the meltwater and dye will spread and absorb throughout the fabric regardless.
7. Sprinkle dye powder over the ice.
Wearing your gloves and mask, sprinkle your chosen dye powder (or combination of colors) directly onto the surface of the ice. Less is often more here — a light, uneven sprinkle across the ice creates a more organic, blended look than dumping dye in one concentrated spot.
8. Let the ice melt completely.
This is the waiting game, and it typically takes anywhere from a few hours to overnight depending on your ice quantity and room temperature. Resist the urge to rush this — the slow melt is exactly what creates the gradual, blended color transitions that make this technique special.
9. Let the fabric cure.
Once the ice has fully melted, let the fabric sit in its damp, dyed state for several more hours (many crafters recommend leaving it for 12 to 24 hours total) to give the dye ample time to fully bond with the fibers.
10. Rinse thoroughly.
Rinse the fabric under cool water first, then gradually increase the water temperature as the rinse water runs clearer, until it runs mostly clean. This removes excess, unbonded dye that hasn’t chemically attached to the fabric.
11. Wash separately.
Run the piece through a full wash cycle on its own (or with other newly dyed pieces only), using a mild detergent, to remove any last traces of loose dye before it has a chance to transfer onto other laundry.
12. Dry and admire.
Once washed, dry as usual and enjoy your one-of-a-kind, designer-looking watercolor piece.
Fabric Folding Techniques and the Look They Create
How you arrange the fabric before piling on the ice has a huge impact on the final pattern.
- Scrunching (bunching the fabric loosely into peaks and valleys): Creates an organic, all-over marbled watercolor look, with no repeating pattern — ideal for a soft, painterly effect.
- Accordion folding: Produces a more structured, pleated color pattern with visible repeated bands, closer to a traditional tie-dye stripe look but softer at the edges.
- Spiral twisting: Creates a classic swirled tie-dye pattern, but with the blended, watercolor-soft edges that only ice dyeing produces.
- Loose crumpling with a few large folds: A middle-ground option, giving some larger color “zones” with soft blended borders between them, closer to what most people picture as the designer watercolor effect.
For a first attempt aiming at that luxury watercolor look specifically, scrunching or loose crumpling tends to give the most reliably soft, high-end-looking results.
Color Combination Guide
Certain color pairings blend into each other more beautifully than others, especially once you factor in how fiber reactive dyes separate into component colors during the ice-melt process.
| Color Combination | Resulting Watercolor Effect | Best For |
|---|---|---|
| Soft blush pink + dusty lavender | Romantic, blended pastel wash | Dresses, feminine basics |
| Navy + teal + a touch of black | Deep, moody watercolor with tonal depth | Statement tees, elevated basics |
| Terracotta + mustard + soft cream | Warm, earthy, sunset-like blend | Fall/winter pieces |
| Sage green + soft yellow | Fresh, botanical watercolor look | Spring pieces, tote bags |
| Single deep color (like eggplant or forest green) | Tonal watercolor with light and dark variation from the same shade | Minimalist, monochrome pieces |
Sticking to two or three colors maximum tends to produce the cleanest, most “designer” looking result. More than that risks muddying together into a less intentional-looking brown or gray zone where the colors overlap most heavily.
📌 YOU MIGHT ALSO LIKE:
The ‘No-Sew’ Revolution: 5 Ways to Hem Your Thrifted Pants Using Only a $4 Tape
Dye Method Comparison Table
Ice dyeing is just one approach to fabric dyeing at home, and it’s worth understanding how it compares to other common methods before committing your basics to a project.
| Method | Pattern Style | Skill Level | Predictability | Best For |
|---|---|---|---|---|
| Ice dyeing | Soft, blended watercolor | Beginner-friendly | Low (intentionally unpredictable) | Designer watercolor looks, one-of-a-kind pieces |
| Traditional tie-dye (liquid dye) | Bold, defined patterns and rings | Beginner-friendly | Moderate to high | Classic bold tie-dye looks |
| Dip dyeing (ombré) | Gradual color fade in one direction | Beginner-friendly | High | Simple gradient effects |
| Shibori (folding/binding resist) | Geometric, structured patterns | Intermediate | High | Structured, repeatable patterns |
| Batik (wax resist) | Sharp-edged design areas | Advanced | High | Detailed, controlled designs |
Ice dyeing stands out specifically because its low predictability is the entire point — that built-in randomness is exactly what mimics the expensive, artisanal watercolor look this guide is aiming for.
Safety Precautions You Shouldn’t Skip
Fiber reactive dye and soda ash are both generally safe for home use, but a few precautions genuinely matter:
- Always wear gloves when handling soda ash and dye powder, since both can irritate skin with repeated or prolonged contact.
- Wear a dust mask or respirator specifically while sprinkling dry dye powder, since inhaling fine dye particles is the biggest safety concern in this entire process.
- Dedicate separate tools to dyeing. Any spoons, containers, or utensils used for mixing dye or soda ash shouldn’t return to food use afterward.
- Protect your workspace with plastic sheeting or a disposable tablecloth, since dye stains permanently on porous surfaces like unsealed countertops or wood.
- Work in a well-ventilated area, especially while handling dry powders.
- Keep dye and soda ash away from children and pets during the entire process, including the melting and curing phases.
Common Mistakes and How to Avoid Them
- Skipping the soda ash soak. Without it, dye may not adhere properly, leading to faded, washed-out colors that fade quickly with subsequent washes.
- Using polyester or heavily blended fabric. No amount of technique compensates for a fiber that fundamentally doesn’t bond with this type of dye.
- Dumping too much dye powder in one spot. This tends to create a solid, blobby patch instead of the gradual, blended transition that makes the technique look intentional.
- Rushing the melt or cure time. Both the melting ice and the post-melt curing period are doing essential chemical work; cutting either short generally results in duller, less vibrant color.
- Rinsing in hot water immediately. Starting the rinse in cool water and gradually warming it helps remove excess dye more effectively than jumping straight to hot.
- Forgetting to wash the piece separately the first several times, since loose, unbonded dye can transfer onto other laundry items in the wash.
Caring for Your Ice-Dyed Pieces Long-Term
- Wash separately for the first several washes, even after the initial post-dye wash, since a small amount of loose dye can continue to rinse out over the first few laundry cycles.
- Use cold water and a mild detergent for ongoing care, which helps preserve color vibrancy over time.
- Avoid excessive sun exposure while drying, since direct sunlight can gradually fade dyed fabric faster than shade-drying or machine drying.
- Skip fabric softener, which can create a coating that dulls the appearance of dyed fabric over repeated washes.
Styling Your Ice-Dyed Basics
- Let the piece be the statement. Since the watercolor pattern is inherently eye-catching, pair it with simple, solid-color bottoms like plain jeans or neutral trousers.
- Layer under a plain blazer or cardigan for a look that feels elevated rather than overtly “craft project.”
- Accessorize with simple, neutral jewelry rather than bold statement pieces, letting the fabric’s color do the visual work.
- Pair with neutral shoes (white sneakers, tan sandals, or simple flats) so the outfit doesn’t compete with the piece’s built-in color complexity.
FAQ
Can I ice dye a shirt that’s already a color, not just white?
Yes, though the results will layer over the existing color rather than starting from a blank slate. Light or pastel-colored garments work best for this, since dark existing colors will largely mask the new dye.
Do I need special dye, or can I use regular fabric dye from the craft store?
Fiber reactive dye (often labeled Procion MX) is specifically what creates the separated, blended watercolor effect ice dyeing is known for. Standard all-purpose fabric dyes generally aren’t formulated the same way and won’t produce the same result.
How long does the whole ice dyeing process take from start to finish?
Realistically, plan for a full day. The soda ash soak takes 15 to 30 minutes, the ice needs several hours to fully melt, and the fabric benefits from an additional curing period of up to 24 hours before rinsing for the most vibrant, long-lasting color.
Is it normal for the color to look different once it’s rinsed and dry compared to when it’s wet?
Yes, very normal. Fabric almost always looks more intensely saturated while wet, and the color settles into its true, slightly lighter final shade once it’s rinsed, washed, and fully dried.
Can I reuse the soda ash solution for future projects?
Yes, the soda ash soaking solution can typically be saved and reused for future dyeing sessions, making the overall cost of repeated projects even lower over time.
Will ice dyeing work on synthetic fabric like polyester?
No, fiber reactive dyes bond specifically with natural, cellulose-based fibers like cotton, linen, and rayon. Polyester and other synthetic fibers won’t hold the dye properly, resulting in a mostly washed-out result after laundering.
The Bottom Line
That soft, blended, designer-boutique watercolor look isn’t locked behind a high price tag — it’s a chemistry trick you can recreate at home with ice, dye powder, and a plain white basic you already own. Prep the fabric properly, let the ice melt slowly, and give the dye time to cure, and you’ll end up with a genuinely one-of-a-kind piece that looks like it belongs on a much pricier rack.
For more budget-friendly DIY fashion projects and upcycling ideas, check out more posts over at The Frugal Glow.