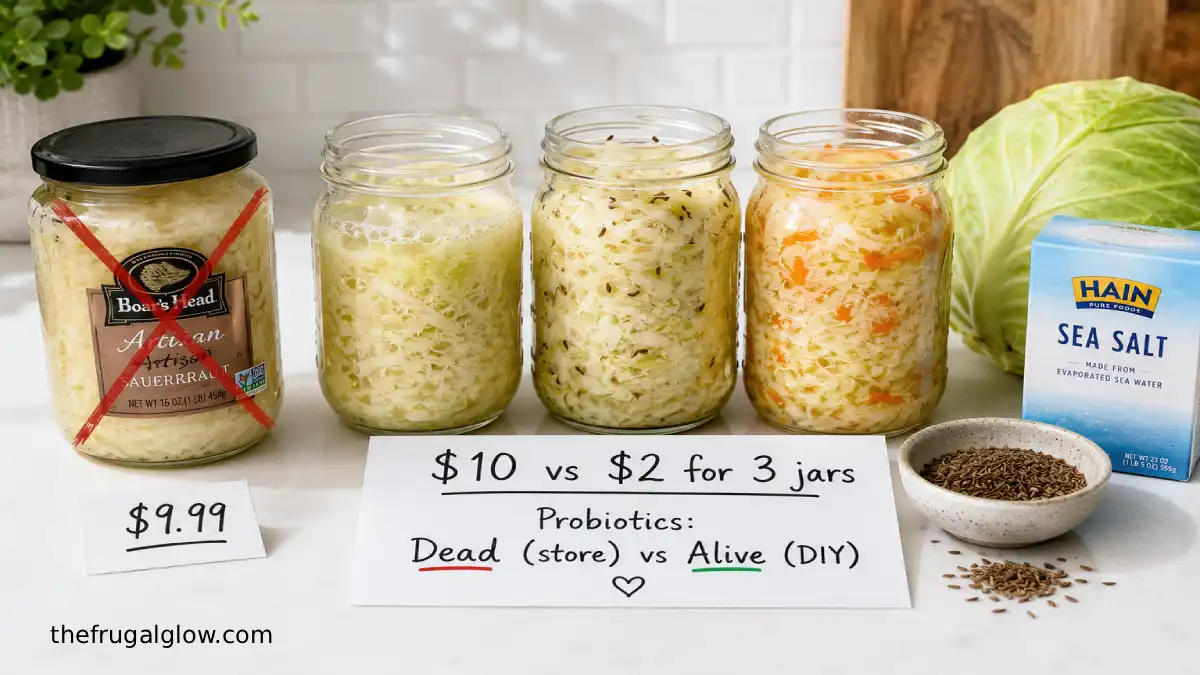
The $2 ‘Pantry’ Probiotic: How to Make Your Own Sauerkraut and Save $10 a Jar
Let me tell you about the $10 jar of sauerkraut that made me feel like I was being robbed.
I was standing in the refrigerated section of my grocery store, staring at a small jar of “artisan” sauerkraut. It claimed to be “raw,” “fermented,” and “probiotic-rich.” The price tag said $9.99. For cabbage. And salt. That’s it. Two ingredients. Cabbage and salt. Ten dollars.
I put it back. I walked to the produce section. I bought a whole head of cabbage for $1.50. I bought a box of sea salt for $1. I went home. I made my own sauerkraut. It cost me about $2 total. It made three jars. That’s $0.67 per jar.
The store wanted $10 for one jar. I made three jars for $2. That’s a 93% savings.
That was three years ago. I’ve been making my own sauerkraut ever since. It’s easier than you think. It’s cheaper than you think. And it’s better for you than anything you can buy at the store.
Today, I’m sharing my exact recipe. The science of fermentation. The health benefits. And why you should never, ever pay $10 for cabbage and salt.
Let’s get into it.
Jump Links
- The $10 Jar That Made Me See Red
- What Is Sauerkraut (And Why It’s a Probiotic Superfood)
- The $2 DIY Recipe (Exact Measurements)
- Step-by-Step: How to Make Sauerkraut at Home
- The Science of Fermentation (What’s Actually Happening)
- My Biggest Mistakes (So You Don’t Make Them)
- How to Tell If Your Sauerkraut Is Ready
- Flavor Variations (From Classic to Creative)
- How to Use Your Homemade Sauerkraut
- The Math: What I Saved in One Year
- Frequently Asked Questions (FAQ)
- Final Thoughts: Cabbage Is Cheap. Probiotics Are Priceless.
The $10 Jar That Made Me See Red
I need to describe that moment of grocery store outrage.
I was in the health food section. I wanted sauerkraut for the probiotics. I knew fermented foods were good for my gut. I was willing to pay a little extra for quality.
But $10? For a jar of cabbage? That’s a 1,000% markup. Cabbage costs $0.50 a pound. Salt costs pennies. The jar is probably the most expensive part.
I put it back. I went to the produce section. I grabbed a head of cabbage for $1.50. I bought a box of sea salt for $1. I went home. I spent 20 minutes shredding, massaging, and packing. I had three jars of sauerkraut. For $2. Total.
The store wanted $10 for one jar. I made three jars for $2. That’s a savings of $28 on that single batch.
I’ve been making my own sauerkraut for three years now. I’ve saved hundreds of dollars. And my gut has never been happier.
What Is Sauerkraut (And Why It’s a Probiotic Superfood)
Let me explain what sauerkraut actually is and why it’s so good for you.
What is sauerkraut?
Sauerkraut is finely cut raw cabbage that has been fermented by lactic acid bacteria. The fermentation process creates lactic acid, which gives sauerkraut its distinctive sour flavor and preserves it without refrigeration.
The probiotic power:
Sauerkraut is a natural source of probiotics—live microorganisms that support gut health. According to the Cleveland Clinic, “Fermented foods like sauerkraut actually supply your gut with good bacteria”. During fermentation, bacteria like Lactobacillus convert sugars in the cabbage into lactic acid, creating an environment where beneficial bacteria thrive.
Health benefits:
Registered dietitian Alexis Supan from the Cleveland Clinic outlines several benefits:
- Improves digestion: Sauerkraut’s probiotics support your gut lining and reduce inflammation. Research shows fermented foods improve your gut lining and reduce inflammation.
- Supports your immune system: Probiotics can prevent the growth of harmful bacteria and aid in antibody production. The vitamin C and iron in sauerkraut also help keep your immune system strong.
- Aids in weight management: A cup of sauerkraut is around 30 calories and high in fiber, helping you feel full without consuming many calories.
- Supports heart and bone health: The vitamin K2 in sauerkraut may improve heart health and strengthen bones by aiding calcium absorption.
- Supports brain health: There’s a connection between your gut health and your brain health. Probiotic foods may help reduce stress and improve memory.
What to look for in store-bought sauerkraut:
To get the probiotic benefits, you need raw, unpasteurized sauerkraut. According to the Cleveland Clinic, “you want to avoid pasteurization. During pasteurization, sauerkraut is heated, which kills all its probiotic properties”. Also, check the label for “raw,” “fermented,” or “live organisms,” and look for it in the refrigerated section rather than the shelf.
The irony: The most expensive sauerkraut at the store is often the pasteurized kind. The cheap, DIY kind is the one with all the health benefits.
The $2 DIY Recipe (Exact Measurements)
Here’s the exact recipe I’ve used for three years. It costs about $2 per batch and makes about three 16-ounce jars.
Ingredients:
| Ingredient | Amount | Cost |
|---|---|---|
| Green or red cabbage | 1 medium head (about 2.5 lbs) | $1.50 |
| Sea salt (non-iodized) | 1-2 tablespoons (about 20 grams) | $0.10 |
| Optional: caraway seeds | 1 teaspoon | $0.10 |
| Optional: shredded carrots, garlic, or other spices | To taste | $0.10 |
Total cost per batch: ~$1.70-1.80
Equipment you’ll need (likely already in your kitchen):
- Large mixing bowl
- Sharp knife or mandoline slicer
- Clean glass jars with lids (quart-sized mason jars work best)
- Fermentation weight (or a clean rock, or a smaller jar filled with water)
- Cloth or paper towel (to cover the jar)
How to get fermentation weights for free:
If you don’t have fermentation weights, use a small glass jar filled with water that fits inside your larger jar. Or fill a zip-lock bag with brine and press it down on top of the cabbage. Or use a clean rock wrapped in plastic wrap. Anything that keeps the cabbage submerged.
Salt calculation (important!):
The best way to measure salt is by weight. The recommended ratio is 2-3% salt by weight of the cabbage. For 2.5 pounds (about 1,100 grams) of cabbage, you need about 22-33 grams of salt (roughly 1.5-2 tablespoons). “Accuracy matters for safe fermentation”.
Pro tip: Use non-iodized salt. Iodized salt can inhibit fermentation. Sea salt, kosher salt, or pickling salt are all fine.
Step-by-Step: How to Make Sauerkraut at Home
Here’s my exact process. It takes about 20 minutes of active time and 1-3 weeks of waiting.
Step 1: Prepare the cabbage (10 minutes)
Remove the outer leaves from the cabbage and set one aside. The outer leaf will be used to cover the cabbage during fermentation. Cut the cabbage into quarters, remove the core, and slice it thinly. You can use a knife, a mandoline slicer, or the shredding attachment on a food processor. For a classic German sauerkraut, most recipes call for green cabbage, but red cabbage works too and creates a beautiful pink color.
Step 2: Massage with salt (5 minutes)
Place the shredded cabbage in a large bowl and sprinkle with salt. Massage the cabbage with clean hands for 5-10 minutes until it becomes limp and releases liquid. The cabbage should be wet enough that you can squeeze a handful and water drips out. “Using clean hands, massage the cabbage hard for 3 to 5 minutes until it begins to wilt and release liquid”.
Step 3: Add flavorings (optional)
If you want to add caraway seeds, shredded carrots, garlic, or other spices, mix them in now.
Step 4: Pack in a jar (5 minutes)
Pack the cabbage tightly into a clean quart-sized jar. Press it down firmly with your fist or a wooden spoon. The goal is to remove air bubbles and create enough brine to cover the cabbage. Pour any liquid from the bowl over the cabbage. The cabbage must be fully submerged in its own brine.
Step 5: Set up for fermentation
Place the reserved outer leaf on top of the cabbage. Add a fermentation weight (or substitute) to keep the cabbage submerged below the brine. Cover the jar loosely with a lid or cloth to allow fermentation gases to escape. If you use a tight lid, you’ll need to “burp” the jar daily to release pressure.
Step 6: Ferment (1-3 weeks)
Store the jar at room temperature (65-75°F) in a dark place for 1-3 weeks. “Check every couple of days to ensure the cabbage stays submerged”. After 7 days, start tasting it. When it’s tangy, bubbly, and sour to your liking, it’s ready. According to Forager Chef, “after two weeks of fermenting at room temperature the sauerkraut will have achieved the maximum reduction in pH and is safe to can or store in the fridge”.
Step 7: Store
Transfer the finished sauerkraut to the refrigerator. It will keep for several months as long as the cabbage stays submerged in its brine.
What to expect: You’ll see bubbles in the brine during fermentation. That’s a good sign—it means the beneficial bacteria are active.
The Science of Fermentation (What’s Actually Happening)
Let me explain the biology behind the bubbles.
The process:
Sauerkraut is made by lactic acid fermentation. The bacteria that do the work are naturally present on cabbage leaves. When you add salt, you create an environment that encourages the growth of beneficial bacteria while inhibiting harmful ones.
The three phases of fermentation:
According to a study published by the National Institutes of Health, the fermentation of sauerkraut occurs in three phases:
- First phase (days 1-3): Anaerobic bacteria such as Klebsiella and Enterobacter lead the fermentation, producing an acidic environment that favors later bacteria.
- Second phase (days 3-7): Leuconostoc mesenteroides and other Leuconostoc species take over as the acid levels become too high for many bacteria.
- Third phase (days 7-14+): Various Lactobacillus species, including L. brevis and L. plantarum, ferment any remaining sugars, further lowering the pH.
The probiotics:
Sauerkraut contains strains of bacteria from various families, including Bifidobacterium, Enterococcus, Lactobacillus, Staphylococcus, Weissella, Lactococcus, and Enterobacteriaceae. The colony-forming units (CFUs) can range between 2 billion and 8 billion per serving.
Why it’s safe:
“Properly cured sauerkraut is sufficiently acidic to prevent a favorable environment for the growth of Clostridium botulinum, the toxins of which cause botulism”. The acid created during fermentation makes the environment inhospitable to harmful bacteria.
The “backslopping” trick:
If you want to speed up fermentation, you can use a technique called “backslopping”—adding a small amount of an old batch of sauerkraut to a new batch. This introduces established bacteria and can cut fermentation time in half.
My Biggest Mistakes (So You Don’t Make Them)
I made a lot of mistakes when I first started. Learn from me.
Mistake #1: Not using enough salt
My first batch had too little salt. The cabbage didn’t release enough liquid. The kraut was dry and moldy. Use the right ratio. The recommended range is 2-3% salt by weight. If you don’t have a kitchen scale, use about 1.5 tablespoons of salt for every 2 pounds of cabbage.
Mistake #2: Not keeping the cabbage submerged
This is the single most important rule of fermentation. The cabbage must be fully submerged in brine. If it’s exposed to air, it will mold. Use a fermentation weight or a clean rock wrapped in plastic wrap. Check it every couple of days. One user on Forager Chef commented: “Remember to check the brine occasionally to ensure the cabbage stays below the water level”.
Mistake #3: Using iodized salt
I used regular table salt. The iodine inhibited fermentation. The kraut took forever to sour. Use non-iodized salt. Sea salt, kosher salt, or pickling salt are all fine.
Mistake #4: Sealing the jar too tightly
I put a tight lid on my jar. The pressure built up. The jar exploded on day 3. Lesson learned. Cover loosely with a cloth, or use a fermentation lid that lets gas escape. If you do use a tight lid, “burp” it daily by opening the lid to release pressure.
Mistake #5: Tasting too early
I tasted my sauerkraut on day 3. It was salty and bland. I thought I had failed. Then I waited. By day 14, it was perfect. Patience is key. The flavor develops over time. “Taste starting at day 7 to find your preferred level of tanginess”.
Mistake #6: Using a metal container
I used a metal bowl. The acid reacted with the metal. The kraut tasted metallic. Use glass, ceramic, or food-grade plastic. Avoid metal.
How to Tell If Your Sauerkraut Is Ready
Here’s what to look for.
Bubbles: You’ll see bubbles in the brine. That’s the carbon dioxide produced by the bacteria. It’s a good sign. “Air bubbles in the brine during fermentation are normal and a good sign that fermentation is active”.
Taste: This is the ultimate test. Start tasting at day 7. When it’s tangy, sour, and bubbly, it’s ready. If it’s still salty and bland, give it more time.
Color: The cabbage will change color. Green cabbage becomes slightly translucent and pale yellow. Red cabbage turns a vibrant pink or purple.
Texture: It should be crisp, not mushy. A crunchy texture is a sign of a good ferment.
Smell: It should smell tangy and fermented. If it smells like rotten eggs or has a strong putrid odor, something went wrong. Trust your nose.
What if it’s moldy?
If you see mold on top, it’s usually safe to scrape it off. The mold is likely on the surface and the kraut underneath is still good. If the mold is extensive or has penetrated the kraut, throw it out.
Flavor Variations (From Classic to Creative)
Once you’ve mastered the basic recipe, experiment with flavors.
Classic German sauerkraut:
- 2.5 lbs cabbage
- 1.5 tablespoons salt
- 1 teaspoon caraway seeds
Eastern European style:
- 2.5 lbs cabbage
- 1.5 tablespoons salt
- 1 shredded carrot
- 1 teaspoon caraway seeds
- 1/2 teaspoon juniper berries (optional)
Spicy sauerkraut:
- 2.5 lbs cabbage
- 1.5 tablespoons salt
- 1 teaspoon crushed red pepper flakes
- 3 cloves garlic, minced
Apple sauerkraut:
- 2.5 lbs cabbage
- 1.5 tablespoons salt
- 1 apple, grated
- 1 teaspoon caraway seeds
Red cabbage sauerkraut:
- Use 2.5 lbs red cabbage instead of green. It creates a beautiful pink color. “You can use any variety of cabbage to make sauerkraut, including regular green cabbage or red cabbage”.
Add-on ingredients to try:
- Shredded carrots
- Bell peppers
- Beets
- Garlic
- Ginger
- Fennel seeds
- Whole or quartered apples
- Cranberries
How to Use Your Homemade Sauerkraut
You’ve made it. Now how do you eat it?
As a side dish:
Serve it alongside sausages, pork, or roasted meats. It’s the perfect complement to rich, fatty foods.
On sandwiches:
Add it to Reubens, pastrami sandwiches, or hot dogs. The tangy crunch cuts through the richness.
In soups:
Add it to hearty soups like shchi (Russian cabbage soup), kapustnica (Polish sauerkraut soup), or bigos (hunter’s stew). One writer loves “adding it to hearty soups in the winter”.
With eggs:
Add a scoop of sauerkraut to scrambled eggs or an omelet. It’s a surprisingly delicious breakfast. Food Smart Colorado says it works “with breakfast, lunch, dinner, or as a snack by the forkful”.
On a Reuben sandwich:
The classic combination of corned beef, Swiss cheese, Russian dressing, and sauerkraut on rye bread.
Straight from the jar:
Some people love it as a snack, just a forkful at a time. A couple of forkfuls once or twice a week delivers the healthy bacteria to your body.
How much to eat:
You don’t need to eat sauerkraut every day to get its probiotic benefits. “Even just eating a couple of forkfuls once or twice a week will deliver that healthy bacteria to your body”.
The Math: What I Saved in One Year
Let me break down the actual dollars.
Store-bought raw sauerkraut:
| Item | Price | Frequency | Annual Cost |
|---|---|---|---|
| Raw sauerkraut (16 oz jar) | $8-10 | Twice a month | $192-240 |
Homemade sauerkraut:
| Item | Price | Frequency | Annual Cost |
|---|---|---|---|
| Cabbage (2.5 lbs) | $1.50 | Twice a month | $36 |
| Sea salt | $0.10 | Twice a month | $2.40 |
| Flavorings (optional) | $0.10 | Twice a month | $2.40 |
| Total | $40.80 |
Annual savings: $151-199
Over 5 years: $755-995
What I did with the savings:
- Bought better fermentation jars ($20)
- Tried new flavor variations with the extra money
- Put the rest into savings
The cost comparison is even more dramatic when you realize that store-bought sauerkraut is often pasteurized. You’re paying $10 for a product with dead probiotics. You’re making $0.67 sauerkraut with live, active cultures.
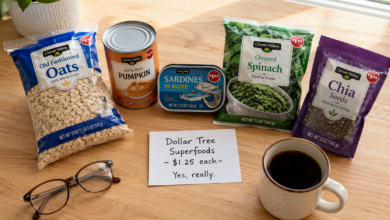
The ‘Dollar Tree’ Superfoods: 5 Pantry Staples That Are Actually Healthy
Frequently Asked Questions (FAQ)
1. Is homemade sauerkraut safe to eat?
Yes. Fermentation is a traditional preservation method that has been used for centuries. “Properly cured sauerkraut is sufficiently acidic to prevent a favorable environment for the growth of Clostridium botulinum, the toxins of which cause botulism”. The lactic acid created during fermentation creates an environment where harmful bacteria cannot survive. Just make sure to use the correct salt ratio (2-3% by weight) and keep the cabbage submerged in brine .
2. How long does homemade sauerkraut last?
Refrigerated, homemade sauerkraut lasts for several months as long as the cabbage stays submerged in its brine. It continues to ferment slowly in the fridge, becoming more sour over time. It’s safe to eat as long as it smells and tastes good and there’s no mold.
3. Is homemade sauerkraut better for you than store-bought?
Yes, if you buy the right kind. Homemade sauerkraut is always raw and unpasteurized, meaning it contains live probiotics. Most store-bought sauerkraut is pasteurized (heated), which kills the beneficial bacteria. To get probiotics from store-bought sauerkraut, “look for it in the refrigerated section” and check for the words “raw,” “fermented,” or “live organisms” on the label.
4. Can I use iodized table salt?
No. Iodized salt can inhibit the fermentation process. Use non-iodized salt like sea salt, kosher salt, or pickling salt. The iodine in table salt is added as a nutrient, but it can slow down or stop the growth of the beneficial bacteria you need for fermentation.
5. Why is my sauerkraut not sour?
It probably hasn’t fermented long enough. The sourness develops over time as the bacteria produce lactic acid. A standard fermentation takes 1-3 weeks at room temperature. If your sauerkraut is still salty and bland after 7 days, give it more time. “Taste starting at day 7 to find your preferred level of tanginess”.
6. Can I make sauerkraut without a fermentation weight?
Yes. If you don’t have a fermentation weight, you can use a small glass jar filled with water that fits inside your larger jar. Or fill a zip-lock bag with brine and press it down on top of the cabbage. The goal is to keep the cabbage submerged in brine. “No fermentation weights, no problem! Fill a zip-lock freezer bag halfway with brine… seal tightly, double-bag it, and press it down on top of the cabbage”.
7. What if I see mold on top?
Scrape it off. The mold is likely on the surface and the kraut underneath is still good. If the mold is extensive or has a strong odor, throw it out. To prevent mold in the future, make sure the cabbage is fully submerged in brine and check it regularly. “Check every couple of days to ensure the cabbage stays submerged”.
8. Why does my sauerkraut have a funny smell?
A tangy, fermented smell is normal. A putrid, rotten, or moldy smell means something went wrong. According to the Cleveland Clinic, “while sauerkraut is safe for most people to eat,” it should smell fermented, not spoiled. The Lactobacillus bacteria produce a distinct, pleasant sour aroma. If it smells bad, trust your nose and don’t eat it.
Final Thoughts: Cabbage Is Cheap. Probiotics Are Priceless.
Here’s what I want you to take away.
I stood in a grocery store, holding a $10 jar of cabbage and salt. I couldn’t do it. I couldn’t spend that much money on something I could make for a fraction of the price.
So I made it myself. For $2. For three jars. With live probiotics that cost $10 a jar at the store.
It’s easier than you think. It’s cheaper than you think. And it’s better for you than anything you can buy at the store.
The most expensive sauerkraut at the store is often the pasteurized kind. The cheap, DIY kind is the one with all the health benefits. That’s not a coincidence. That’s marketing.
So this weekend, go to the grocery store. Buy a head of cabbage for $1.50. Buy a box of sea salt for $1. Go home. Shred the cabbage. Massage it with salt. Pack it in a jar. Wait two weeks.
You’ll have sauerkraut that’s better than anything in the store. And you’ll have saved $10 in the process.
That’s the frugal glow. And it’s bubbling in your kitchen. 🥬💛
For more DIY food recipes, frugal health hacks, and money-saving wellness strategies, visit The Frugal Glow.