

How to Use Fabric Glue to Turn Old Flare Jeans into a Trendy Denim Maxi Skirt
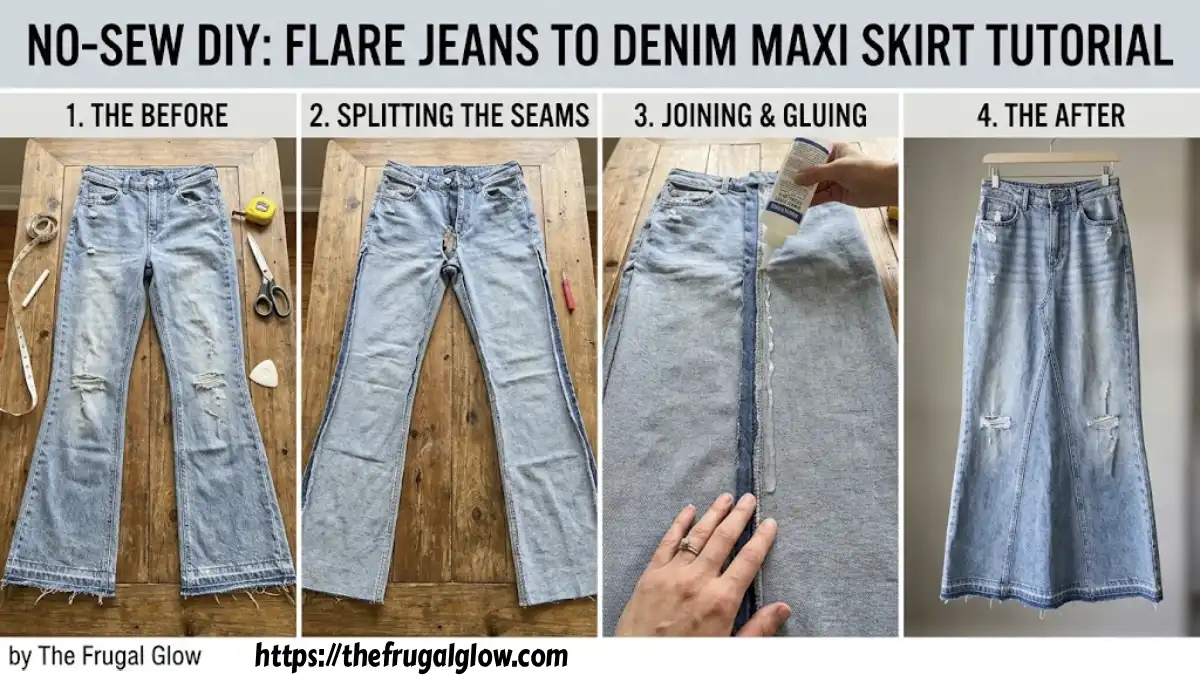
That old pair of flare jeans sitting at the bottom of your closet — the ones you love the wash on but never actually reach for anymore — doesn’t need to become a donation pile casualty. With a bit of cutting, a few denim panel inserts, and a bottle of fabric glue, they can become one of the trendiest pieces in your closet right now: a denim maxi skirt. No sewing machine, no needle and thread, no tailoring experience required.
This method uses fabric glue instead of stitching to hold everything together, which makes it genuinely accessible even if you’ve never attempted a clothing DIY before. Here’s the full breakdown, from picking the right jeans to the exact gluing technique that keeps everything looking clean instead of crafty.
Jump Links
- Why This DIY Works So Well
- What You’ll Need
- Choosing the Right Jeans for This Project
- Step-by-Step: Flare Jeans to Denim Maxi Skirt
- Fabric Glue Options Comparison Table
- Preventing Fray at the Seams
- Styling Your New Denim Maxi Skirt
- Common Mistakes to Avoid
- Skirt Length Guide Table
- FAQ
- The Bottom Line
Why This DIY Works So Well
Flare jeans are the ideal starting material for this transformation for one simple reason: the flare at the bottom already gives you extra fabric width to work with, which is exactly what a maxi skirt silhouette needs. Straight-leg or skinny jeans technically can work too, but they require more panel inserts to achieve the same swishy, wide-hem look, since there’s less natural width built into the leg already.
The fabric glue element is what makes this project realistic for anyone, regardless of sewing skill. Denim is a woven fabric, and any woven fabric will fray or unravel along a cut edge unless something is done to stabilize it — traditionally that’s a job for a sewing machine, but a strong, flexible fabric glue does the same stabilizing job on raw denim edges without a single stitch.
What You’ll Need
- Old flare jeans (the wider the flare, the less extra fabric you’ll need)
- Fabric glue rated for denim/heavy fabric (see comparison table below)
- Scissors or a seam ripper
- A spare pair of old jeans, or leftover denim fabric, for panel inserts
- Fabric chalk or a light pencil for marking cut lines
- An iron (for pressing seams flat before gluing)
- Pins or clips to hold pieces in place while the glue sets
- Wax paper or cardboard (to protect surfaces from glue seep-through)
Choosing the Right Jeans for This Project
- Flare or bootcut jeans work best, since the existing flare gives you a head start on the wide maxi silhouette.
- A slightly stretchy denim blend is easier to work with than 100% rigid denim, since it’s more forgiving while cutting and repositioning panels.
- A wash you genuinely love — this matters more than people think, since the final skirt keeps the exact color and fade pattern of the original jeans.
- A waist and hip fit that already feels comfortable, since this DIY changes the leg shape, not the waist and hip fit, so start with jeans that already fit well through the top.
Step-by-Step: Flare Jeans to Denim Maxi Skirt
1. Try on the jeans and mark your desired skirt length.
Put the jeans on and use fabric chalk to mark where you want the hem to fall — ankle-length, floor-length, or anywhere in between. Add about half an inch below your mark for a folded hem allowance.
2. Cut off the excess length (if needed) and set the fabric aside.
If the jeans are longer than your desired skirt length, cut off the excess from both legs evenly. Don’t throw this fabric away — you may be able to use it later for hem allowance or small patches.
3. Open up the inner leg seam.
Using a seam ripper, carefully open the inseam (the inner leg seam) from the crotch down to roughly where the flare begins. This is what allows the two legs to open up into a skirt shape instead of staying as two separate tubes.
4. Cut your denim gore panels.
From your spare denim piece, cut two triangular panels (wider at the bottom, narrowing to a point at the top) sized to fill the gap created by opening the inseam. These panels are what give the skirt its dramatic maxi flare.
5. Position the panels and pin them in place.
Slide each triangular panel behind the opened seam, overlapping the raw edges by about half an inch on each side. Pin or clip everything in place before gluing so nothing shifts.
6. Apply fabric glue along all overlapping edges.
Working on the inside of the skirt, run a thin, even line of fabric glue along every edge where the panel overlaps the original denim. Press firmly along the glued seam and hold for the amount of time specified on your glue’s instructions (usually 30 seconds to a minute).
7. Let the glue cure fully before wearing.
Lay the skirt flat and let it cure for the full time listed on the glue packaging — this is commonly anywhere from a few hours to a full 24 hours depending on the product. Resist the urge to try it on before it’s fully cured.
8. Hem the bottom edge.
Fold the raw bottom edge under by about half an inch, press with an iron to set the fold, then run a line of fabric glue along the fold to secure it in place. This finishes the edge and helps prevent fraying along the hemline specifically.
9. Reinforce the top of each gore panel.
The point where each triangular panel meets the original waist area gets the most stress when walking, so add a small extra dab of glue right at that junction point for durability.
Fabric Glue Options Comparison Table
| Glue Type | Best For | Dry/Cure Time | Durability Through Washing | Notes |
|---|---|---|---|---|
| Fray Check-style thin adhesive (e.g., Dritz Fray Check) | Sealing raw edges, hems | A few hours | Holds up to regular laundering and even dry cleaning | Best for edges, not for bonding two separate panels together |
| Heavy-duty fabric glue (e.g., Aleene’s Fabric Fusion) | Bonding gore panels to the main garment | Several hours to overnight | Good, flexible bond | The main glue for this specific project |
| Fusible bonding web/tape (iron-activated) | An alternative to liquid glue for flat seams | Minutes (heat-activated) | Good, but less flexible on curved seams | Works well combined with liquid glue at stress points |
| Super glue | Small emergency fixes only | Fast | Poor for large seams; stiffens fabric | Not recommended for this full project |
For this specific transformation, a heavy-duty fabric glue is the main tool for bonding the gore panels, while a thinner Fray Check-style product is best reserved for sealing the raw hem edge at the very bottom.
Preventing Fray at the Seams
Since denim is a heavy woven fabric, every raw cut breaks the tight weave of the threads, making it a hotspot for fraying, unraveling, and eventual seam failure if left untreated. While stitching normally locks these loose fibers, fabric glue acts as a clear, flexible binder that coats and seals the threads in place.
To keep your upcycled denim maxi skirt looking clean, structured, and store-bought for the long haul, follow these extra sealing and maintenance guidelines:
- Seal Every Hidden Edge, Not Just the Visible Hem:
It’s easy to focus only on the bottom hem, but the raw edges of your inserted gore panels tucked inside the seams are just as vulnerable. Before bonding the panels, run a thin line of adhesive along the raw cut edges of both the main jeans and the insert panels to permanently bind the warp and weft threads. - Apply Glue on the Reverse Side (Inside-Out):
Always apply your fabric adhesive on the interior side of the garment. This prevents any minor glue seepage, residue, or texture stiffening from showing on the outer, visible denim. - Trim Unraveling Threads Before Gluing:
Before applying any adhesive, take a pair of sharp fabric scissors and snip off any long, fuzzy threads sticking out from the cut line. Trying to glue down stray, messy threads creates tiny lumps along your seam instead of a smooth, flat finish. - Use Wax Paper or Cardboard Dividers:
Denim can absorb liquid adhesives, and without a protective barrier, the glue can seep through the front panel and accidentally bond it to the back panel of the skirt. Slide a sheet of wax paper or sturdy cardboard inside the leg or under the seam area while working to keep layers completely separated until dry. - Control Your Glue Application (Less is More):
Avoid squeezing out a thick, heavy bead of glue. Excessive glue saturates the denim fibers, takes significantly longer to cure, and turns hard and uncomfortable against your skin. A thin, even, continuous bead spread lightly with a swab or craft stick creates a strong bond that stays flexible. - Launder With Care Once Fully Cured:
Always wait for the full cure time recommended on your glue’s bottle (usually 24 hours) before exposing the skirt to moisture. When it’s time to wash, turn the skirt inside-out, place it in a mesh laundry bag if possible, and run a cold water, delicate cycle to minimize mechanical friction against the glued seams. - Skip the Dryer Entirely (Air Dry Only):
High heat from tumble dryers is the ultimate enemy of fabric adhesives; repeated heat exposure breaks down the chemical bonds, causing seams to lift over time. Always hang or lay your denim maxi skirt flat to air dry to preserve both the glue strength and the denim’s original shape.
Styling Your New Denim Maxi Skirt
A denim maxi skirt is one of the most versatile, year-round wardrobe staples you can own. Because denim acts as a neutral canvas, you can easily dress it up or down depending on the occasion. Here is how to style your new upcycled skirt to maximize both comfort and modern aesthetic appeal:
- Tuck in a Fitted Top or Bodysuit:
Since a maxi skirt has plenty of volume and length through the lower half, pairing it with a simple tucked-in white tee, tank, or sleek bodysuit creates a balanced silhouette. This emphasizes your waistline and lets the flared shape of the skirt remain the focal point of your outfit. - Define Your Waist with a Leather Belt:
Adding a classic leather belt at your natural waist brings structure to the look while pulling the whole ensemble together. This is especially helpful if your original jeans had a slightly relaxed or mid-rise waist, as it anchors the skirt firmly in place. - Choose Shoes That Balance the Length:
For warmer months, platform sandals, clogs, or retro sneakers complement the breezy maxi length perfectly while keeping the hem off the ground. When the weather cools down, swap them for pointed-toe ankle boots or chunky leather boots tucked neatly under the hem. - Layer with Cropped Outerwear:
To avoid looking overwhelmed by fabric, layer with cropped jackets, fitted cardigans, or a tailored leather jacket that hits right at your waistline. Keeping your top layer short maintains flattering proportions and highlights the flow and movement of the denim skirt. - Play with Monochromatic Denim (Double Denim):
Pair your new skirt with a denim jacket or a chambray button-down shirt in a similar or contrasting wash for a timeless “Canadian tuxedo” vibe. Complete the look with simple gold jewelry to elevate the casual feel.
Common Mistakes to Avoid
Even though a no-sew denim transformation is straightforward, denim’s weight and stiffness leave little room for error when using adhesives. Avoiding these common DIY pitfalls will ensure your skirt looks professionally tailored and stays intact wear after wear:
- Skipping the Pinning and Alignment Step:
Attempting to glue denim panels “by eye” without securing them first almost always leads to misaligned seams and uneven hems. Wet glue creates a slippery surface between fabric layers; always pin or clamp your panels securely in place before applying a single drop of adhesive. - Over-Applying the Fabric Adhesive:
Squeezing out too much glue is a classic beginner mistake. A thick layer doesn’t make the bond stronger—instead, it bleeds through to the front side of the denim, leaves stiff dark marks, and drastically increases drying time. Stick to a thin, even bead spread thinly along the seam allowance. - Rushing the Cure Time Before Wearing:
Fabric glue requires time to chemically bond with heavy cotton fibers. Trying on the skirt or wearing it out before the manufacturer’s full cure time (often up to 24 hours) puts immediate tension on wet seams, leading to premature splitting or peeling. - Mismatched Fabric Weights and Stretch:
Inserting a lightweight cotton or stretchy fabric panel into heavy, rigid denim causes awkward puckering and uneven movement when you walk. Always try to match the fabric weight, stiffness, and stretch percentage of your insert panels to your original flare jeans. - Neglecting High-Stress Junction Points:
The apex where the triangular gore panel merges into the original jeans near the upper thigh/hip takes continuous pull and friction with every step. Failing to reinforce this junction point with an extra dab of glue or an interior patch makes it the first place a seam will pop open. - Forging a Flat Surface While Gluing:
Gluing seams while the skirt is bunched up or draped over your lap creates unintended folds and crooked lines. Always lay your project completely flat on a table with a sheet of wax paper underneath to protect your workspace and maintain clean, straight seams.
📌 YOU MIGHT ALSO LIKE:
Don’t Buy New Curtains! How to Upcycle Vintage Bed Sheets Into ‘Boho-Chic’ Window Treatments
Skirt Length Guide Table
| Style Goal | Approximate Length | Ideal Footwear Pairing | Best For / Style Vibe |
|---|---|---|---|
| Ankle-Grazing Maxi | Hits just above or at the ankle bone | Retro sneakers, flat sandals, loafers | Everyday casual wear; practical for active walking without scuffing the hem |
| Full Floor-Length Maxi | Gently brushes the floor while standing | Platform sandals, chunky heels, tall boots | Dramatic statement look; best paired with elevated footwear to keep the hem clean |
| Midi-Maxi Hybrid | Falls around mid-to-lower calf | Ankle boots, knee-high boots, mules | Transitional weather & office-casual styling; highlights statement footwear |
FAQ
Do I need sewing experience for this project at all?
No. This entire method is designed as a fully no-sew project using fabric glue instead of stitching, which is exactly what makes it accessible for beginners.
How long does fabric glue actually hold up on denim?
Quality fabric glue designed for heavy fabrics like denim typically holds up well through regular washing, especially when washed cold, turned inside out, and air-dried rather than machine-dried.
Can I use any jeans, or does it need to be flare specifically?
Flare or bootcut jeans work best since they already have extra width at the hem, requiring fewer or smaller panel inserts. Straight or skinny jeans can still work, just with larger panels needed to achieve the same maxi flare.
What if I don’t have a spare pair of jeans for the panel inserts?
Any similarly weighted denim fabric works, including denim scraps, an old denim skirt, or even denim fabric purchased by the yard from a fabric store.
Will the glued seams show on the outside of the skirt?
Not if applied correctly. Gluing from the inside, using a thin even layer, and protecting the fabric with wax paper while it cures all help keep the visible outer seam looking clean and flat.
Is fabric glue actually strong enough for a wearable, functional garment?
Yes, when using a glue specifically rated for heavy fabric or denim. It’s genuinely durable enough for a garment worn and washed regularly, though reinforcing high-stress points like the hip area adds extra security.
The Bottom Line
An old pair of flare jeans doesn’t need a donation bag or a sewing machine to become something new — a bottle of fabric glue, a couple of denim panel inserts, and an afternoon are genuinely all it takes to turn them into a trendy, flowy denim maxi skirt. It’s one of the most budget-friendly ways to refresh your closet with something that looks intentional, not thrifted-and-forgotten.
For more budget-friendly DIY fashion projects and style upcycling ideas, check out more posts over at The Frugal Glow.