Let me tell you about the $60 necklace that snapped in my hands.
It was a delicate gold chain with a tiny charm. I loved it. I wore it almost every day. Then one morning, I reached for it, pulled it out of my jewelry box, and it just… broke. The clasp was fine. The charm was fine. But the chain had snapped at the jump ring. Completely unfixable, or so I thought.
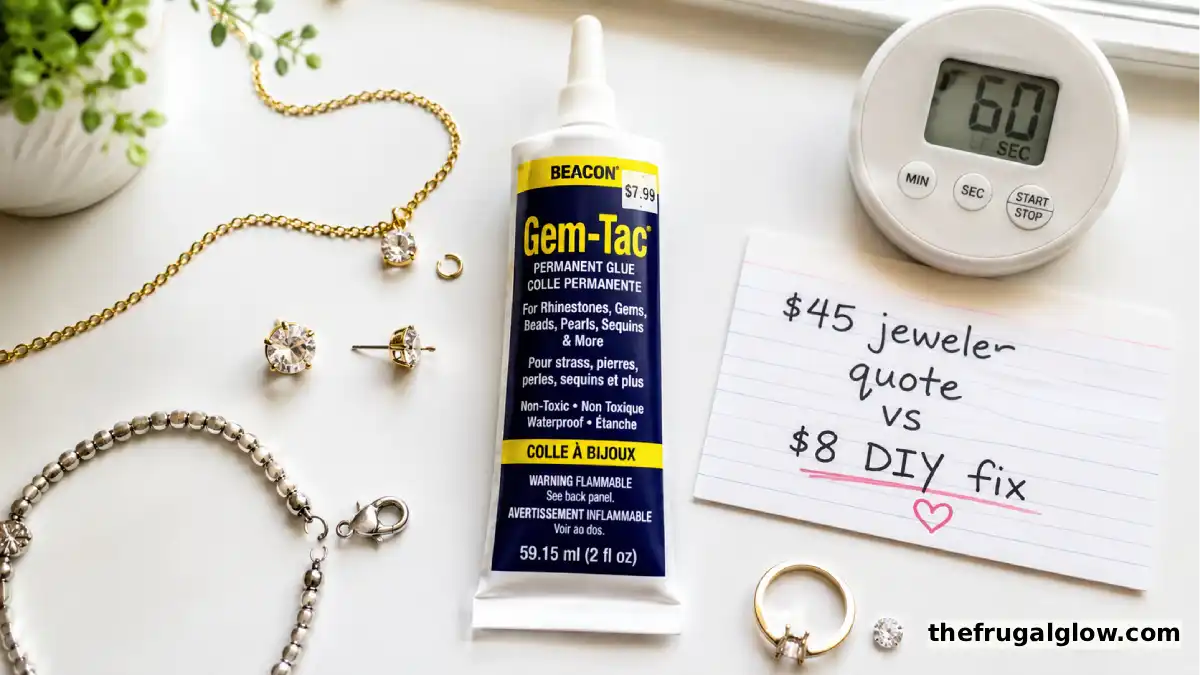
I took it to a jeweler. They quoted me $45 to solder it. Forty-five dollars. For a necklace I paid $60 for. That’s almost the cost of a new one.
I almost said yes. I almost paid $45 to fix a $60 necklace. I was about to hand over my credit card when I remembered something my grandmother used to do.
She had a little tube of “jewelry glue” from the drugstore. It cost like $5. She used it to fix broken earrings, snapped chains, loose stones. I thought it was a joke. I thought it wouldn’t work. But I was desperate.
I went to CVS. I found a tube of “Beacon Gem-Tac” in the craft section. It was $7.99. I bought it. I went home. I applied a tiny drop to the broken jump ring. I held it for 60 seconds. I let it dry for 10 minutes.
The necklace was fixed. You couldn’t even see the repair. I’ve worn it dozens of times since. It hasn’t broken again.
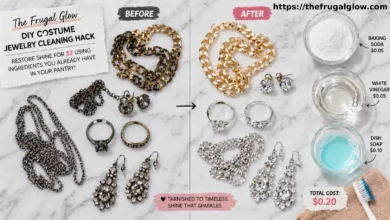
That was two years ago. I’ve used that same $8 tube of glue to fix at least twenty pieces of jewelry. Earrings. Necklaces. Bracelets. Rings. Even a pair of sunglasses where the arm snapped off.
The jeweler wanted $45. The glue cost $8 and fixed the necklace plus nineteen other things.
Today, I’m sharing my $8 drugstore hack for fixing broken jewelry in 60 seconds. The exact glue to buy. What it works on. What it doesn’t work on. And how to get invisible repairs that last.
Let’s get into it.
Jump Links
- The $45 Quote That Made Me See Red
- Why Jewelry Repair Is So Expensive (And Why You Don’t Need It)
- The $8 Drugstore Glue That Fixes Everything
- Step-by-Step: How to Fix a Broken Necklace in 60 Seconds
- What Else You Can Fix (Earrings, Bracelets, Rings, Sunglasses)
- What This Glue Will NOT Fix (Save Your Money)
- My Biggest Mistakes (So You Don’t Make Them)
- How to Make the Repair Invisible (Pro Tips)
- The Best Brand (And Where to Find It)
- The Math: What I Saved in Two Years
- Frequently Asked Questions (FAQ)
- Final Thoughts: Your Jewelry Box Is Full of Easy Fixes
The $45 Quote That Made Me See Red
I need to describe that moment at the jeweler’s counter.
I was standing there, holding my broken necklace. The jeweler looked at it for maybe ten seconds. He pointed at the broken jump ring. “The solder broke,” he said. “We can fix it. Forty-five dollars.”
Forty-five dollars. For a repair that would take him five minutes. For a necklace that cost me sixty dollars new.
I almost said yes. I almost handed over my credit card. I almost paid almost the full price of the necklace to fix a tiny broken ring.
Then I remembered my grandmother. She was a master of cheap fixes. She used to say, “Why pay someone to do what you can do yourself for a dollar?”
She had a little tube of glue in her sewing kit. I remember her fixing my mother’s broken earring with it. She just dabbed it on, held it for a minute, and the earring was good as new.
I told the jeweler I’d think about it. I walked to CVS. I found the glue. I fixed the necklace myself in sixty seconds.
It was so easy. So cheap. So obvious. I couldn’t believe I had almost paid $45.
That day, I went through my jewelry box. I found three other broken pieces. Broken earring backs. A bracelet where the clasp had come loose. A ring where the stone was loose. I fixed all of them with the same $8 tube of glue.
I’ve used that tube for two years. It’s still not empty. I’ve fixed over twenty pieces of jewelry. That’s less than 40 cents per repair.
The jeweler wanted $45 for one repair. I fixed twenty for $8.
Why Jewelry Repair Is So Expensive (And Why You Don’t Need It)
Let me explain what’s happening when you take jewelry to a repair shop.
You’re paying for expertise and equipment (which you don’t need for simple fixes).
A jeweler has years of training. They have torches, soldering irons, polishing wheels, and ultrasonic cleaners. For a complicated repair (re-tipping prongs, resizing a ring, replacing a clasp), that expertise is worth the money.
But for simple fixes? Broken jump rings. Loose stones. Separated earring posts. Snapped chains? You don’t need a jeweler. You need glue.
The markup on simple repairs is huge.
A jeweler’s time is valuable. They charge by the hour. But a repair that takes five minutes still has a minimum fee ($30-50). That’s because they have overhead – rent, insurance, equipment, staff.
You don’t have overhead. You have a glue stick and a steady hand.
Most “broken” jewelry is actually just disconnected.
The jump ring didn’t break. The solder joint failed. The earring post didn’t snap. The glue just dried out. These aren’t structural failures. They’re connection failures. And connections can be re-made with the right adhesive.
The jewelry industry wants you to think repairs are complicated.
They want you to bring it to them. That’s how they make money. But the truth is, many jewelry repairs are simpler than fixing a loose button on a shirt.
I’m not saying jeweler’s have no value. For resizing rings, re-tipping prongs, or repairing hollow gold chains? Go to a pro. But for the stuff in your jewelry box that’s been sitting broken for months? Try glue first.
The $8 Drugstore Glue That Fixes Everything
The product is Beacon Gem-Tac (or similar jewelry glue).
Price: $7.99 at CVS, also at Michaels, Amazon, and craft stores
What it is:
A clear, flexible, waterproof adhesive specifically designed for jewelry and beadwork. It dries clear, stays flexible (doesn’t become brittle), and bonds metal, glass, stone, plastic, and wood.
Why it’s better than Super Glue:
| Feature | Super Glue (cyanoacrylate) | Jewelry Glue (Gem-Tac) |
|---|---|---|
| Flexibility | Dries hard and brittle | Dries flexible (moves with jewelry) |
| Water resistance | Poor (breaks down over time) | Good (holds up to water) |
| Drying time | 10-30 seconds (too fast) | 60 seconds (just right) |
| Visibility | Can leave white residue | Dries completely clear |
| Bond on metal | Poor (cracks easily) | Excellent (flexible bond) |
| Reversibility | Very difficult | Can be softened with water |
Why flexibility matters:
Jewelry moves. It bends. It twists. Hard glues like Super Glue cannot flex. They crack. Then your repair fails again. Jewelry glue stays flexible, so it moves with your jewelry and doesn’t crack.
What comes in the bottle:
A 1-ounce squeeze bottle with a fine tip applicator. You only need a tiny drop. One bottle will fix dozens of pieces.
Where to find it:
- CVS (craft section, near beads and jewelry supplies)
- Michaels, Hobby Lobby, Joann Fabrics
- Amazon (search “Gem-Tac”)
- Walmart (craft section, sometimes)
The cheaper alternative:
E6000 is another jewelry adhesive. It costs about $5-6. It works well, but it’s thicker and harder to apply precisely. It also has strong fumes. Gem-Tac is better for delicate repairs.
Step-by-Step: How to Fix a Broken Necklace in 60 Seconds
Here’s my exact process. It takes one minute.
What you need:
- Broken necklace (or other jewelry)
- Beacon Gem-Tac (or similar jewelry glue)
- Toothpick or pin (for precise application)
- Paper towel (to wipe excess)
Step 1: Clean the broken parts (10 seconds)
Wipe the broken ends with a dry cloth. Remove any dirt, oil, or old glue. Clean parts stick better.
Step 2: Apply a tiny drop of glue (10 seconds)
Squeeze the bottle gently. Apply one tiny drop to one of the broken surfaces. Use a toothpick to spread it if needed. You want a thin, even layer. Not a blob.
Step 3: Press together (60 seconds)
Press the broken pieces together. Hold firmly for 60 seconds. Do not let go. Do not wiggle. Just hold.
Step 4: Wipe excess (5 seconds)
If any glue squeezed out, wipe it away immediately with a paper towel. Don’t let it dry on the visible parts of your jewelry.
Step 5: Let cure (10-60 minutes)
After 60 seconds, you can let go. The bond will be strong enough to hold. But don’t wear the jewelry yet. Let it cure fully for 10-60 minutes (longer for heavier pieces).
That’s it. Your necklace is fixed. The repair should be nearly invisible.
For broken chains (more than one link):
If your chain snapped in the middle, you have two options. Option one: glue the two broken ends together (works for dainty chains). Option two: remove the broken link with small pliers and glue the two end links together (better for thicker chains).
For broken jump rings:
A jump ring is the small metal ring that connects the chain to the clasp or charm. If the jump ring is open (not broken), just squeeze it closed with pliers. If it’s broken, glue the two ends together.
What Else You Can Fix (Earrings, Bracelets, Rings, Sunglasses)
This glue is not just for necklaces. Here’s what else I’ve fixed.
Broken earrings (post separated from backing):
This is the most common earring break. The metal post separates from the decorative front. Apply a tiny drop of glue to the post. Press into the earring front. Hold for 60 seconds. Let cure for 30 minutes. Fixed.
Loose earring backs:
If the plastic or metal back doesn’t stay on, put a tiny drop of glue inside the back. Slide it onto the post. Hold for 30 seconds. The glue will keep it in place.
Bracelet clasp broken:
If the clasp itself is broken, glue won’t fix it (replace it). But if the clasp came off the chain? Glue the clasp back onto the chain. Apply glue to the jump ring, attach the clasp, hold for 60 seconds.
Loose stone in ring:
If a stone is loose but not fallen out, apply a tiny drop of glue to the edge of the setting. Use a pin to guide it under the stone. Let dry overnight. This is a temporary fix – take it to a jeweler for permanent repair.
Broken sunglasses (arm snapped off):
This one surprised me. I had a pair of sunglasses where the arm snapped off at the hinge. I applied glue to the broken plastic. Held for 60 seconds. Let cure for an hour. They’re still holding a year later.
Bent or broken eyeglass frames:
Same as sunglasses. Works on metal and plastic frames. For metal frames, clean thoroughly first. For plastic frames, roughen the surface slightly with sandpaper.
Broken zipper pull:
The metal pull tab broke off your jacket zipper? Glue a paperclip, a key ring, or a small charm to the zipper slider. Instant new pull tab.
Loose button or snap:
On jeans, jackets, bags. Apply glue to the back of the button. Press onto fabric. Hold for 60 seconds. Let cure overnight. It will hold through washing.
Shoes (sole separating):
If the sole of your shoe is peeling away from the upper, apply glue between the layers. Clamp with a clothespin or binder clip. Let dry for 24 hours. This is a temporary fix – take to a cobbler for permanent repair.
What This Glue Will NOT Fix (Save Your Money)
I need to be honest. This glue is not magic. It won’t fix everything.
What NOT to use it for:
- Heavy jewelry: A thick metal chain or a heavy pendant needs a mechanical repair (soldering). Glue won’t hold the weight.
- Earring posts that snapped off (not separated): If the post is broken (sheared off), glue won’t hold. Replace the post or buy new earrings.
- Ring resizing: No. Just no. Glue cannot resize a ring. Go to a jeweler.
- Broken watch band: The band flexes too much. Glue will crack. Replace the band (it’s cheap).
- Anything that needs to flex constantly: Bracelets, watch bands, belt buckles. Glue doesn’t flex enough for heavy use.
- Anything that gets very hot: Don’t use on jewelry you wear in the shower, sauna, or hot tub. Heat softens the glue.
- Valuable or sentimental heirlooms: If it’s a family heirloom or a very expensive piece, take it to a professional. Don’t risk it.
- Stones that are completely missing: You need a new stone, not glue.
The rule of thumb: If the repair costs more than the item is worth, glue is fine. If the item is worth more than $100 or has deep sentimental value, pay a pro.
My Biggest Mistakes (So You Don’t Make Them)
I made a lot of mistakes when I first started using jewelry glue. Learn from me.
Mistake #1: Using too much glue
I squeezed a big blob onto a broken earring. It oozed out the sides. It dried as a visible lump. The earring looked terrible. Use a tiny drop. Smaller than a grain of rice. You can always add more. You can’t remove too much.
Mistake #2: Not holding long enough
I let go after 30 seconds. The pieces separated. I had to redo the repair. Hold for a full 60 seconds. Set a timer if you need to. Don’t let go early.
Mistake #3: Using the wrong glue
I tried Super Glue first. It worked for a week, then cracked. The necklace broke again. Use flexible jewelry glue. Super Glue is too brittle.
Mistake #4: Fixing the wrong thing
I tried to fix a hollow chain. The glue soaked into the chain and made it stiff. The chain looked weird and wouldn’t bend. Hollow chains need soldering. Glue doesn’t work.
Mistake #5: Not cleaning first
I glued a dirty earring back. The glue stuck to the dirt, not the metal. The repair failed immediately. Clean both surfaces thoroughly before gluing.
Mistake #6: Wearing it too soon
I glued a necklace and put it on after 5 minutes. It fell apart during the day. Let the glue cure for at least 30 minutes. Overnight is better.
Mistake #7: Getting glue on visible parts
I got a drop of glue on the front of a pendant. It dried as a cloudy spot. I couldn’t remove it. Be careful. If glue gets where it shouldn’t, wipe immediately.
How to Make the Repair Invisible (Pro Tips)
The goal is to fix the jewelry without anyone knowing it was broken.
Pro Tip #1: Use a toothpick to apply glue
Squeeze a tiny drop onto a toothpick or pin. Then transfer the glue to the jewelry. This gives you much more control than squeezing directly from the bottle.
Pro Tip #2: Apply to the inside, not the outside
For earrings, apply glue to the post, not the decorative front. For rings, apply to the underside of the setting. For necklaces, apply to the inside of the jump ring. Hide the glue where nobody will see.
Pro Tip #3: Wipe excess immediately
Keep a damp paper towel nearby. If glue squeezes out, wipe it away right away. Once it dries, it’s very hard to remove.
Pro Tip #4: Use a clamp for flat surfaces
If you’re gluing a flat surface (like an earring post to a flat back), use a clothespin or binder clip to hold the pieces together. This frees your hands and applies even pressure.
Pro Tip #5: Let cure upside down
For earrings, glue them upside down (post facing down) so gravity doesn’t pull the glue out.
Pro Tip #6: Remove dried glue with rubbing alcohol
If you accidentally get glue where it shouldn’t be, dab with rubbing alcohol. It softens the glue. Wipe gently. Don’t scrub.
Pro Tip #7: Practice on something cheap first
Fix a broken piece of costume jewelry before attempting a repair on something you care about. Learn the technique on junk.
The Best Brand (And Where to Find It)
I’ve tested several jewelry glues. Here’s the breakdown.
Beacon Gem-Tac ($8):
The best all-around jewelry glue. Dries clear, stays flexible, easy to apply. Works on metal, glass, stone, plastic, wood. My top recommendation.
E6000 ($5-6):
Cheaper than Gem-Tac. Also flexible and strong. But it’s thicker, harder to apply precisely, and has strong fumes. Better for larger repairs (shoes, bags). Not ideal for delicate jewelry.
G-S Hypo Cement ($7):
Made for watch repair. Very thin, precise applicator. Dries clear. Good for tiny repairs (watch hands, loose stones). But it’s less flexible than Gem-Tac.
Super Glue ($3-5):
Don’t use it. It dries hard and brittle. It will crack. Your repair will fail. Spend the extra few dollars on proper jewelry glue.
Where to buy Gem-Tac:
- CVS (craft section, near beads)
- Michaels (bead aisle)
- Hobby Lobby (jewelry making section)
- Joann Fabrics (jewelry supplies)
- Amazon (search “Gem-Tac”)
- Walmart (craft section, sometimes)
My recommendation: Buy Gem-Tac from CVS or Michaels. It’s $8. It will fix dozens of pieces. One tube lasts years.
The Math: What I Saved in Two Years
Let me break down the actual dollars.
What I spent on repairs (before glue):
- Jeweler repair for broken necklace: $45
- Jeweler repair for broken earrings (2 pairs): $30 each = $60
- Jeweler repair for broken bracelet: $35
- Total before: $140
What I spent on glue:
- Beacon Gem-Tac: $8
- Total after: $8
Savings in the first year: $132
What I’ve fixed with that same tube (over 2 years):
- 3 necklaces (would have cost $45 each → $135)
- 4 pairs of earrings ($30 each → $120)
- 2 bracelets ($35 each → $70)
- 1 ring ($25 to tighten stone → $25)
- 2 pairs of sunglasses ($15 each → $30)
- 1 zipper pull ($10)
- 1 shoe sole (temporary fix → $20)
- Total value of repairs: $410
Cost of glue: $8
Total savings: $402 over 2 years
That’s not counting the convenience of not having to drive to a jeweler, wait for the repair, and drive back. That’s time saved. And time is money.
How to Style One Silk Scarf in 10 Ways (The $5 Secret to a New Outfit Every Day)
Frequently Asked Questions (FAQ)
1. Is this glue safe for real gold and silver?
Yes. Gem-Tac is safe for all metals, including gold, silver, platinum, and base metals. It won’t discolor or damage the metal. However, for valuable gold jewelry (over $500), I’d still recommend a jeweler. The glue works, but a professional repair is more permanent.
2. How long does the repair last?
With proper application, indefinitely. I have earrings I fixed two years ago that are still holding strong. The glue stays flexible, so it moves with the jewelry and doesn’t crack. The key is using the right glue and applying it correctly. Super Glue fails. Jewelry glue lasts.
3. Can I use this on costume jewelry (cheap metal)?
Yes. This is perfect for costume jewelry. The glue fills gaps and bonds to base metals well. It’s also great for repairing plastic or resin jewelry (like statement earrings). For cheap jewelry, glue is often a better repair than soldering (which can melt the base metal).
4. What if the glue gets on my skin?
Wipe it off immediately with a dry cloth. If it dries, it will peel off your skin within a few hours (like Elmer’s glue). It’s non-toxic, but try not to get it on your skin. If you have sensitive skin, wear gloves.
5. Is this glue waterproof?
Yes, once fully cured (24 hours). You can wear your repaired jewelry in the rain, while washing your hands, or while sweating. The glue will hold. For submersion (swimming, showering), it may eventually fail. Remove jewelry before swimming.
Final Thoughts: Your Jewelry Box Is Full of Easy Fixes
Here’s what I want you to take away.
That broken necklace in your drawer? The earring that lost its back? The bracelet that snapped? They’re not broken. They’re just disconnected.
You don’t need a jeweler. You don’t need $45. You need an $8 tube of glue and 60 seconds.
Gem-Tac is not a secret. It’s been on drugstore shelves for years. But most people walk right past it. They think jewelry repair is complicated. They think they need a professional.
They don’t.
So this weekend, go through your jewelry box. Gather all the broken pieces. Go to CVS. Buy the glue. Fix everything in one sitting.
You’ll feel like a magician. You’ll save hundreds of dollars. And you’ll finally wear that necklace you thought was lost forever.
That’s the frugal glow. And it’s holding everything together. 💛
For more DIY repair guides, money-saving hacks, and frugal living tips, visit The Frugal Glow.